I love a different style and focus of wargame. A game that takes a look at an important but somewhat obscure or rarely addressed historical topic, such as espionage or intelligence, and creates a gaming experience tailored around the events to highlight and evoke the difficulties and tension that would have been present. In January 2026, GMT Games announced such a game in Checkpoint Charlie, which is a solo or cooperative game focused on SIS espionage missions in Berlin in the 1960’s designed by Russell Brown. We have posted an interview with Russel and it was very well received and he has now agreed to create a series of History Behind the Cards to highlight the events of the 1960’s Cold War struggle in West Germany but also to share aspects about the game play and how it models the history.
*Note: The cards highlighted in this series and their event text, as well as any pictures used showing any of the various components, are still in the design and development process and as such event effects and text might still change prior to final development and publication.Also the art and layout of the cards are only for playtest purposes at this point and the game will enter the art department as it nears publication.
History Behind the Cards – Checkpoint Charlie from GMT Games – Card #1: Cousins Operation
The British SIS wasn’t the only intelligence agency operating in Berlin in the 1960’s, not by a longshot. The Potsdam Agreement of 1945 had divided Germany into allied occupation zones, with West Berlin itself divided into British, French and American sectors for administration and military presence, but those boundaries in no way restricted the activities of intelligence organizations in the city. The US Central Intelligence Agency had the largest presence.
The remarkably close relationship between US and British intelligence was formalized in 1946 under the British-US Communications Intelligence Agreement (BRUSA). It became the UKUSA agreement in 1955, including Canada, New Zealand and Australia (the “Five Eyes”), and still stands today. The term “cousins” was used within the British and American intelligence communities to refer to their counterparts from the other agencies, in reference to their longstanding Special Relationship. There were notable examples of not just coordination, but cooperation among the agencies, like Operation Gold – a joint operation in the 1950’s to tunnel beneath the city and tap into the landline communication of the Soviet Army headquarters in Berlin.
This relationship was formalized in the rules of a much earlier version of Checkpoint Charlie, with a specific step in the turn sequence when SIS assets could call upon the CIA for assistance, though with increased risk of detection. However, even with liaison officers and daily intelligence briefings between the two agencies, it was impossible to inform the other service of every aspect of day-to-day activities, let alone coordinate at a task level, so I removed that interaction.
This card represents a CIA operation in one of the locations in the city that has come to the attention of the KGB and was unknown to SIS case officers. This card places a marker that makes it more difficult for SIS assets to operate in the location, as indicated by the negative detection save modifier, and also draws a KGB Agent closer to that location.
In the next article in this series, we will take a look at the Cuban Missile Crisis and how the status of Berlin, even though it is located halfway around the world, effected things on the world stage.
In my opinion, this game looks extremely interesting and I am very much excited to learn more about it. I am appreciative to Russell and his efforts to bring us these cards and to write these entries to share with our readers. I am also very glad that this topic is being covered in a game and look forward to playing this one day soon.
With this My Favorite Wargame Cards Series, I hope to take a look at a specific card from the various wargames that I have played and share how it is used in the game. I am not a strategist and frankly I am not that good at games but I do understand how things should work and be used in games. With that being said, here is the next entry in this series.
#83: British Leader Wellington from Congress of Vienna from GMT Games
Congress of Vienna from GMT Games is a diplomatic card driven wargame based on Churchill and is the 4th game in the Great Statesmen Series. The game is set during the years of 1813-1814 and sees players take on the role of the main characters of the struggle between the Napoleonic Empire and the coalition of Russia, Austria, and Great Britain with their Prussian, Spanish, Portuguese, and Swedish allies. Congress of Vienna has two different but related phases including the conference table where players first debate over the control of issues germane to the factions and the period of the war and second these issues are then used on the battlefield to recruit units, attack and take overall command of battles. The players will be playing cards from their hands to “debate” over the various issues that were placed on the table, which include all types of things such as Military Operations, Recruitment, who will lead the combined Coalition forces (Generalissimo), Future of French Government, British Financial Aid, Liberalism vs. Absolutism, Austrian Neutrality and several other issues, and then later the players will use their accumulated Resources gained from the issues to enact action on the Military Map and do things like mobilize troops, place Military Support Markers and the ultimately to conduct warfare.
The game relies on cards and cards can be used to negotiate, i.e. move an issue to your National Track. Cards can provide a particular issue with positive and negative DRM’s depending on which nation plays them and can also be traded with another player during the Diplomacy Phase. Certain cards are better than others for debating an issue moved by another player; and finally, if they are saved for the War Phase, staff cards can be used to modify dice rolling in battles. These are very versatile cards and the players will have to learn them and their benefits in order to be effective at the game.
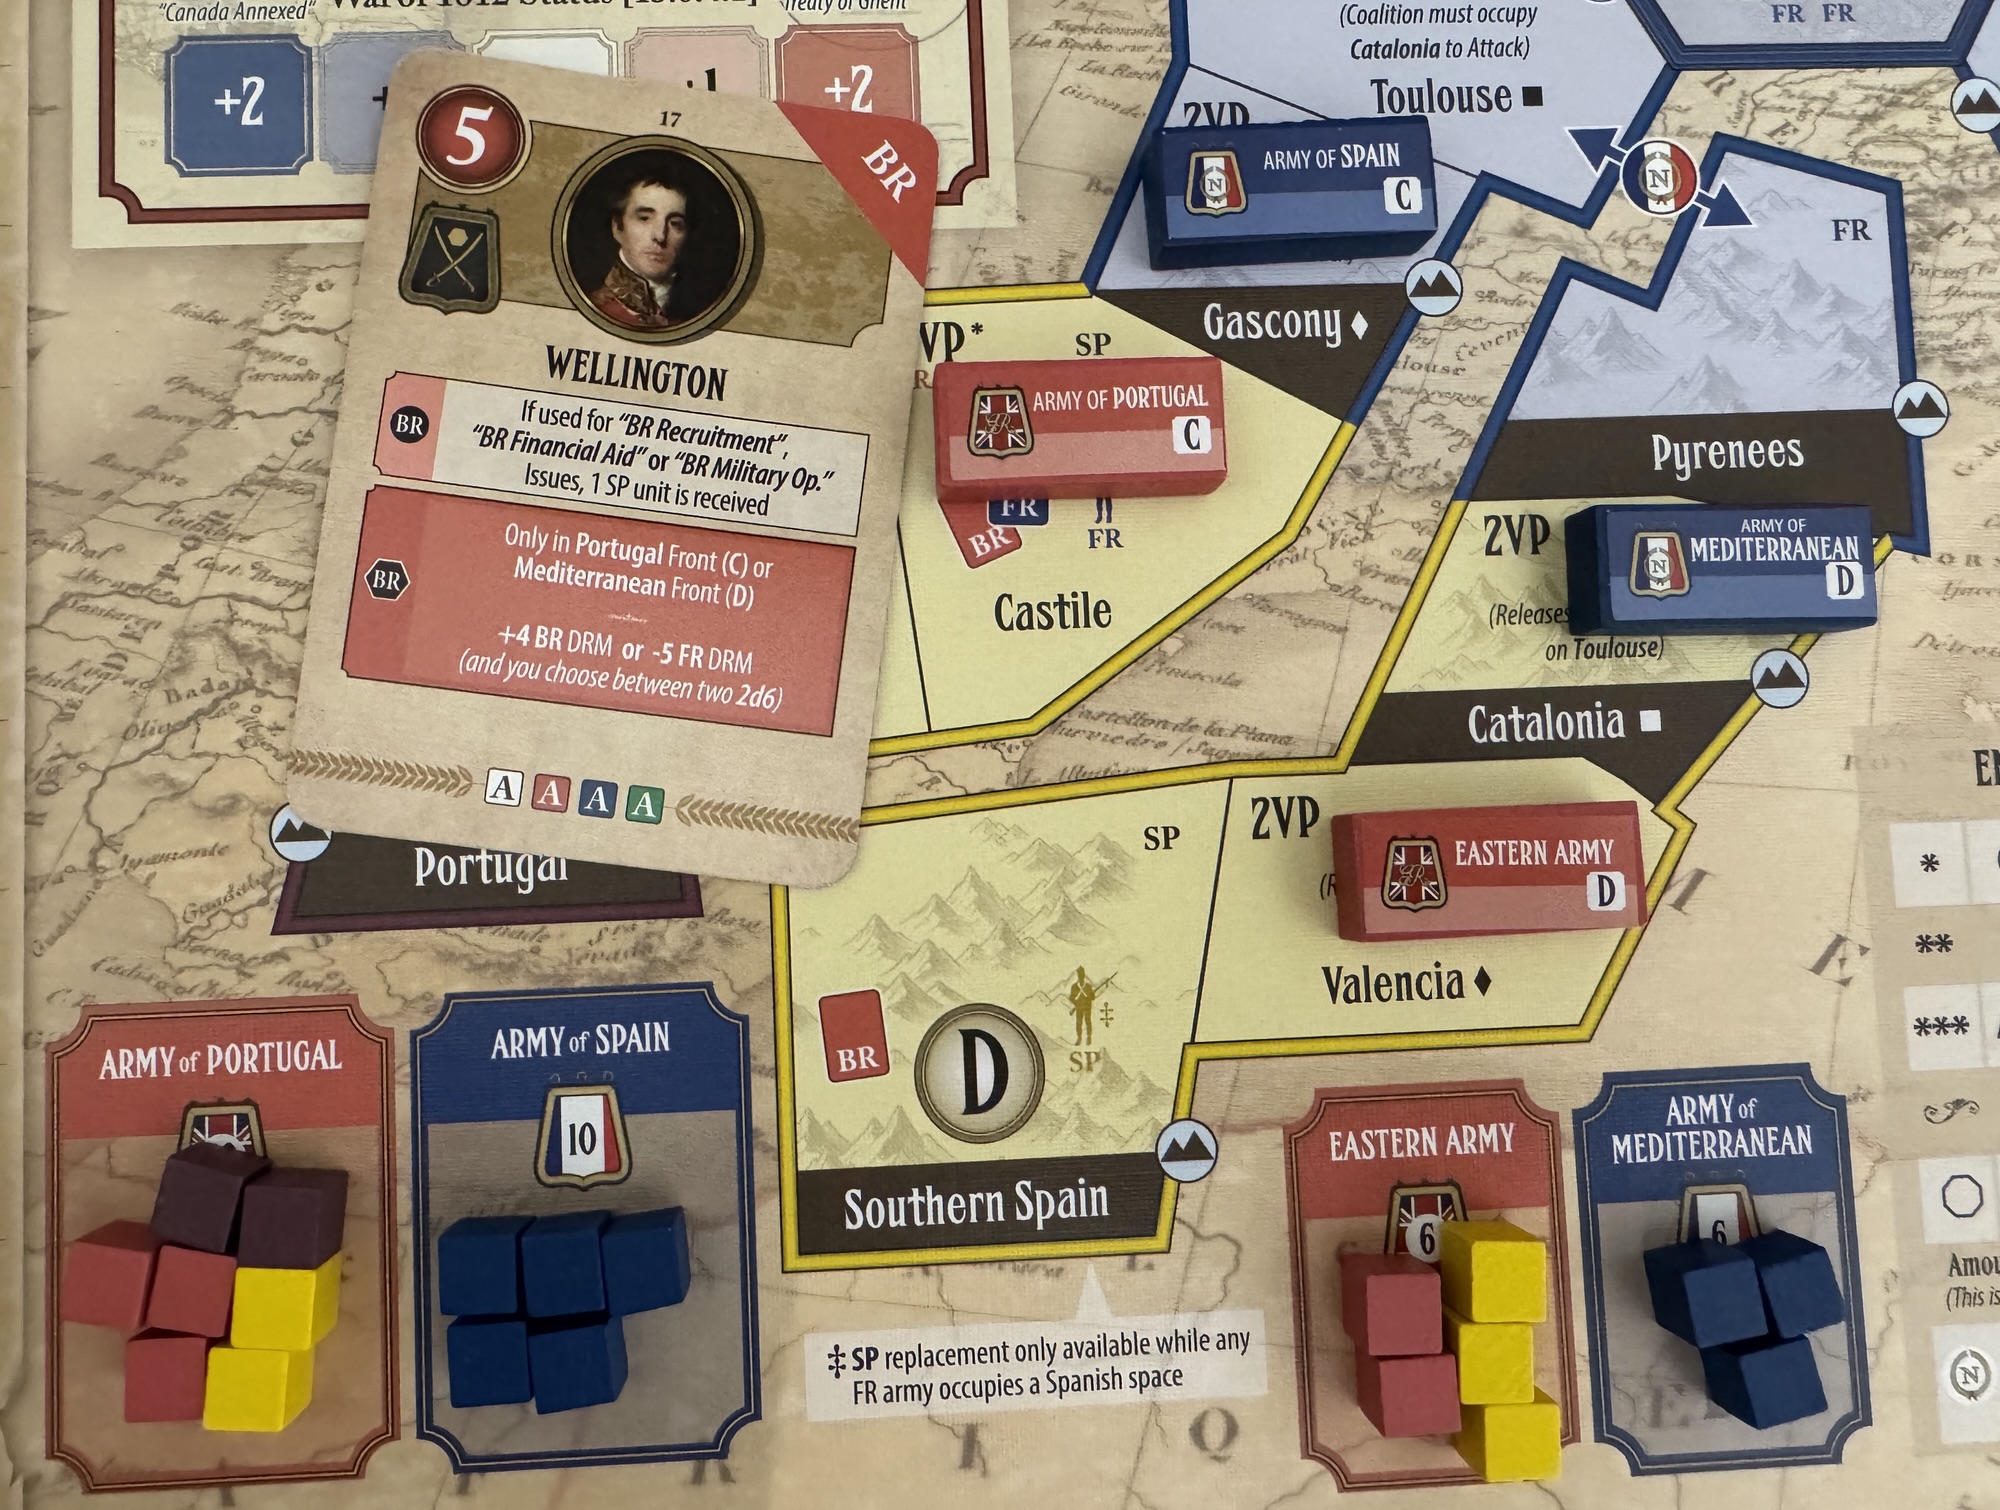
In this entry, we are going to take a look at the British Leader Wellington card. The Wellington card is the most powerful British military asset available and the British player should work hard to make sure that they get the card either by luck of the draw or by attempting to trade cards with other players. The major benefit of the card is during the War Phase, as it provides multiple benefits that can make combat much easier for the British. The bottom part of the card gives a boost during combat by granting an impressive +4 DRM in battles or to make the French have a -5 DRM. This is a very important decision and will mainly come into play to ensure losses are greater for the French or to make sure that a battle can we won. The combat benefit can only be used in the Portugal or Mediterranean Fronts but that is fine as this is where a majority of the British military actions will occur. But even more important than the DRM’s is the re-roll of the combat dice for the British. The other part of the combat benefit shown on the card is that the British player will get to roll 2d6 twice and then select the highest result during battles, greatly mitigating their risks of rolling poorly. Just a very powerful card for battles and I would definitely recommend its use in this fashion.
But, the top part of the card is also very important, particularly in the early part of the game, as when the card is used to move a British Recruitment, Financial Aid or Military Op Issue at the negotiating table they will gain a 1 SP unit that can be placed in the future into Fronts. This extra unit recruitment allows the British to slowly build up their forces without having to solely focus on choosing Recruitment Issues. This gives them the opportunity to focus on other Issues which can be very beneficial and give them a more well rounded approach.
Field Marshal Arthur Wellesley, 1st Duke of Wellington was a British Army officer and statesman who was one of the leading military and political figures in Britain during the early 19th century, twice serving as Prime Minister. He was one of the British commanders who ended the Anglo-Mysore wars by defeating Tipu Sultan in 1799, and was among those generals who ended the Napoleonic Wars in a major Coalition victory when the Seventh Coalition defeated Napoleon at the Battle of Waterloo in 1815.
Wellesley was born into a Protestant Ascendancy family in Dublin, in the Kingdom of Ireland. He was commissioned as an ensign in the British Army in 1787, serving in Ireland as aide-de-camp to 2 successive lords lieutenant of Ireland. He was also elected as a member of Parliament in the Irish House of Commons. Rising to the rank of colonel by 1796, Wellesley served in the Flanders campaign before being sent to India, where he fought in the Fourth Anglo-Mysore War, ending the conflict with a victory at Seringapatam in 1799. He was appointed governor of Seringapatam and Mysore and, as a newly appointed major general, won a decisive victory over the Maratha Confederacy at the Battle of Assaye in 1803.
Rising to prominence as a general officer during the Peninsular War, Wellesley was promoted to field marshal after leading British-led forces to victory against a French army at the Battle of Vitoria in 1813. Following Napoleon’s first exile in 1814, he served as the British ambassador to France and was made Duke of Wellington. During the Hundred Days campaign in 1815, Wellington commanded another British-led army which, together with a Prussian army under Field Marshal Gebhard von Blücher defeated Napoleon at Waterloo.
After the end of his active military career, Wellington returned to politics, becoming a prominent member of the British Tory party. He served as prime minister from 1828 to 1830, as well as on an interim basis for a little less than a month in 1834. Wellington oversaw the passage of the Roman Catholic Relief Act 1829 and opposed the Reform Act 1832. He continued to be one of the leading figures in the House of Lords until his retirement in 1846 and remained Commander-in-Chief of the Forces until his death in 1852.
Portrait of the Duke of Wellington by Sir Thomas Lawrence, c. 1815–1816.
We have done 2 videos on this game including the following RAW Video after out 1st play at Buckeye Game Fest in May 2025:
We then did the following full Review Video after our 2nd play at WBC last July:
We have interviewed the venerable designer Ty Bomba on numerous occasions over the 10-year life of the blog. In fact, I counted up the interviews and to date we have done 18 total! Wow but the last one we did was in January 2023 and we have just not had him on since. No reason for that other than I have been busy with other games. But recently I saw from War Diary Publications that they were printing one of his What If? style alternative history games called Rommel in Italy, 1943-1944: A Counter-Factual Simulation, which supposes Field Marshal Erwin Rommel had taken command of German forces in Northern Italy rather than being sent to help with the defense of France against the expected Allied invasion. I reached out to Ty and he was more than glad to give me some more information.
Grant: What is your upcoming game Rommel in Italy about?
Ty:Rommel in Italy, 1943-1944: A Counter-Factual Simulation allows 2 players (or one playing 2-hand solitaire) to investigate the strategic and operational potentials that would have been in place across northern Italy from September 1943 through May 1944 if Hitler had left Field Marshal Erwin Rommel in charge there rather than Kesselring. Rommel advocated for immediately pulling back to a shorter, easier to defend, position at the south edge of the Po Valley rather than trying to fight it out farther south, with both the German’s flanks exposed to possible encirclement via Allied amphibious end runs. In effect, it put the Allies into a strategic position that historically they did not achieve until a year later. The question then becomes can they keep up that kind of advance into and across the Alps.
Grant: Why was this a subject that you wanted to design a game around? What assumptions about history did you take into account?
Ty: Historically, we had 2 of Germany’s best field commanders, Rommel and Kesselring at complete odds with each other over theater-level strategy. Kesselring felt confident the Allies would not achieve a level of operational efficiency that would allow them to effectively exploit the supremacy in the seas along both of Italy’s coasts. History showed that he was correct in that assessment, but Rommel’s transfer to France was not a sure thing. Hitler actually tried to send him back to Italy, to take full charge there, shortly after Rommel had gotten on a plane to fly to France. Radio communications temporarily failed, and by the time Hitler’s communications people got that all sorted out, the dictator had again changed his mind and kept Kesselring in place.
Further, the fact Kesselring was shown to have been correct does not mean Rommel was necessarily wrong – and there’s a fun-to-play wargame inherent in that iron.
Grant: What is important from the overall period and setting to model in the game?
Ty: The opening of the campaign, in September 1943, is filled with opportunity – but also fraught with peril – for both sides. At the start of play, there are only a few German garrison units in the far north of Italy, while the 10 (mostly elite) divisions of their Tenth Army start off-map to the south, where they just received Rommel’s order to run north. There are no Allied units setup on the map at all. They enter on the south edge during the first turn, and both players operate using the sequence below.
5.3 Allied Reinforcement & Replacement Phases
During these phases, the Allied player may bring onto the map newly arriving units and reclaim into play units that had been previously eliminated in combat. This phase is skipped on Turn 1.
5.4 German Reinforcement Phases
During these phases, the German player may bring onto the map newly arriving units and reclaim into play units that had been previously eliminated in combat. This phase is skipped on Turn 1.
5.5 Movement & Combat Sequence Determination Phases
In each of these phases, excluding that of Turn 1, the Allied player openly declares whether that turn’s movement phase or combat phase will be taken first. On Turn 1 the sequence is always the movement phase followed by the combat phase.
5.6 Alternating Actions Movement or Combat Phases
Always starting with the Allied player, the two players alternate either launching one attack or moving one unit, depending on whether the present phase is movement or combat. Individual attacks may have more than one attacking unit in them, but moves are always made one unit at a time. The unit(s) committed to those “actions” are, upon their completion, flipped over to show their disrupted sides. If a player does not actually want to make an attack or a move when it is his time to do so, he must flip one unit to its disrupted side, just as if it had moved or launched an attack: no “passing” is allowed.
5.7 Movement or Combat Recovery Phases
A movement or combat phase continues as described above until both players are out of undisrupted units or both agree they want to end the phase. If one player runs out of undisrupted units before the other, the player with remaining undisrupted units may go ahead and complete whatever actions he wants to perform with them within normal strictures, but now uninterrupted by having to pause to allow the opposing player to take an action. When a combat or movement phase is ended, both players should cooperatively turn over all disrupted units on the map so their undisrupted sides are and showing.
5.8 German Supply Check Phases
In each of these phases, both players should cooperatively look over the map to find if there are any German units out of supply. Each such unit is immediately removed to the dead pile.
5.9 Allied Supply Check Phases
In each of these phases, both players should cooperatively look over the map to find if there are any Allied units out of supply. Each such unit is immediately removed to the dead pile.
5.10 Ending & Starting Turns
Each time a Allied Supply Check Phase has been completed, advance the Turn marker one box on the Turn Track printed on the mapsheet and start a new turn with Phase I.
On the first turn, the Allied player has a relatively open front before him. If he can exploit that to get into the Po Valley quickly, he will move the strategic timetable significantly forward of the historic one. However, as he’s moving onto the map, so too it German Tenth Army. Depending on how bold both players are, it is not unusual to see pockets form inside other pockets.
Grant: How has this design changed since its original publication in 2021 in Banzai Magazine under the title Rommel’s Last Stand: Italy 1943-44, What If?
Ty: The new publisher has fixed the (scant) errata from the first (bilingual) Japanese edition from Banzai Magazine. They have also taken all the Japanese off the map and out of the rules, presenting everything fully in English. Other than the removal of those irritants, it is the same game.
Grant: What is the scale and force structure of units used for this design?
Ty: Each hex on the map equals 5 miles (8 km) from side to opposite side. Each full turn represents 2 weeks to 2 months, depending on the time of year. Every ground unit represents a regiment, brigade or division of about 2,500 to 12,000 men and/or 50 to 350 armored fighting vehicles.
Grant: How many maps are used in the game?
Ty: There is 1 large-hex based 34×22” map showing Italy north of the line of the Arno River to Ancona.
Grant: What is the anatomy of the counters?
Ty: The units are standard-classical in their data presentations, except their movement factors are not printed on them. All Allied units have (supplied) MF’s of 16 throughout the game, while the German MF’s are as follows.
German Mechanized Units Turns 1-6 – 16 MF’s
German Non-Mechanized Units Turns 1-6 – 8 MF’s
German Mechanized Units On Turns 7-10 – 12 MF’s
German Non-Mechanized Units On Turns 7-10 – 6 MF’s
Grant: What sources did you consult for the Order of Battle?
Ty: The Armies of Rommel by George Forty was an excellent source for the subtleties in the initial German Order of Battle. Beyond that, I pulled the roughly half-dozen historical Italian campaign games off my shelves and pulled information out of them. This is one of the most thoroughly simulated campaigns in the hobby, going all the way back to Avalon Hill’s Anzio, so I was not looking to find any heretofore undiscovered anomalies in either sides’ OB. The uniqueness in this game’s treatment of it comes from the changed strategic context combined with the tension inherent in the turn sequence, which requires both players to remain alert for sudden danger or fortuitous opportunities all throughout its play
Grant: How does combat work?
Ty: Combat is always voluntary and, when viewed on a battle-by-battle basis, is standard/classical odds ratio using a six-sided die.
Grant: What are the victory conditions?
Ty: Operating in conjunction with the alternating-actions turn sequence, the victory conditions are a further element I used to keep both players on the edges of their seats at all times. See below.
4.1 In General. The Allied player is on the offensive, trying to win by advancing fast enough to cause a major disruption to the historic timeline.
4.2 Allied Victory During 1943 Turns. If Phase 9 of Turn 1 or 2 or 3 or 4 ends with Venice or Milan or Trieste, or any one or more of the four German supply source hexes, occupied by an Allied unit or stack, that game ends at that time in an Allied victory.
4.3 Allied Victory During 1944 Turns. If Phase 9 of Turn 5 or 6 or 7 or 8 or 9 or 10 ends with any one or more of the four German supply source hexes occupied by an Allied unit or stack, that game ends at that time in an Allied victory.
4.4 German 1943 Sudden Death Victory. If any movement or combat phase of a 1943 turn ends with the German player having gained control of the containing the Allied Amphibious Invasion Beachhead marker, the games ends in a German victory at that time.
4.5 German 1944 Sudden Death Victory. If any movement or combat phase of a 1944 turn ends with one or more German units in any hex(es) on the south map edge, that game ends in a German victory at that time.
4.6 German End-Game Victory. If Phase 9 of Turn 10 ends without the Allied player having achieved a victory, the game ends at that time in a German victory.
The “White Dragon Game Designer” dressed as a samurai.
Grant: What are you most pleased with about the design?
Ty: As I mentioned above, the Italian campaign has been one of our hobby’s most thoroughly plowed fields for decades. Despite that, I believe I have offered a new experience with it here. Players will get a new slant on it, one that operates within the broad parameters of the war’s historic decision-making, but that is also tense and entertaining for both commanders.
I also hope its appearance in an easily available all-English edition may lead this and other publishers to look into acquiring the rights to other of my designs that have so far appeared only in East Asia (where I am affectionately known as the “White Dragon Game Designer”). I have done several games that have been well-received there, but are barely known here in the West.
Grant: I know you are a busy man with game design projects as well as editing for various wargame magazines but what other games are you currently working on?
Ty: I am presently working on this alternative history design, which is scheduled to appear in World at War No. 130, called Stalin’s Missed Opportunity: What If He Invaded Romania in May 1940?.
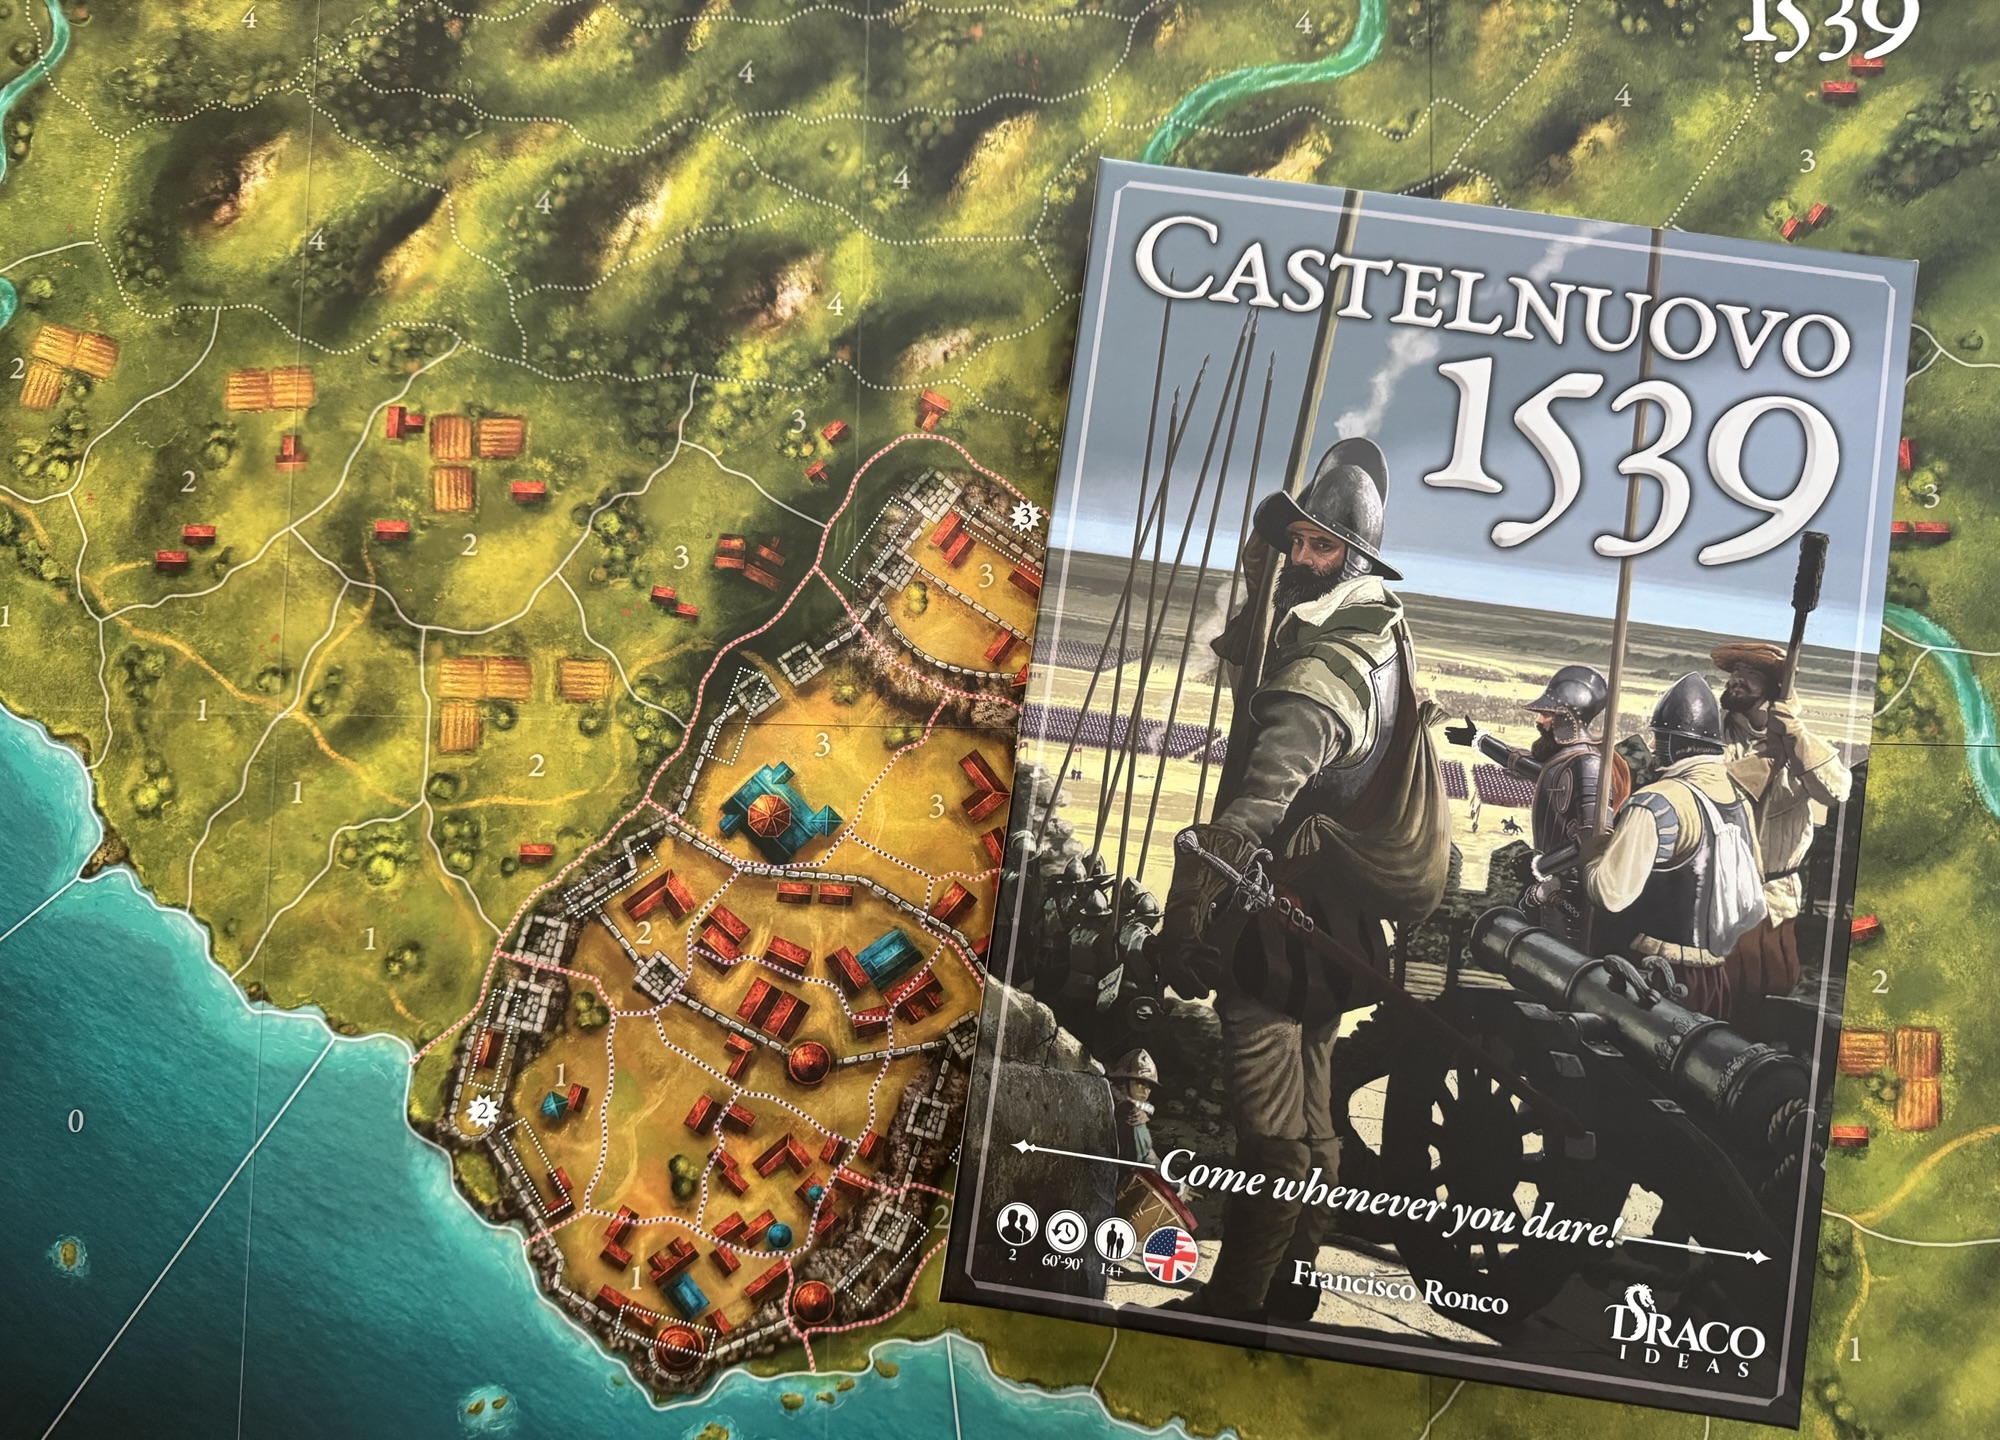
In 1539, a small Spanish garrison of troops numbering 3,500 men held the Albanian village of Castelnuovo for 22 days against the massive Ottoman army consisting of over 54,000 Turk soldiers. This siege took place as a part of the Ottoman-Habsburg struggle for control of the Mediterranean Sea in July 1539 at the walled town of Castelnuovo, which is the location of present-day Herceg Novi, Montenegro. After days of open trench warfare and more than a month of smaller combats, skirmishes, assaults and bombardments from the Turkish navy, the last Spanish defenders fell ending the siege. Castelnuovo 1539 is a wargame that focuses on this siege designed by Francisco Ronco. The defenders are safe behind sturdy walls and battlements but time and continual shelling from the Ottomans will lead to assaults over the walls. The battle is hopeless for the defenders but they can win the game by doing enough damage to the Ottomans to end their campaign and stop them from invading further into the Albania and then onto Spain and the rest of Europe. The game is very well produced using wooden blocks for soldiers, stylized walls, siege trenches and cannon along with ships and the board is also beautifully illustrated. The game is a block wargame where the strength of units are hidden from the opponent and plays pretty quickly in less than 90 minutes and really is a great representation of the battle and its history.
In this series of Action Points, we will first take a look at the beautiful Game Board and its area movement scheme, examine the units available to both sides and compare their relative strengths and weaknesses, take a look at the 5 different types of Command Cards and discuss how they are used, look at the 2 different types of rounds including a Siege Round and an Assault Round and how they differ, take a look at an example of combat and bombardment and finally examine the victory conditions for both sides and how casualties effect this outcome.
Game Board
The Game Board represents the fortified city of Castelnuovo and its surrounding areas, including the Mediterranean Sea to the south and the rolling countryside to the north. The Game Board is divided up into areas which are used to regulate the movement and positioning of the block units. The Game Board is pretty large really measuring in at 29″ x 21″ and is a fully mounted map board and is very nicely illustrated by Paco Arenas and absolutely was a joy to play on.
As you look at the Game Board in the picture above you will notice a few things. The areas of the city of Castelnuovo are outlined in red with a dotted line representing the city walls around its perimeter. There are also 4 inner areas of the city itself outlined in purple. Sometimes the game rules make reference to the “Fortress”, which means the 4 areas of the city and the walls surrounding them.
Here is a closeup of the Fortress where you can see the colored lines a bit better. You will also notice that there are rectangular boxes on top of the walls in the Fortress outlined with white dotted lines. These are spaces where the wooden wall segments are placed to represent the Resistance Level of the walls. You will see that in each area of the city that has walls, there is a number found in a white star that represents this Resistance Level. There are areas with both Resistance 1, 2 and 3 inside the Fortress. As the walls are attacked with bombardments from artillery, their Resistance Level will be degraded represented by placing wooden cubes in each area marking the current Resistance Level with 1, 2 or 3 cubes. If an area has 3 Resistance Level and takes a hit, the player will remove one wooden piece indicating that the Resistance points have dropped. Once the Resistance Level reaches 0, the walls are destroyed and the wooden wall pieces are removed from the board. The Ottoman player may then storm the walls and attack the defending units in the city.
There are 2 types of terrain found in the countryside of the Game Board with clear terrain being shown by a solid white outline and rough terrain outlined by a white dotted line. Each area of the map has a Height Level value printed in its location, which indicates the height of the area. The heights are 0 being the lowest, or basically the sea level with a 4 being the highest which represents a mountain level. The height effects the shooting of firearms. In addition, other terrain features are printed on the Game Board including the coastline, which separates the sea areas from the land areas, and also is a landing point for a majority of the Ottoman player’s reinforcement troops. Also, the 3 areas with Resistance Levels of 2 and 3, marked with the white star, are the areas that the Ottoman army must occupy at the end of any round to win the game.
Movement is specifically tied to the type of lines found in the areas of terrain. Units and Leaders can move by playing Action Cards, which allow a group of 1 to 3 units that are in the same area to one or more areas. Activated Infantry units will have 2 movement points and Cavalry have 4 movement points. Moving into a clear terrain area costs 1 movement point while moving into a rough terrain area, which is marked with white dotted lines will cost 2.
The countryside areas have various depictions of buildings including shacks, storage sheds, houses as well as farm fields. These buildings do not affect combat or movement and are simply illustrative of the surroundings of the city. They are also many trees and bushes drawn on the Game Board with connecting roads also shown.
There are a few pieces that the players will place on the Game Board at the outset of playing including the wall blocks already mentioned as well as the Bastions. These Bastions are used by the Spanish player and are placed at the beginning of the game in any terrain areas outside of the city proper. These Bastions function similarly to the walls of Castelnuovo’s fortifications. Once these are placed, they cannot be moved and will remain on the board even if their Resistance drops to 0 and they are destroyed. The Ottoman player can destroy them with artillery Bombardments or by spending Trench Points from Command Cards when entering them. These Bastions do not provide defense to the Ottoman player.
The Casualty Track is printed in the bottom left hand corner of the Game Board and is used to keep track of the number of blocks lost by the Ottoman player. In addition, also tracked will be Leaders and the number of Assault Rounds used by the Ottoman player.
The game really is a nicely made production with the Game Board being one of the best parts of the package. It is clear, well laid out and takes little to no time to understand its locations and areas. I think that one of the strengths of this game is that it is not only nicely produced but the rules are very clear and the strategy of what each side should be doing, by taking advantage of their defenses and the terrain.
In Action Point 2, we will examine the units available to both sides and compare their relative strengths and weaknesses.
With this My Favorite Wargame Cards Series, I hope to take a look at a specific card from the various wargames that I have played and share how it is used in the game. I am not a strategist and frankly I am not that good at games but I do understand how things should work and be used in games. With that being said, here is the next entry in this series.
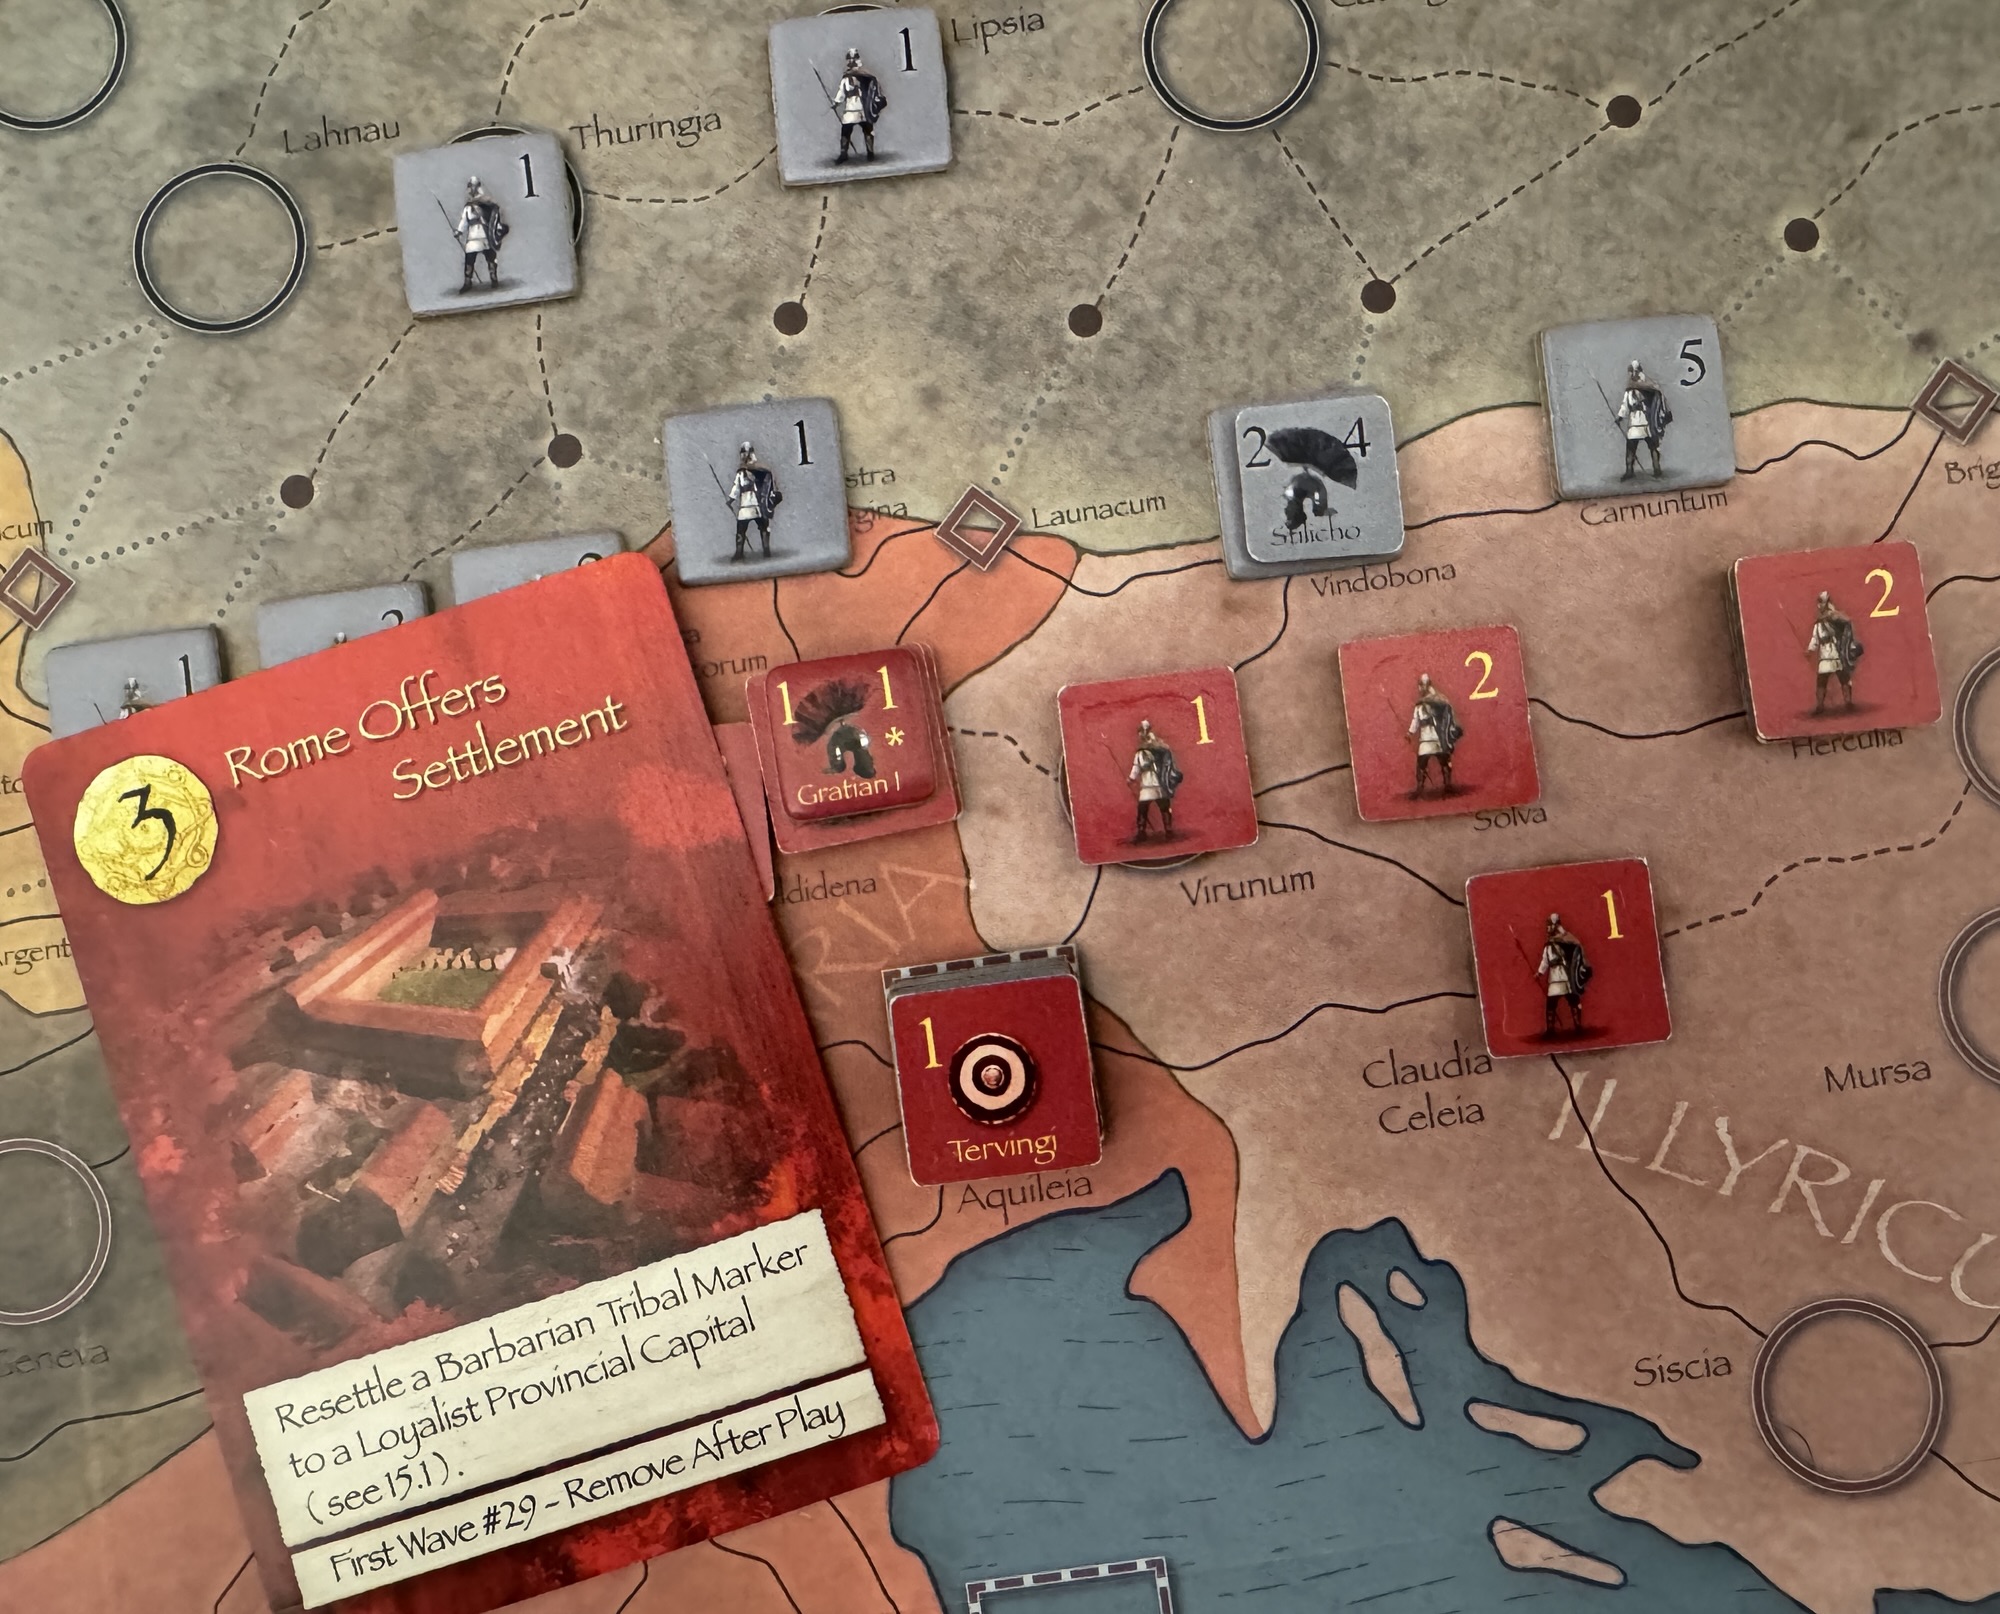
#82: Good Omens from The Wars of Marcus Aurelius: Rome 170-180CE from Hollandspiele
TheWars of Marcus Aurelius: Rome 170-180CE is a solitaire only game that uses cards similarly to a CDG to simulate the strategic level struggle of the Romans led by Marcus Aurelius to stave off the invasions of Germanic tribes and Sarmatian raiders as they encroach on Roman territory across the Danube River. That’s the history. And it is really well integrated. The game play is very fun, strategic, with lots of decision points about what to do and what cards to use, and it is really challenging.
In the game, the Roman player has a deck of Roman Cards that can be used for the printed events for various effects or that can be discarded to take any number of actions such as attack a Barbarian army or Off-Map Conflict enemy, advance the marker on the Imperium Track, add two Level 1 Forts to any eligible map spaces, flip one Level 1 Fort to a Level 2 Fort among several other actions. Sometimes the printed events in the game are just more powerful than discarding a card for just 1 action so you have to pay attention to this economy and make sure you get the most out of your cards. Now, keep in mind, sometimes discarding a good card whose ability is not right for the current situation you find yourself in is part of the game but you have to use these cards wisely to do well in the game.
The game uses two separate decks of cards including the Barbarian Deck (Green) and The Roman Deck (Red). Both of the decks are made up of 50 cards each but each have very different purposes. The Barbarian Deck is used to determine the actions of the invading Germanic tribes as well as events that effect the war effort including mutinies, plague and the will of the people. While the Roman Deck provides the resources and events that are used by the Roman player to mount a defense against the invasions and to fight back each of the different barbarian tribes. There are unique cards called Late War Cards in the deck that will be held out until the start of the 175CE turn at which time they will be mixed in with the cards to form a new Late War Deck. There are also special cards that are marked with an asterisk that if played for the event will be discarded from the game to form what is called a History Pile.
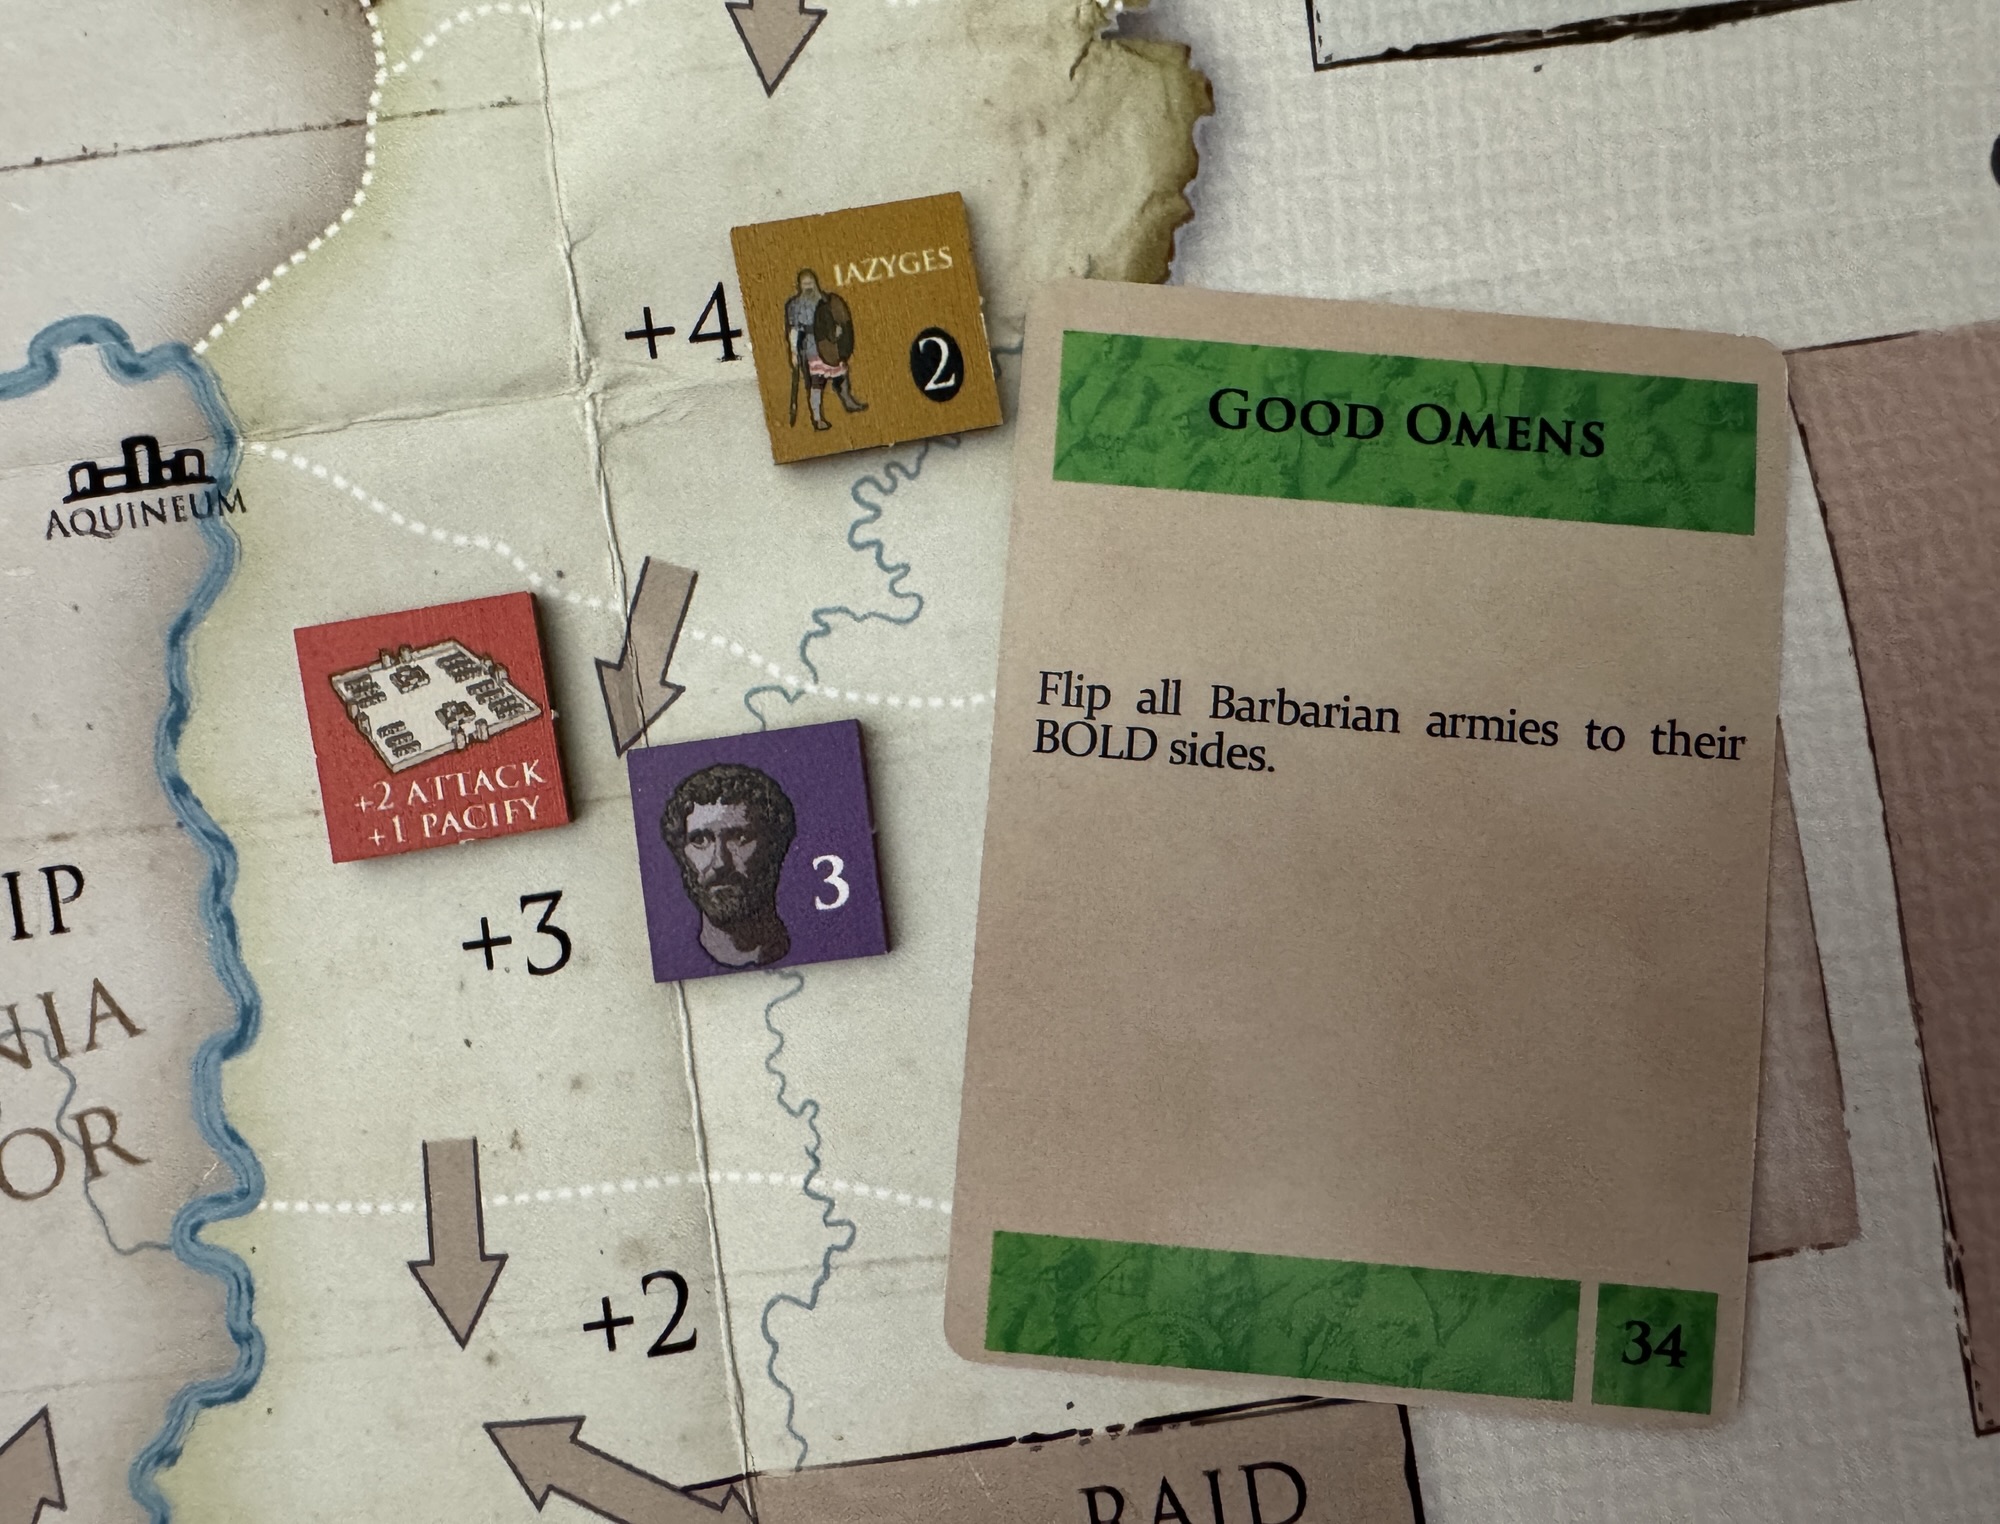
In this entry, we will focus on our first Barbarian Card from the game, as almost all of these cards are really bad for the player, called Good Omens. The “Good” portion of the card’s name doesn’t refer to the Romans but is a benefit for the Barbarians. This card can undo the hard fought victories of Marcus Aurelius and his commanders as its effect is immediate and cannot be cancelled like a Barbarian Surge effect can be by discarding a card. The Good Omens Barbarian Card will immediately cause the player to flip all of the Barbarian armies to their Bold side. Well that doesn’t sound so bad you say? Well, remember that each of the Barbarian army counters is double sided with one side being their Bold side and the other their Demoralized side. On their Bold side, the army is at its strongest with its Combat Value being higher than on the Demoralized side. In our pictures, you can see that the Iazyges army counter has a 4 Combat Value on its Bold side while the Combat Value on the Demoralized side is 2 less at just 2 Combat Value. During combat, or even due to some of the events on the Roman Cards, if a Roman army defeats a Barbarian army, their counter will be flipped from their Bold side to their Demoralized side and they will also have to retreat backward 1 space. I know that the difference here is only 2 but that is in essence gaining a +2 to the Barbarians Combat Value and in a game where the differences between the 2 armies can be just 1 or 2 or even no difference at all, this makes a huge difference and can sometimes feel like you are having to climb a mountain to overcome these Barbarian foes.
Ancient peoples believed deeply in their gods and traditions and would watch for signs in the heavens or from other sources when making key decisions about many things including military campaigns. Good omens would be seen positively as they believed that their decision was favored by the gods and that they would have a good outcome. The Romans believed these things as well but unlike the highly structured Romans, who read omens by sacrificing animals or watching birds fly, barbarian armies like the Germans and Celts relied on signs from nature or even from dreams. These signs when seen would boost morale and gave tribes the psychological edge they needed to fight the powerful armies of the Romans. Germanic tribes believed sacred groves and rivers were portals to their gods and if they were fighting near these places they would take greater strength. Weather was also seen as a major sign and roaring winds, dark storms or rivers that suddenly flooded were viewed as the gods fighting on their side.
The most famous “omen” came from the Battle of the Teutoburg Forest in 9 AD, which occurred over 100 years before the events of the game. A fierce storm, combined with the clever planning of the Germanic leader Arminius, allowed Germanic tribes to completely trap and wipe out 3 Roman legions. The Romans viewed the loss of their legionary eagles and this devastating defeat as a terrible omen for their empire’s future.
Hermann (Arminius) at the Battle of the Teutoburg Forest in 9 AD by Peter Janssen.
I shot a playthrough video for the game and you can watch that at the following link:
I also followed that up with a full video review sharing my thoughts:
PHALANX does some really great games and they have 2 new games that have recently been placed on pre-order in a 2-pack called Pacific War Games (you can order them separately). This package includes 1943: Race to Rabaul designed by Volko Ruhnke and Tora Tora Tora! designed by Wataru Horiba. I have reached out to Volko Ruhnke to discuss his 1943: Race to Rabaul, which is part of the Keep ‘Em Rolling Series of logistics focused wargames that includes titles such as 1944: Race to the Rhine and 1941: Race to Moscow, and he was more than willing to share.
If you are interested in 1943: Race to Rabaul, or its sister game in the Pacific Wargames package called Tora Tora Tora!, you can pre-order copies on the Gamefound pre-order page at the following link: https://gamefound.com/en/projects/phalanx/pacificwar-games
Grant: Volko welcome back to the blog. What is your new upcoming game 1943: Race to Rabaul?
Volko:1943: Race to Rabaul will be the next volume in Phalanx Games’ “Keep ‘Em Rolling” Series, following up on 1944: Race to the Rhine and 1941: Race to Moscow. Also set in World War II, this time you are supplying forces moving and fighting across the South Pacific–with the twists that players are fighting each other and have to manage sea, air, and land operations.
Grant: You have designed logistics focused games in the past such as the Levy & Campaign Series. How has that experience lead you to the Keep ‘EM Rolling Series?
Volko: I’ve always enjoyed wargames that include placing, moving, consuming, destroying actual supply bits on the map–going back at least to The Gamers’ Standard Combat Series AFRIKA. In Levy & Campaign, I wanted to show that for medieval campaigns, in a simple enough way to be fun rather than tedious. When I later played 1944: Race to the Rhine, I saw that that design accomplished that very well indeed, even made it the focus of play. So I was hooked.
Grant: How did this opportunity come to you?
Volko: Two Septembers ago, I was in Prague for Czech Con hosted by Levy & Campaign Žižka designer Petr Mojžíš, where I got to meet Phalanx co-owner Jaro Andruszkiewicz. He invited me to do a design with his company. I at once knew that it had to be something in their “Race” series. Via my research for Coast Watchers from GMT Games, I already had become fascinated by Japanese logistical challenges and Allied counter-logistics strategy in the South Pacific. So the fit seemed a natural.
Grant: What sources did you consult to get the historical details correct? What one must-read source would you recommend?
Volko: I had already done a lot of reading for Coast Watchers. The source that really laid out the Japanese perspective on their difficulties in reinforcing the front line was Kengoro Tanaka’s Operations of the Imperial Japanese Armed Forces in the Papua New Guinea Theater. I also picked up Breaking the Bismarcks Barrier, an official US Navy history of the campaign. My favorite general Pacific War history source is Ronald Spector’s Eagle Against the Sun (as I briefly had the opportunity to study history under Professor Spector at George Washington University.)
Grant: What is your overall design goal and thesis for Race to Rabaul?
Volko: In the South Pacific of 1943, the Allies were far more savvy than just piling their firepower and men directly against the well-fortified Japanese positions. Instead, they wore them down with air strikes over time, while blockading them by air and sea. The key challenge to the Japanese defense was the inability to get enough supplies and men through the growing Allied air and then sea superiority to reinforce–and even just feed the Japanese forces holding the line. In1943: Race to Rabaul, you manage that logistical and counter-logistical struggle on each side.
Grant: How tough was working within the constraints of an existing system?
Volko: I find it easier overall to start with an existing system that I know works and build from there (as I did with classic-CDG Wilderness War and the scenarios and C3iMagazine campaign that I’ve done within Combat Commander). The key challenges for me in bringing the Phalanx “Race” system to the South Pacific were expanding it to opposed play necessary to capture the critical counter-logistical aspect – and to a maritime environment – sea, air, amphibious and land warfare – all with the eye to adding just a dose of added complexity.
Grant: How does the vastness and remoteness of the pacific affect logistics? How did you model this?
Volko: The environmental problem that the Japanese faced and the Allies exploited in the South Pacific was that nearly all logistics came by sea, so air interdiction ruled. There were land campaigns in New Guinea’s interior. But the jungle and ridge terrain there required air lift or coastal transport to build up. And by 1943, the Allies increasingly dominated the air war. Race to Rabaul requires you to move your troops, ammunition, and food across sea–you can’t just march your corps forward. For the more constrained Japanese, that means launching Convoys that the Allies might detect and strike.
Grant: What was most important to model in the game? What about inter-service rivalry?
Volko: That Japanese challenge moving anything and the Allied effort to stop it is most characteristic of the design. But perhaps its most impactful addition to the “Race” system is opposed combat. Rabaul taps the same principle of counting supply bits to determine combat outcomes. But with 2 opposed players, playing cards to hope to out wit each other, as well as land and amphibious attacks, the combat subsystem in this volume is necessarily more involved. For non-wargamers, that is probably a hindrance. But for wargamers, it may make Rabaul even more up their alley than the earlier games. Inter-service rivalry comes to the fore in Rabaul when you have 3 or 4 players. Each side has two Commander roles, “racing” along either the east or west half of the map. Each represents the Japanese or Allied army or naval dominance of the New Guinea and Solomons campaigns, respectively. Whichever player (not side) reaches its goal first wins the game–so you can choose to cooperate with the other Commander on your side or not!
Grant: How does the logistics support differ between the Allies and the Japanese?
Volko: I’ve mentioned the Japanese use of Convoys and Allied Convoy Strikes above. The Allies have that easier–their abundance of transports is assumed wherever they have Air Cover. The problem is that they must take ground and build Air Bases to extend that Air Cover and Convoy Strike range forward. The Allies also get more abundant Men &Material–generally more bits per action at their Supply Bases than the Japanese get at theirs. But, as in the earlier “Race” games, here the Allies must work their Logistics Level up to add to that capacity. The Japanese also have an advantage stalwart austerity in feeding their troops: the Japanese, unlike the Allies, never lose their last Troops piece in a space due to lack of Food, they garden!
Grant: What was the process of taking a series designed for land based campaigns into one involving amphibious supply and operations?
Volko: I had to add some complication to show the maritime environment. Instead of one type of connection between spaces, Race to Rabaul has Land, Sea, and Straight. Instead of just Trucks (and in Moscow Trains), Rabaul has Japanese Freighters, Destroyers and Barges and Allied Landing Craft. Because you have to transport soldiers not just supplies across water, Rabaul has Troops bits instead of Fuel, and Troops become key to feeding requirements, building Air Bases, fortifying, and, naturally, combat. Allied amphibious landings can be disastrous if defeated with the sea at their backs. And air power looms far larger int he naval environment, with Commanders controlling up to 6 Air tokens instead of Rhine’s 1 each.
Grant: What other challenges does each side face in obtaining their goal?
Volko: The Japanese defenders are essentially playing for time, as each Logistics step that the Allies need to trigger will award Japanese medals for holding the Bismarcks Barrier. But just those Japanese medals probably won’t be enough: the Japanese Commanders need to find openings to strike and cause Allied Troop losses as well. That takes timing and will cost Japanese Men & Material or Air tokens–possibly accelerating the Allied drive that will break the Bismarcks Barrier and stop those medal awards for good. The Allied attackers need to manage the troops, supplies, and cards to take Japanese positions efficiently to reduce the number of enemy medals for those Logistics steps. But rushing too much will result in risky attacks–even a potentially disastrous failed invasion–not to mention exposure to Japanese Banzai counterattacks. Pushing Allied Men & Material forward needs to occur even while the Allies keep up the pressure on Japanese convoys and bomb Japanese positions to counter their defensive buildup and digging in.
Grant: What is the layout of the game board and the purpose of the different boxes?
Volko: The board shows 2 tracks, in effect: MacArthur (green player) is racing up the New Guinea coast on the west half, while Halsey (blue) is racing up the Solomon Island chain on the east. These work like the colored areas in the earlier “Race” games, except that each track has a human opponent trying to stop you: Imamura (gold) against MacArthur, and Kusaka (white) against Halsey. The various boxes serve as pools for each side’s Men & Materiel bits and Fleets of Convoys or Landing Craft. Boxes also track what is just temporarily removed or spent rather than out of play (off the board). An Allied Logistics track works very much like those in the earlier games, showing how much each Allied Commander has developed the logistical infrastructure, affecting how many M&M they get per action, how many Air tokens they have, and how many cards they hold.
1943: Race to Rabaul game board art by Donal Hegarty.
Grant: What is the general Sequence of Play?
Volko: The Sequence of Play is quite basic–first the Japanese take actions, then the Allies do. As in the other games, Commanders each get 2 core actions from a menu, plus Bonus actions from cards, in this case at most 1 of the latter.
But before each Japanese turn, there is a free Delivery step in which Convoys drop off cargo. That wrinkle in the sequence means that (mostly) there will be an Allied turn in between Japanese Convoy Launch (an action) and Delivery, so a chance for the Allied players to strike the Japanese ships. The exception is certain Japanese Bonus action cards representing particularly successful “Tokyo Express” runs and the like. Logistics steps, when (mostly) the Allies trigger them, always occur after Allied actions. There are a couple Japanese cards that can force a Logistics step, representing intervention by Japanese fleet commander Yamamoto. Victory is instantaneous, whenever any Commander takes their 12th medal or–far less likely–a Japanese Supply Base such as Rabaul falls.
Grant: How many players is the game designed for?
Volko: The game handles 2, 3, or 4 players. We always have Japanese and Allied players opposing each other, as both logistics and counter-logistics feature. With 4 players, each takes a Commander: the 2 Commanders on a side can help each other with longer-range strikes and intelligence, or they can withhold help or even sabotage each other if their ally is pulling ahead and getting too close to winning. With3 players, one takes both Commanders on a side and must win with both, facing 2 players each as a single Commander. The single player can be either on the Japanese or Allied side, either works. With 2 players, you can either each command a side–the 2 Japanese Commanders versus the 2 Allied–or you can pick either half of the map–New Guinea alone or the Solomons–and play a shorter game with just 1 Commander each side.
Grant: What different commanders do players have a choice to play as? How do they differ?
Volko: The paired Commanders personify not only the conditions in New Guinea and the Solomons, respectively, but also the bureaucratic friction between Army and Navy on each side.
-MacArthur in New Guinea is also the theater commander so gets say in any internal Allied dispute such as order of actions. As an Army General, he has more land assets such as Artillery cards and a related Special Ability to redraw them, more suitable anyway to the New Guinea “track” that involves some interior fighting. Also, MacArthur alone can use Airdrops to seize jungle airstrips.
-Halsey in the Solomons has more Naval Shelling, Cruisers against Japanese Convoys–also his Special Ability–plus Guerrillas but correspondingly less Artillery and attack Divisions. Halsey late in the campaign needs to be the most careful not to get the last of his Divisions beaten up and withdrawn.
-Facing MacArthur, General Imamura represents the overall Japanese Army’s focus on New Guinea and the overall Japanese priority on that axis over the Solomons chain–so that player is the senior partner on the Japanese side. Imamura has more Troop and Ammo unit cards at his disposal and a Special Ability that can redraw them. He has his own Bonus action cards like Supply Road and Barge Assault.
-Admiral Kusaka facing Halsey has an edge in Carrier Pilots–his Special Ability–naval advantages like Long Lance torpedoes, but also the defensively crafty Army General Sasaki, who held up the Allies bloodily on New Georgia.
Grant: How is victory achieved?
Volko: As in the other “Race” games, capture of a Supply Base–here an Allied Commander advancing to either Rabaul, Madang in New Guinea, or Kavieng in the islands–ends the game immediately in an Allied Commander win. But, as in those games, that rarely will occur: the main way to win is to be the first of the 4 Commanders to gather 12 medals along the way.
Grant: What different scenarios are included?
Volko: The game includes 4 scenarios, each of different length. They all end with capture of a Japanese Supply Base or with a 12th medal. They run different play lengths by starting at later and later points in the South Pacific campaign:
-TheFull Campaignbegins with the Japanese still to make their final push on the Kokoda track and Guadalcanal in late 1942. The Allies must battle their way to Buna in Papau before heading up the New Guinea coast, while throwing the Japanese off Guadalcanal before driving up the Solomons chain.
-CARTWHEEL begins with the Allies preparing their historical 1943 drive to conquer or encircle Rabaul. Buna and Guadalcanal are cleared and serving as Allied bases, but the great Allied offensive has not yet launched.
-POSTERN begins with MacArthur primed for the historical September invasion to capture the Japanese New Guinea base of Lae and Halsey’s forces having just fought across New Georgia in the central Solomons.
-Finally, CHERRY BLOSSOM is a small learning scenario for just 2 players on the Solomons half of the board, representing the moment that Halsey is about to invade the Japanese bastion island of Bougainville.
Grant: What do you feel the game models well?
Volko: Phalanx’s “Race” system does so well highlighting the need to gather and push supplies forward in a mobile mechanized campaign–especially one in which the defender is largely on the run. Race to Rabaul I hope similarly succeeds in showing that the overwhelming Allied logistical edge over the Japanese in the South Pacific by 1943 was alone not enough against tenacious, dug-in defenders. The Allies succeeded as they did by smartly targeting Japanese logistics first, and only then throwing ground forces at the enemy bastions. To me, this design makes that counter-logistics approach vivid. I hope players will agree!
Grant: What are you most pleased about with the design?
Volko: I’m pleased with how the one-sided “Race” concept ported here to a full wargame, force on force, and that some added map features, pieces types, and combat rules brought the Phalanx system to “tri-phibious” warfare. The game is more complicated than either 1944: Race to the Rhine or 1941: Race to Moscow, to be sure, but remains more accessible than my usual design space such as Levy & Campaign or Recon Series. (I think so, anyway.)
Grant: What other designs are you contemplating or already working on?
Volko: Jaro of Phalanx, who commissioned this design from me, and I have chatted back and forth about a wide range of settings for a possible next “Race” volume from me. I have a good idea what that would be, if players end up digging Rabaul. But it would be premature to raise particular expectations as yet.
Thank you for the intriguing questions!
If you are interested in 1943: Race to Rabaul, or its sister game in the Pacific Wargames package called Tora Tora Tora!, you can pre-order copies on the Gamefound pre-order page at the following link: https://gamefound.com/en/projects/phalanx/pacificwar-games
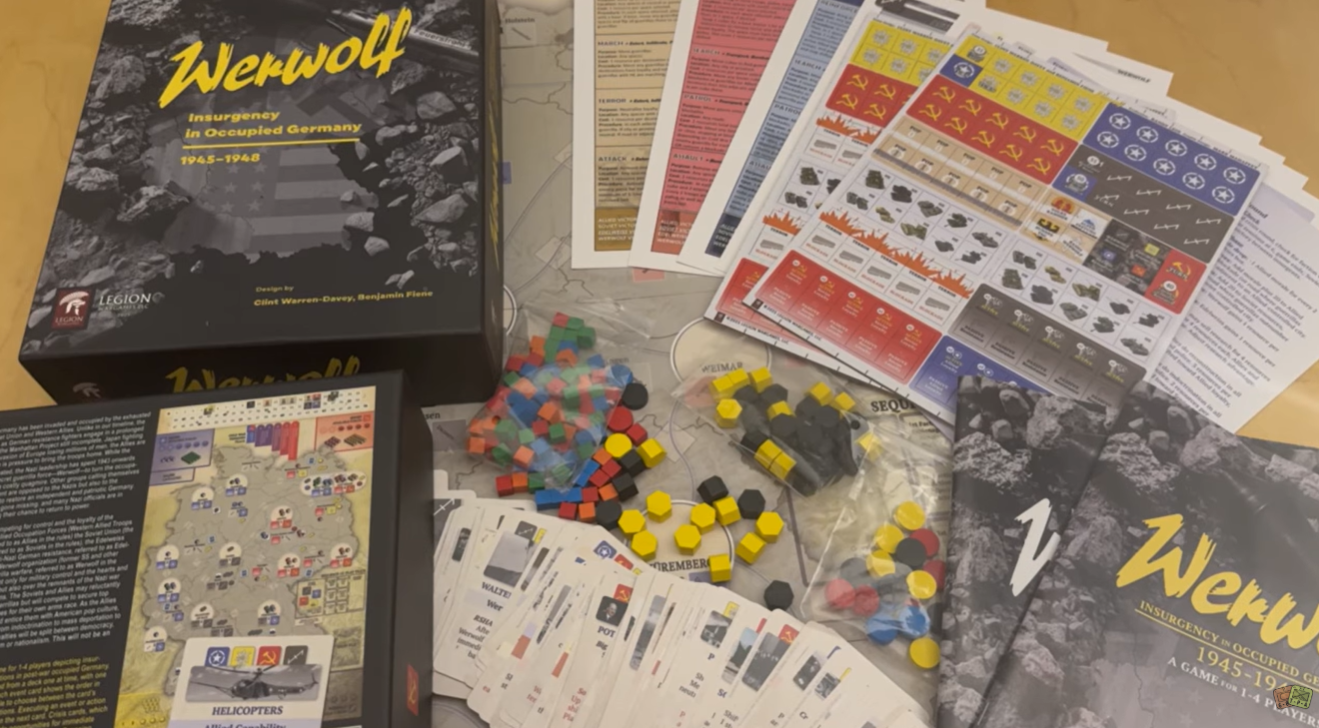
Werwolf: Insurgency in Occupied Germany, 1945-1948 from Legion Wargames is a COIN Series inspired, alternate history wargame with 4 totally different factions. Werwolf was a real underground guerrilla group, comprised of SS and Hitler Youth members. It was intended to lead an insurgency against the invading Allies and Soviets when it became clear that Germany was losing the war in a conventional sense in the mid-1940’s. They did in fact have a few successes and American intelligence officer Frank Manuel said that the Werwolves were prepared “to strike down the isolated soldier in his jeep, the MP on patrol, the fool who goes a-courting after dark, the Yankee braggart who takes a back road.”
Following the successful deployment of missiles on Cuba in 1962, the Communists gained much ground in Latin America. Western Europe became less convinced of American commitment to defend the continent. This led to the NATO alliance being dissolved and replaced by a neutral bloc.
America was now alone!
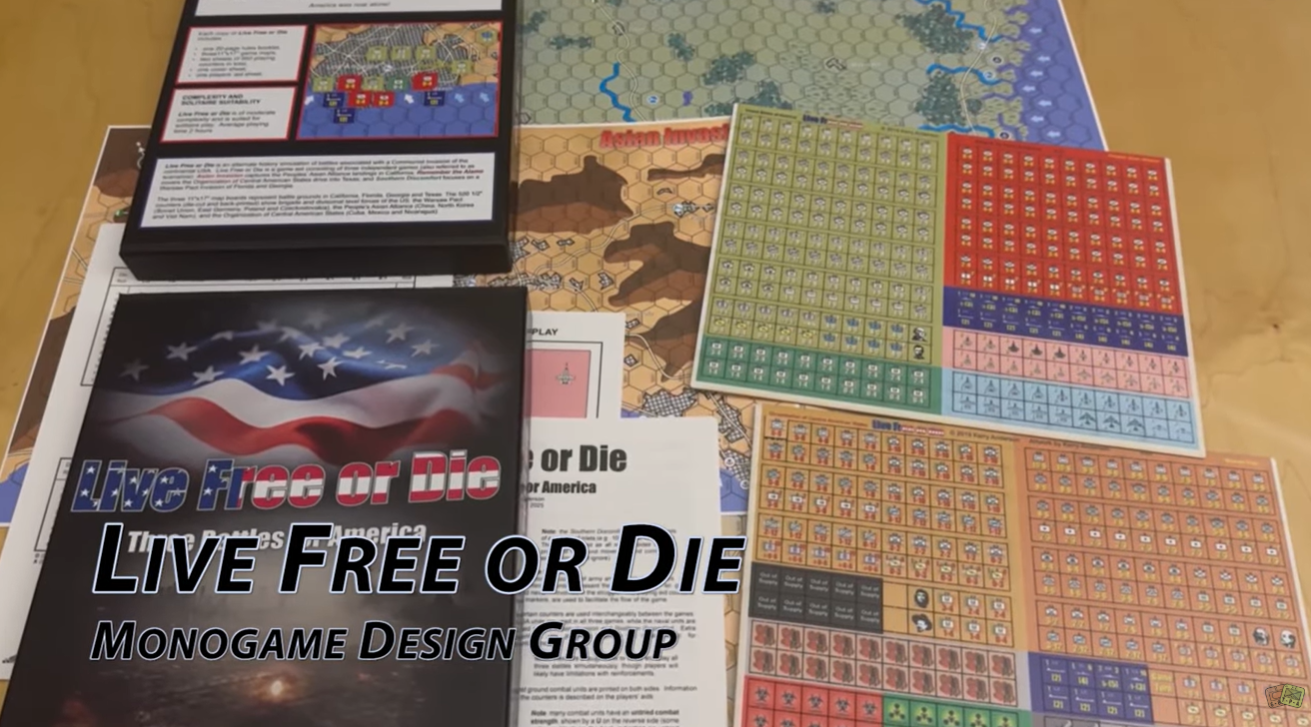
Live Free or Die is an alternate history simulation of battles associated with a Communist invasion of continental USA. Live Free or Die is a game set consisting of three independent games:
Asian Invasion captures the Peoples’ Asian Alliance landings in California;
Remember the Alamo covers the Organization of Central American States drive into Texas; and
Southern Discomfort focuses on a Warsaw Pact invasion of Florida, Georgia.
The Basic Game focuses on ground combat, providing a quick, entertaining game. The Advanced Game introduces air and naval units as well as additional specialized units like cruise missiles, laser defenses and political troops. And beware, there are rules for nuclear, biological and chemical warfare!
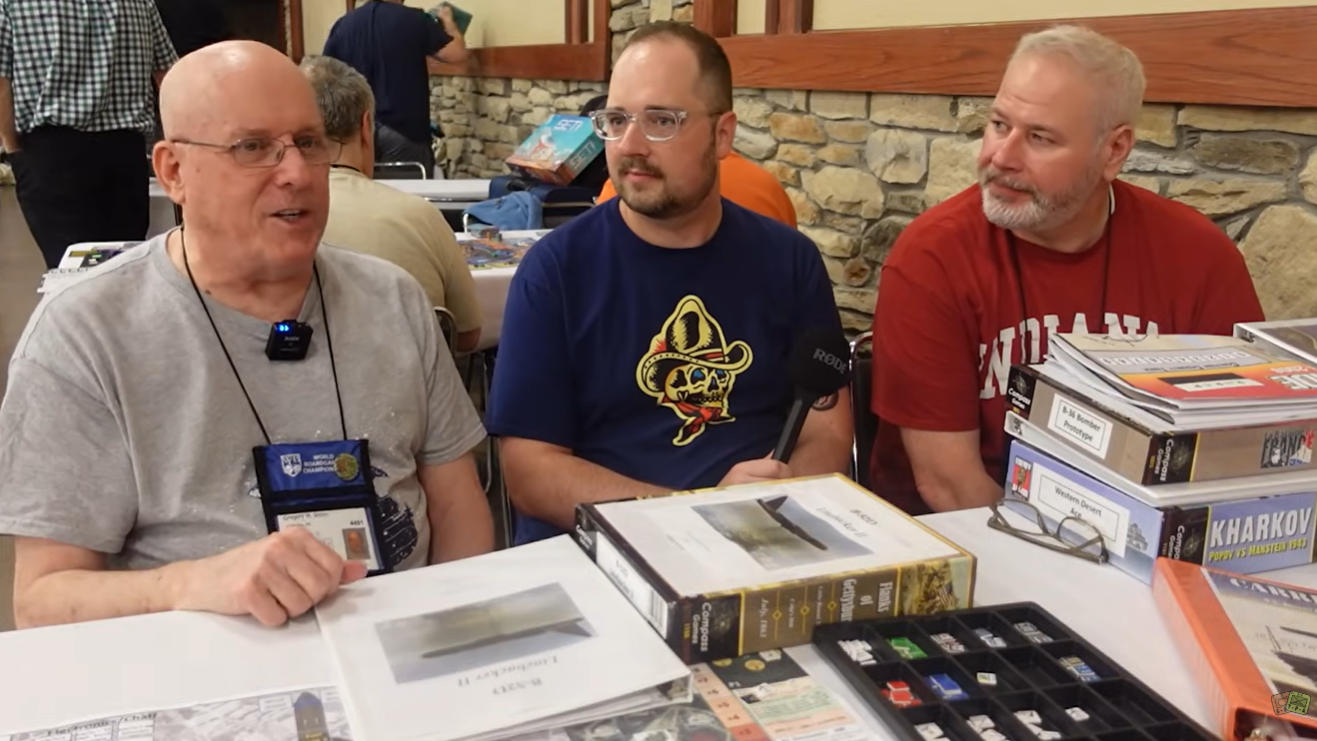
Last year, while attending the World Boardgaming Championships in Pennsylvania, we had the chance to sit down separately with 2 wargaming icons in Gregory M. Smith and Mark Herman and shoot interview videos.
The first is with Greg and covers his ongoing list of in-design games:
The second was with Mark and covered his now recently released Army of the Potomac from GMT Games:
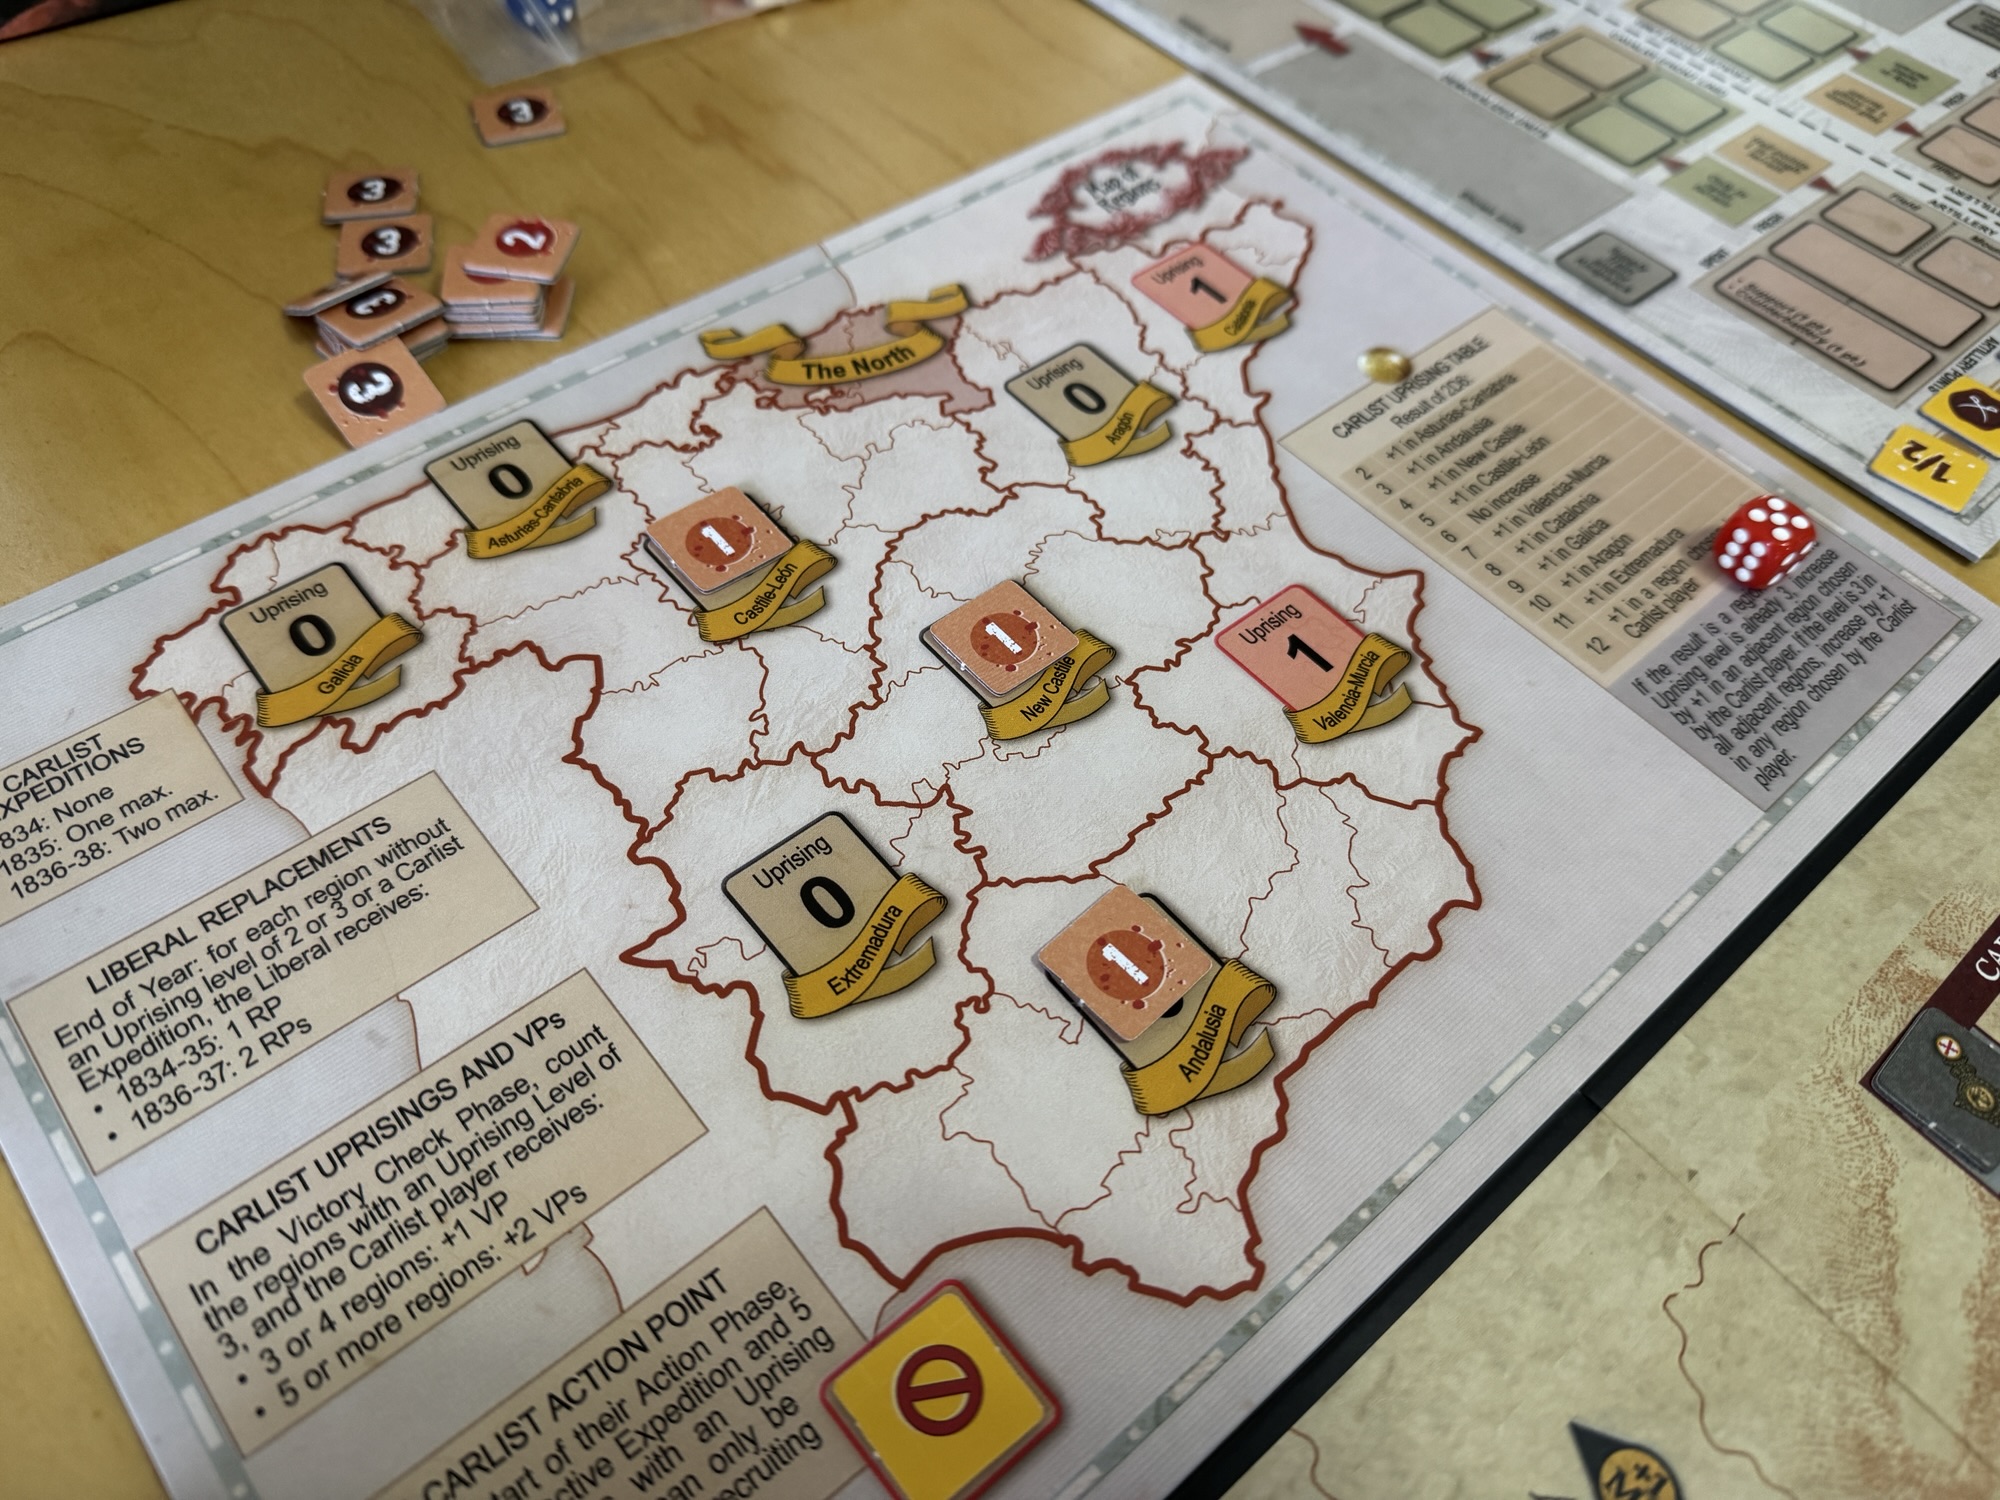
An Impossible War: The First Carlist War in the North, 1834-1838 from Bellica Third Generation is a block wargame that recreates the First Carlist War in the North of Spain which was a civil war between the Carlists who supported the succession of the late king’s brother Carlos de Borbón and the progressive and centralist supporters of the regent Maria Christina acting for Isabella II of Spain who were referred to as the Liberals. The game uses blocks representing units but also includes counters and uses cards. I was able to play the game about a month or so ago with Francisco Ronco who owns the publishing company Bellica Third Generation and very much enjoyed the game and how it represented this interesting struggle.
In Action Point 1, we took a look at the Game Map, discussing the point-to-point movement configuration, the various spaces and the delineation of the Carlist versus the Liberal Zones, as well as explained the use of the Rest of Spain smaller map. In Action Point 2, we examined the units available to both sides and covered the importance of Supply. In Action Point 3, we took a closer look at the Carlist Uprising Phase and what it means for the game. In this Action Point, we will take a look at the activation system and the use of Action Point Markers.
Activation System
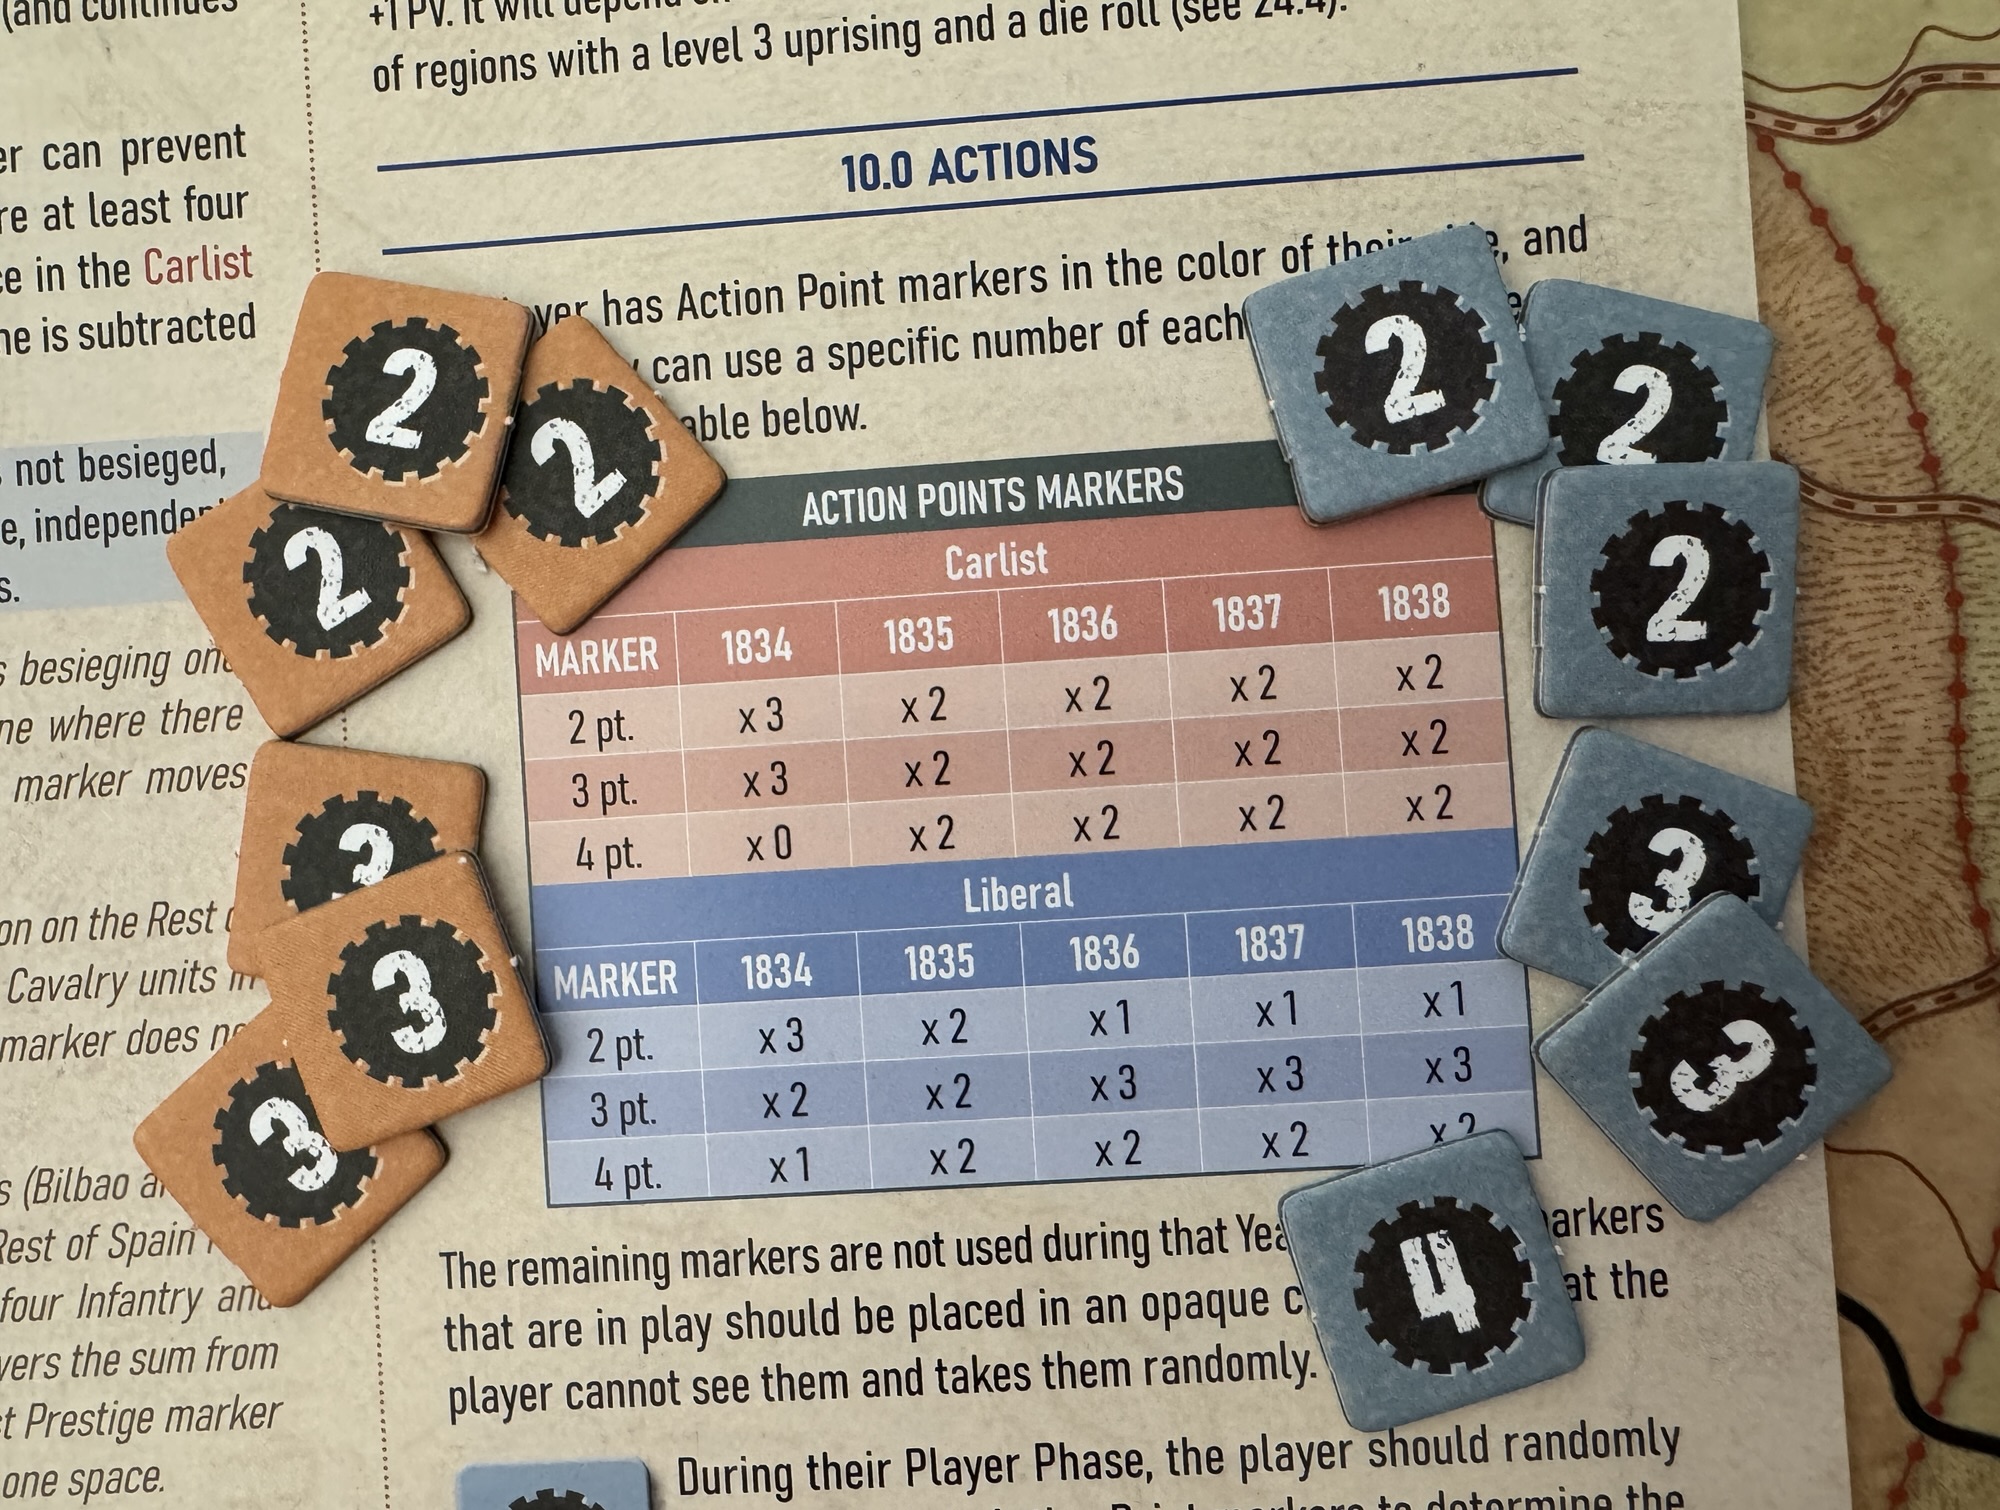
The main focus of the activation of units is the concept of Action Points. These Action Points are used to take various actions such as to activate units for movement, build fortresses, destroy enemy fortresses, obtain replacements, recruit units into Expeditions, suppress uprisings and enter into combat as a part of activation for movement. Both the Carlist and Liberal player has Action Point Markers in the color of their side and each year they can use a specific number of each value of marker. This is determined at the outset of each year according to the Action Point Marker Table.
After the number of Action Point Markers used is determined, the players will each build a chit draw cup for their own Action Point Markers. This should be an opaque container that obscures the identity of each marker as the draw is supposed to be random and is really part of the fun of the design. Then at the start of their Activation Phase, the player will randomly draw an Action Point Marker and then mark their Action Point Track accordingly. As already mentioned, these Action Points are the “fuel” spent to perform actions.
As you can see in the chart above, each year the players both have access to the same amount of overall Action Point Markers with 6 but the makeup of these markers will be different ranging from 2 points to a maximum of 4 points. For example, in 1834 the Carlist player will have three 2-point markers and three 3 point markers while the Liberal player will have access to three 2-point markers, two 3-point markers and one 4-point marker. This is an interesting point as the Liberal player has the potential to obtain more Action Points in 4 of the 5 years covered in the game. This is random of course and fate can decide that the Carlist player will get the most Action Points each year but the potential is there for the Liberal player to have the advantage.
As mentioned, these Action Points are the currency used to take various actions and in most instances they will be used to Activate units on the board. Activated units can then move and their movement allowance will depend on how many units move together and the roads used, either main or secondary.
But one of the more interesting ways that Action Points can be used is to convert them into Command Points. The player may choose to convert as many Action Points as desired each year into Command Points, noting them on the Command Points Track. A player may have no more than 5 Command Points. Command Points are flexible currency that will not be lost and can then be used to contest initiative, as Action Points or even to attempt an interception of enemy units. These Command Points are vital and should be something that players invest into as they are very flexible and also allow for the taking of actions during the other players activation. I like the way the game uses this random activation concept and currency for those actions. In reading the designer notes in the Playbook, the designer David Gómez Relloso emphasized the fact that the war was brutal, difficult and that communication and distribution of orders was very difficult, particularly for the Liberals as they were operating in hostile territory where the locals continually harassed and denied them of provender as they would flee taking their livestock with them to keep them out of enemy hands. This random number of Action Points, and thereby a varied number of points to do things with on the board, really is central to the design and can make for a very interesting challenge for those that are unlucky like me. While the differences in the values of the Action Points are not that far apart, a few extra or less than your opponent can cause great difficulty as you will simply not be able to perform what you need to each turn. This boils down to a prioritization of goals and will lead to some very tough decision having to be made about activating units versus recruitment of new units or focusing on the game board state versus the state of the Rest of Spain Map and the Carlist Uprisings and Expeditions.
I also was able to shoot a fairly short video summary of my game play with Francisco Ronco who is the owner of Bellica Third Generation and you can watch that at the following link:
In Action Point 5, which is the conclusion to the series, we will cover some examples of Battle, focusing on the tactical aspect of combat with the use of the Battlefield Board, as well as an example of a Siege.
I know it is now June….I am usually done with this post by mid-March but this year we had a bunch of great games that came out in November and December and we just had to get several of them to the table before we shut 2025 down. Our opportunity to do so with full tables as there were several multi-player games in that bunch, was during Buckeye Game Fest in mid-March where we played lots of great games including Werwolf: Insurgency in Occupied Germany, 1945-1948 from Legion Wargames, Cross Bronx Expressway from GMT Games and Imperial Elegy: The Road to the Great War 1850-1920 from VUCA Simulations to name just a few. And now, with those final games getting played, comes the impossible task of distilling an entire year’s worth of gaming down to a list of the 10 games that we most enjoyed. I hate doing this. I love writing about, thinking about and sharing my experiences about the games we have played but hate having to make somewhat objective choices about which is better and which games should even be considered for the list. The first comment I would have is that not all games are the same. Not the same scale, the same play time, the same mechanically or even historically. Each game is unique and in my opinion, all games have something objectively good about them. Secondly, we didn’t get around to playing some of the new releases in 2025. I say some but we actually didn’t play a lot of the new releases and did the best that we could to play as many as possible. So we might leave off a game that you thought was very good and deserving and it probably is but we either didn’t get around to playing it or it just didn’t hit with us. But, in the end, I have to make this list and this is my best effort at doing just that!
In 2025, we played 33 unique titles from 22 different publishers. Some were operational, strategic or tactical scale and in the list this year I didn’t include any solitaire games. Some used counters. Some used cards. Some used wooden bits and some used miniatures. Some were only card games with no other components and some were cooperative. At the end of the day, in 2025 we played a lot of games! And here I present to you my list of the Top 10 Wargames of 2025!
10. China’s War: 1937-1941 from GMT Games
This is a game that I have been awaiting for a long, long time. Really since it was announced nearly 7 years ago in 2019. Yes you read that right…2019! And I am happy to report that the wait was definitely worth it as the game feels fresh and is a very worthy addition to the COIN Series. China’s War: 1937-1941 from GMT Games, which is volume 13 in the well respected and venerable COIN Series, examines the first five years of the 2nd Sino-Japanese conflict, when China stood alone against the whole of the Japanese Empire. Each player takes on the role of 1 of 4 Factions seeking to attack or defend the Republic of China including the aggressive and powerful Japanese, the harried Government represented by the Guomindang party, the rebellious Chinese Communist Party, or the unruly and fractious Warlords who are obedient when convenient but have their eye on gaining state power. Using military, political, and economic actions and exploiting various events, players will build and maneuver forces to influence or control the population, extract resources, or otherwise achieve their Faction’s goals and victory conditions. As with all COIN Series games that are Card Assisted rather than Card Driven Games, the deck of cards will regulate turn order, inject historical events into the game with major benefits or consequences, cause victory checks and other in game processes.
China’s War feels like a classic COIN Series game but in my opinion has 3 insurgent style factions against the powerful Japanese who don’t really act like the large Government factions in previous entries in the series. The focus really centers on the control of the Lines of Communication or LoC’s on the game board, which was a very refreshing approach that created some really interesting interplay and caused me to think differently about how I would go about achieving my Victory Conditions.
We find that Brian Train’s designs are just fantastic. I think that sometimes they can be a bit opaque, meaning that their true genius cannot be seen with just a few plays but will be unlocked over 4 or 5 plays as we have found with A Distant Plain, which has continually moved up on my list of favorite COIN Series games with each play that now numbers around 5. But China’s War was just special. It is totally unique as to its take on insurgency within the COIN Series, is really frenetic and active and gives the feeling of classic COIN while really turning things a bit upside down with the way the powerful faction works in the Japanese as they really only care about maintaining and cleaning off their Lines of Communication. In fact, they are so unique that they are the faction that will place Terror on the board, which is typically reserved for the insurgent factions to sway Support and Opposition.
We very much enjoyed the game and had a good time with it. We had a newer COIN Series player and they seemed to take to the game quickly and understood what it was that they were supposed to be doing. With that being said, with only the 1 play, I am sure that there are lots of things that we didn’t experience and will be able to discover those in future gaming opportunities. Suffice it to say that we can’t wait to play the game again and I am planning to bring this one along with me to the World Boardgaming Championships at the end of July.
We recently shot a First Impression/review video and you can watch that at the following link:
9. Imperial Elegy: The Road to the Great War 1850-1920 from VUCA Simulations
This spring, while attending Buckeye Game Fest in Columbus, Ohio, we were able to coordinate a 6-player game of Imperial Elegy: The Road to the Great War 1850-1920 from VUCA Simulations. Imperial Elegy is a card driven game that blends diplomacy, warfare, and statecraft and feels a bit akin to games like Here I Stand and Virgin Queen from GMT Games. Grand scale sweeping epics that play multiplayers and take a day to play. Players play as 1 of 6 unique major powers in the game including Germany/Prussia, the United Kingdom, France, Austria-Hungary, Russia and the Ottoman Empire.
Imperial Elegy is a fantastically themed game that takes place over 7 turns, with each of the turns representing approximately a decade. If the Great War breaks out due to the World Tension Track reaching a certain level, the game can be extended by an additional 6 shorter turns. A turn in the game consists of player impulses that is driven by the play of action cards for their Command Points or for the printed events. Players will use CP and events to take actions like colonize, conduct diplomacy with minor nations, fight wars, as well as hinder their opponents by playing events that take away their actions or resources. A turn will end once all players have consecutively passed or when all players run out of cards.
The game is somewhat of a sandbox style game as you have so many options and choices about what to do during the course of the game. Obviously, your faction has some direction about what you should be doing but really it is up the player to spend their resources how they will to accomplish their ultimate goals and score Victory Points. I truly love that aspect about this game and as we played we saw that sandbox and the asymmetry between the various factions. Particularly at the start, each country has some specific goals that they have drawn from the National Goals Deck that are a source of Victory Points, in fact a major source of Victory Points, and players will need to prioritize these cards and decide which ones to attempt to go after from the start. With only 7 turns, they will have to make progress on these National Goals if they have any hope of actually achieving them.
Each of the represented nations in the game have their own special player board that contains various tracks that keep various information readily available to the players. Here is a look at the German player board. I very much enjoyed that they have gone to a great deal of effort to make these player boards and also that they gave each of the nation’s Stability, which decides whether various actions like war can be taken or if there are various positive or negative modifiers, the available Manpower that will determine how many armies can be built, Industry that tells how many action pointed you will have to spend during war to maneuver units, attack and replace losses. The focus of the game is about the control of territories both in Europe as well as colonies abroad and there is an automatic victory if a certain target number is met, in the case of Germany 15.
As we played, I started to realize that the key focus of the overall world stability and things like the Domestic Stability Tracks, which are focused of both the internal and external pressures faced by the powers. I really very much liked this thematic inclusion as no one wants to start a major global conflagration and there are steps that players have to take to skirt the inevitable troubles that result in their own actions and how they are seen by the other players in the game. But in our limited play, I never really felt threatened by this concept. Either our group was super skilled at avoiding the inevitable increase in tension or due to our short play we didn’t really experience some of the events that would have tipped this over the edge. I think that we say small increases in our full turn play but nothing that seemed unmanageable and we actually had an event that lowered it so it never became an issue. The game is about spending your resources wisely, in the form of your cards and your aspects like Stability, and to use your cards to do the events that could increase tension didn’t seem to be in our best interest, at least not in the 1st decade of the game. But maybe that will come later.
8. An Impossible War: The First Carlist War in the North, 1834-1838 from Bellica Third Generation
Earlier this year, I was able to host Francisco Ronco at my home to play a few games together. One of the games we played was published by his company Bellica Third Generation and was called An Impossible War. An Impossible War: The First Carlist War in the North, 1834-1838 is a block wargame that recreates the First Carlist War in the North of Spain which was a civil war between the Carlists who supported the succession of the late king’s brother Carlos de Borbón and the progressive and centralist supporters of the regent Maria Christina acting for Isabella II of Spain who were referred to as the Liberals. The game uses blocks representing units but also includes counters and uses cards.
An Impossible War is a fantastic design that attempts to capture the historical aspects of this titanic struggle for the throne of Spain in the mid 19th century. Historically, the Carlist forces who were defenders of traditional monarchy, regional privileges, and the Catholic Church, were a minority faction fighting an overwhelmingly larger, richer liberal government. The uprising phase reflects how the Carlists compensated for this disparity by forcing the Liberal government to fight on multiple fronts and suffer from logistical nightmares across hostile terrain. The Carlist Uprising Phase, and the use of its auxiliary Rest of Spain regional map, forces some really tough dilemmas on the Liberal player. They must attempt to divide their forces between the main Game Map and the Rest of Spain Map to prevent the opposition Carlist forces from overwhelming the home territory in the north. It serves as a vital strategic balancing act for the Liberal player that cannot be ignored and must be dealt with systematically and somewhat evenly. Too much focus on the Rest of Spain Map and the situation on the Game Map will quickly snowball and they will lose control. Focus on the situation on the Game Map and the protection of Cities and Towns and the Carlist Expeditions will gain momentum and turn the countryside red. While the primary war centers on the rugged terrain of northern Spain (Navarre and the Basque Provinces), the uprising mechanic abstractly models scattered insurgencies across the rest of the country. And as you know, insurgencies can be very unpredictable and difficult to contain. You stamp out one area only to see a fire start in another. The Liberal player must divert troops and supply resources to the secondary map to quell these localized rebellions and hunt down Carlist expeditions originating from the north. And, the important thing for the Carlist player and the expansion of the uprisings and the success of their expeditions is the possible generation of generation of Prestige and Victory Points, which is really crucial to their path to victory.
I very much enjoyed the asymmetry between the Carlist and Liberal forces in the game. It made for a very interesting tactical challenge for both sides as they have to play to their strengths and not get too overly concerned with the numbers. The Carlists will be much more mobile in their defense and look to exploit every gap in a supply line to move around and stay away from the numerically superior Liberal forces, whereas the Liberal player will have to move more methodically to take outlying towns and settlements to be able to shore up their lines and create less opportunities for end arounds by the Carlists. The disparity in the forces was a very interesting choice by the designer David Gómez Relloso and I am sure is reflective of the historical reality of the First Carlist War.
I very much enjoyed An Impossible War, even though I played just a few turns of a smaller scenario with Francisco Ronco. He was a master at the game, as obviously as the publisher and a playtester he is intimately familiar with the rules and strategies, and I learned a lot from him about how the game should be played. I am looking forward to future plays as the game is just very good and has some interesting aspects that create a very tense and interesting game of maneuver and strategy. The Game Map is very well done, from an aesthetic perspective as well as functionally, and the board makes playing the game easier.
I also was able to shoot a fairly short video summary of my game play with Francisco Ronco who is the owner of Bellica Third Generation and you can watch that at the following link:
Also I have embarked on a series of written Action Point post highlighting the various aspects of the game. Those published to date are as follows:
If you are interested in An Impossible War: The First Carlist War in the North, 1834-1838, you can purchase a copy for 120,00 € ($139.08 in US Dollars) from the Bellica Third Generation website at the following link: https://bellica3g.com/en/product/una-guerra-imposible/
7. Blue & Gray Deluxe Edition from Decision Games
If you like classic wargames, and by that I mean simple I Go You Go Hex and Counter games from the 70’s and 80’s, then you are going to love Blue & Gray Deluxe Edition, which is a new updated version of 2 classic quadrigames from SPI covering several key battles from the American Civil War. Blue & Gray Deluxe Edition consists of the original eight games from the SPI Blue & Gray I & II Quadrigames but with massively upgraded components and counters and some better written rules. The key battles depicted are among the most important of the American Civil War and include Shiloh, Antietam, Fredericksburg, Chancellorsville, Gettysburg, Chickamauga, Chattanooga and The Battle of the Wilderness.
The Deluxe Edition part of the title is really just a few changes including a mounted board that is really gorgeous and pretty sturdy. The counters have been slightly enlarged and there are a few additional optional rules including things like night turns, fatigue, leader casualties. There also were some optional unit counters that could be used but overall this was an artist and layout reissue of the game with some other nice additions such as period fonts and a very solid choice of colors for the maps and the counters as they really compliment each other well. But the game is really extremely playable meaning that is doesn’t take long to pick up the rules and the system is very standard fair. The game mechanics used are based on the Borodino/Napoleon at Waterloo system and frankly are very easy to grock and to get into. I did very much like the back and forth of the scenarios as the players will tend to clash over control of certain key areas that have defensible terrain and that are only approachable from a few areas. But the game does have a few concerns for me such as generally no fog of war and no difficulty in activating any and all of your stacks. But that is what the system is and it will truly appeal to those that are looking for that nostalgic feeling from their childhoods.
But it plays well, fast and is solid and any good solid wargame is good with me.
6. Fighting Formations: US 29th Infantry Division from GMT Games
One of my favorite tactical systems of all time is Combat Commander designed by the late Chad Jensen. I had yet to play his other tactical combined-arms series called Fighting Formations until the newest release came out in 2025 called Fighting Formations: US 29th Infantry Division. Fighting Formations is intended to be an ongoing series of wargames covering WWII tactical combined-arms combat at the platoon and squad levels. Each game in the series will feature a distinct combat unit, highlighting battles in which that unit participated as well as its particular order of battle and fighting characteristics. In this second volume of Fighting Formations, GMT features the US 29th Infantry Division—“Blue and Gray”—as it fought from just after D-Day in June of 1944 to the end of the year.
The core mechanics from the original Fighting Formations remain unchanged in this volume. The difference from the original game is in the way the units will fight. The different costs on the matrix place an emphasis on certain actions and assets for the 29th ID that were different than the others games way of approaching a battle. This game is far from Combat Commander though as it uses cards but they are not the engine of the game. The game also has a very interesting and unique activation system where each of the orders cost a different amount of Initiative and tuns into and impulse-type back and forth where the various Orders carry with them a certain cost in Initiative. The game has a pool of 40 Initiative that is spent to give these orders and then to activate units for those orders. At the end of every order, the player with the most Initiative is able to give the next order. In response, the opponent can also spend Initiative to conduct both Opportunity Fire or Reactive Fire which keeps the game very dynamic and fluid. Just a really great way to approach this and if you have played Downfall from GMT Games you will notice similarities with the system.
The game also tells a great narrative of the differences between the US and German troops as the 29th had access to more battlefield support than their German counterparts and the card deck is tailored to that experience as well. The US player in the new game has access to more cards and at lower initiative costs, bringing artillery and air support to the forefront in a way that we have not seen before.
We did a RAW video after our 1st play and you can watch that at the following link:
The Rock of Chickamauga is the 2nd entry in the Black Swan Series from Flying Pig Games designed by Hermann Luttmann and follows closely on the heels of A Most Fearful Sacrifice. Using the same game system, which is based on the well received Blind Sword Series, The Rock of Chickamauga covers the entire Battle of Chickamauga, fought from September 18th through the 20th, 1863 in northern Georgia. The Union Army of the Cumberland, under William Rosecrans, is driving south from Chattanooga, hoping to envelop and trap Braxton Bragg’s Confederate Army of Tennessee. But Bragg anticipates the maneuver, pulls back and then counterattacks the overextended Union forces. They meet along Chickamauga Creek, nicknamed the “River of Death”, in an epic struggle.
The Black Swan Series uses a card-draw activation system that functions similarly to a traditional chit-pull system. This system is a core mechanic for introducing uncertainty, friction, and the fog of war into the gameplay. The cards themselves contain specific game information and orders, which streamlines play and reduces the need to look up rules or charts, saving time compared to traditional chit-pull systems.
I also very much liked how the confusion and true fog of war that existed at the battlefield was included in the game play. Not only do to the commanders’ lack precise information about their opponent but also the physical nature of the battlefield. Both sides basically went into battle stumbling and bumbling through the woods, searching out what they thought was the enemy’s flank and actually being way off in their assumptions. The woods themselves were so uniquely characteristic in that they were mostly thickly grouped with little undergrowth (being cleared by the local farmers and millers), but still displaying significant canopies. This canopy functioned like a tropical jungle “roof” and trapped smoke and dust within it. To add to that, there had been little rain in the area and the trails, lanes, and roads were exceedingly dry and produced clouds of dust. My main concern therefore was replicating all that confusion and ignorance of the location of opposing forces and thankfully, that’s what the entire Blind Swords/Black Swan System is modeled to reflect. Therefore, I just doubled-down on the inherent “chaos” elements of the core system and made those factors even more prevalent.
I also love how the system models the units and their fighting prowess referred to as Cohesion. The Cohesion Rating of a unit is essentially a catch-all for its morale, training and experience and includes what the unit’s intangible fighting qualities are, other than just sheer number of men. It is probably the most important aspect of the game engine as it is the key element that will determine how well a unit will fight – and survive – during the battle. It is used throughout the game to measure a unit’s ability to fight and endure on the battlefield. The CR will fluctuate during the entire game, and it will do so often. Units that are Shaken or Battleworn will have their CR suffer. Units can also raise their CR temporarily through the use of various events or by providing them with Unit Support. A low CR makes units more vulnerable and increases their risk during a Break Test, which will cause them to leave the game if they fail. You have to focus on this aspect or you will be unable to consistently move your attacks forward.
Just such a great system and I love Hermann’s attention to the historical details and the way he tells these ACW stories. I love this Black Swan Series and look forward to future volumes.
4. BCS Inflection Point: The Battle for Kalach and the Battle of Chir from Multi-Man Publishing
Over the past couple years, we have played a few venerated and respected series games from Multi-Man Publishing for the first time that frankly I had initially turned my nose up at for various reasons. These reasons were not really anything important or truly about the design or mechanics but included things like price, graphic design, style and somewhat because of the complexity and reputation of complexity of those systems. These series included first the Standard Combat Series (SCS) with our first game being Rostov ’41 and now the Battalion Combat Series (BCS) with our first game being Arracourt and since we have played several other volumes including Brazen Chariots and Baptism by Fire. I must admit here that I am actually embarrassed that I hadn’t played those series and readily admit that I just discounted and dismissed them out of hand. I am so very glad that we repented of our stubbornness and found this system because it really is very, very good at what it is trying to teach and demonstrate about warfare at this scale.
One of the best parts about this new volume in the series is that it is actually 2 games in the same box. One game which is smaller, with fewer counters and formations and that uses a smaller version of the board included in the game and one that is the full campaign with more counters and formations, a larger board and is much more involved. Overall, I would say that the BCS is a fairly straightforward series even for someone who is a beginner and has less experience with the BCS system like me. I think that I thought they were designing Arracourt as the entry to the series, and I still think that is the case, but this volume has some of the same flexibility and approachability that some of the larger titles don’t necessarily have. I feel that players can cut their teeth on this one using the smaller scenario while getting comfortable with the rules and system before you attempt the larger scenarior or even other larger games in the series. I also feel that the game requires somewhat of a paradigm shift before playing. What I mean by that is really two fold.
First, I really feel that usually these big hex and counter wargames are set in their combat methods, namely focused on odds based Combat Results Tables and counting up combat factors to get the perfect odds, and require a bit of calculation. But BCS doesn’t use a traditional CRT but breaks the combat down into more of a collection of DRM’s based on many factors.
Second, the game also has very low counter density, with the scenario we played having about 40 counters per side on the map at any given time, and stacking limits are just 2 combat units with other counters also allowed such as support units or HQ’s. There are not enough counters here to create the long contiguous line or wall of units that are typical in some of the larger systems, which lends this one to a bit more maneuvering of units to get into good position while using terrain to attempt to isolate and cut off units from supply or to prevent the enemy from doing the same to your units. This created somewhat of a back and forth dance for us that kept my focus and attention and was really quite entertaining. Supply is important to the system but not as focused on it as say the Operational Combat Series (OCS). The players must manage their HQ’s and their combat trains to keep their units in full supply and this becomes somewhat of a different type of dance that sees players cautiously keeping their units in a loose perimeter to prevent a freak breakthrough or run around to get to the back of the formations to take out supply sources and cut off units. I really liked the scale and feeling of this BCS system and had a very good time in trying to learn and understand it and also trying to figure out the best strategies to engage.
The counters included in BCS Inflection Point are dual sided but the back side is not to show a reduced unit as is normal with these wargames. The front side is the unit’s move side while the back side is its deployed side. Each of these stances is very important and must be used by each player to get the most out of their units and to take it to their opponent.
We also did a review video and you can watch that at the following link:
If you are interested in BCS Inflection Point: The Battle for Kalach and the Battle of Chir, you can order a copy for $112.00 from the Multi-Man Publishing website at the following link: https://mmpgamers.com/inflection-point-p-418
3. Close Quarter Battles: Waterloo from Lock ‘n Load Publishing
Close Quarter Battles: Waterloo was such a surprise of the year for us. It is a tactical level wargame that is truly intense and chaotic that attempts to, and does a fantastic job of accomplishing, the brutal, up-close engagements of Napoleonic warfare. The game puts players in command of elite British, French, or Prussian forces as they fight for control of key battlefield positions. The designer has chosen to center on the two strongpoints of the battle of Waterloo including the La Haye Sainte farm and the Hougoumont Farm. First off, the game is just gorgeous and the maps are stunning. In fact, they are so good that I am going to highlight them in an upcoming entry on the blog in the Beautiful Boards of Wargaming Series. But, the Waterloo battles here are skirmishes around and for the taking of these two farms. The game uses a grand tactical system that works to attempt to to simulate the interactions between infantry skirmishers of small groups, artillery sections and cavalry in a fortified area. This leads to the game being uber violent and bloody as assaults are common but difficult particularly for the attackers who will have to scale formidable walls and then take on the awaiting crack troops inside. Officers and generals are very important to the battle as they will influence the battlefield with their command range and other attributes to add DRM’s to the troops by issuing orders, rallying troops, and trying their best to maintain discipline.
I really like this one as it is really a game. Meaning that the rules are simple yet impactful and the game provides each of the players with a deck of cards that act as events to provide bonuses, allow for greater movement distance or to perform heroic acts. They also provide the chance to attack and eliminate leaders with sniper fire to cause even further chaos and blood.
We did a review video and you can watch that at the following link:
2. All Are Brothers: Solferino, 1859 from Legion Wargames
We very much enjoy the Blind Swords Series originally designed by Hermann Luttmann. We love it for its chaos, unpredictability and for is crunchy combat system. This past year, a new designer Bryan Armor took up the call and took this Blind Swords System and put it into action in the Second Italian War of Independence. All Are Brothers: Solferino, 1859 simulates the decisive battle of the Second Italian War of Independence at the Brigade-level, with some additional Regimental-size and smaller detachments included.
And the other part that is so good about this system and the game itself is the activation chit pull system. The chit pull mechanic also very much aids in solitaire play, as does variable activation rules and reinforcement tables but it really makes for a lot of uncertainty about how and what units will activate. No battle is in your full control and this system really reinforces that truth about the battlefield.
One of the best parts is the morale system. Each corps has an associated Corps Morale marker on the Morale Track. Each Corps Morale marker will be reduced by one when they activate including movement and fire attacks but also when Leaders take casualties or break tests are failed. This can all lead to the corps becoming demoralized which means they will be unable to offensively move and attack and will be relegated to a defensive posture. So you really have to make good choices about what units and when they will activate. You cannot just wholesale activate each formation every turn but must look at their status to decide how best to manage this aspect that was a very interesting and nice addition to an all ready proven and very good system. This means that units are also prone to attrition and need to be covered or supported by artillery fire. They can be used most effectively if massed at certain points. The chits also effected the corps’ stance switching between aggressive or defensive and this is a choice that must be made with a full understanding of a plan of attack.
Just a very solid and playable game that felt like a big wargame that played fairly quickly and easily and didn’t get bogged down too much.
We did a review video and you can watch that at the following link:
If you are interested in All Are Brothers: Solferino, 1859, you can order a copy for $58.00 from the Legion Wargames website at the following link: https://www.legionwargames.com/legion_AAB.html
1. Congress of Vienna from GMT Games
I am a big fan of the Great Statesman Series from GMT Games and several of its volumes including Churchill and Pericles are among my favorite wargames. But Congress of Vienna is a really great game, probably the best of the bunch, and has matured the system laid out by its found Mark Herman. Congress of Vienna has two different but related phases including the conference table where players first debate over the control of issues germane to the factions and the period of the war and second these issues are then used on the battlefield to recruit units, attack and take overall command of battles. The players will be playing cards from their hands to “debate” over the various issues that were placed on the table, which include all types of things such as Military Operations, Recruitment, who will lead the combined Coalition forces (Generalissimo), Future of French Government, British Financial Aid, Liberalism vs. Absolutism, Austrian Neutrality and several other issues, and then later the players will use their accumulated Resources gained from the issues to enact action on the Military Map and do things like mobilize troops, place Military Support Markers and the ultimately to conduct warfare.
The interesting thing about this mechanic is that sometimes the other players will win your issues by having them rest on their side of the conference table at the conclusion of the phase. In this case, the winning player will gain control of that issue and then will get the opportunity to choose where the issues will be placed on the Military Map, but the owner of the issue will still pay for it and must do where the placement is telling them to do, such as attack on a certain front. There also is a small area on the board where the Russian player must turn their effort to fight in Asia. This action has no real in game effect or benefit other than causing Russia to lose the choice of what they wanted to do in favor of doing something else. This can be a great tactic for the French player, or even for other Coalition players to spoil the plans of the Russian player and possibly box them out of gaining VP for military victories on various tracks.
The game relies on cards and cards can be used to negotiate, i.e. move an issue to your National Track. Cards can provide a particular issue with positive and negative DRM’s depending on which nation plays them and can also be traded with another player during the Diplomacy Phase. Certain cards are better than others for debating an issue moved by another player; and finally, if they are saved for the War Phase, staff cards can be used to modify dice rolling in battles. These are very versatile cards and the players will have to learn them and their benefits in order to be effective at the game.
But even though the game relies on cards and has an important Diplomacy Phase, without a doubt CoV is a wargame with DRM’s for units and military leaders, terrain, military support, a Casualties Table, retreat and advancing after battle, etc. However, both Phases are inversely related and if players use their Character Cards in the form of generals and military leaders for the Diplomacy Phase you will not have them available for the Military Phase. If you do not win enough issues during the Diplomacy Phase, you will not have recruiting or military operations where they are most important to your power.
I would say that the game is very involved and will take a few plays to really get comfortable with. I don’t want anyone to take this to mean that the game is overly complex and difficult to play. That is not the case. It is a very approachable system and game once you get the basics down through the play of a few turns. I would also say that there is a ton of differences and asymmetry with the nations and learning all of them well and understanding their tactics will take some time. But that is a good thing in my opinion and means that there is depth to the game and replayabilty is huge. And in my opinion, this was the best game that I played from 2025. Just fantastic!
Each year I feel compelled to tack on some games to this list just because they were so very interesting or dealt with unique settings that I feel they are worthy of mentioning. While they didn’t make the Top 10 list, they are each good games in their own right.
Alliance: Multi-Player Napoleonic Wargame from Columbia Games
All in all, we had a great time with Alliance. I think that we felt that the game was solid, with some great mechanics such as the card play and the block combat system, but was just missing some things. I would like to see what the community comes up with as far as variants and other changes over the next year. But the game delivers on its promise of a sandbox strategic level Napoleonic wargame with a focus on alliance building and maintenance. There is a lot to like and we plan to play this one again.
We also did a full video review and you can watch that at the following link:
If you are interested in Alliance: Multi-Player Napoleonic Wargame, you can order a copy for $99.98 from the Columbia Games website at the following link: https://secure.columbiagames.com/products/3221
Werwolf: Insurgency in Occupied Germany, 1945-1948 from Legion Wargames
Werwolf: Insurgency in Occupied Germany, 1945-1948 is a COIN Series adjacent game designed by Clint Warren-Davey and Benjamin Feine and is an alternate history game, but the story that is presented is entirely plausible. Werwolf was a real underground guerrilla group, comprised of SS and Hitler Youth members. It was intended to lead an insurgency against the invading Allies and Soviets when it became clear that Germany was losing the war in a conventional sense in the mid-1940’s. They did in fact have a few successes and American intelligence officer Frank Manuel said that the Werwolves were prepared “to strike down the isolated soldier in his jeep, the MP on patrol, the fool who goes a-courting after dark, the Yankee braggart who takes a back road.” The game allows players to take on the role of the occupying Soviets and Western Allies along with this Werwolf insurgency and the Edelweiss insurgency.
This game was very good and frankly was a breath of fresh air in the COIN Series or COIN Series adjacent arena. This game was very kinetic and each faction had a ton of combat and had to engage each other to accomplish their goals. The cards were fantastic and the additions to the system such as Research Tokens, Heavy Weapons in the form of leftover tanks, Wunder-waffen and the Cold War Tension Track, were really fresh and well integrated into the game play. I loved the game and would play it again in a heart beat!
If you are interested in Werwolf: Insurgency in Occupied Germany, 1945-1948, you can order a copy for $106.00 from the Legion Wargames website at the following link: https://www.legionwargames.com/legion_WER.html
Verdun from Dragon Dawn Productions
Verdun is a card game that is focused on the famous siege of Verdun during World War I. As player’s hands dwindle down as they play 2 cards per round but only draw 1, players will also have to play cards that help the other side, timing it strategically to minimize their own casualties. The teams alternate being the Attacker, and each card played leads to more and more deaths. You are fighting over positive victory points from trying to win several positions through over the top attacks that are worth a set amount of VP but that are hidden from view until they are taken so you never know if you are going for the high VP area or the low ones until you blow the whistle to initiate the attack.
A game of Verdun lasts about 16 rounds as players start with 12 cards, which they then play in a series of 12 tricks. When you win the trick, you gain the VP for the position but the winner will lose their lowest valued cards while the loser will lose their highest value cards to the dead pile representing mounting casualties. Low cards have fewer skulls on them representing deaths while higher cards have more. So even in victory you will be accumulating negative VP’s and this is one of the key aspects of the game…managing those deaths! Just like the high command.
In the end, the player with the highest score will win and this number will be very low or can even be negative. In our play of the game, my French defeated Alexander’s Germans by a final score of 3 VP to -14 VP. What a great little trick taking game! The really interesting part about the late game is that your hand has dwindled to being full of your worst cards as you have most likely used the good cards earlier to win tricks or cause losses to your opponent. The last few card plays just seem brutal and you are just hoping to not have to take a lot of skulls. This felt very fruitless and mimics the despair of commanders as they had to issue orders that they knew were not going to result in any positive gains but only the loss of life.
We did a full video review and you can watch that at the following link:
Drop Zone: Southern France from Worthington Publishing
Drop Zone: Southern France is a company-level wargame covering the Allied airborne assault that spearheaded Operation Dragoon, which was the invasion of Southern France or the Second D-Day on August 15, 1944. The history behind this operation is really very interesting as early on the morning of D-Day, the allied First Airborne Task Force (1st ABTF) parachuted a dozen miles behind the Riviera landing beaches to seize key towns and road junctions, to prevent the German occupation forces from counter-attacking the amphibious landing, and to facilitate the advance of Allied forces. The 4:00 AM parachute drop was badly scattered due to an unexpected dense fog bank that blanketed the battlefield. Drop Zone: Southern France covers the first two days of this airborne operation in six game turns, when the American and British paratroopers and glider-men fought surrounded and alone, supported only by French resistance bands. This game is very good and is just a solid wargame.
This game is surprisingly good and we had a great time playing it! There are just so many interesting elements to consider including the various operations, objectives and paths to take for the Allies to attempt to capture their objectives as planned. We found the game to be imminently playable and were very pleased with the strategy and planning required to do well. This one is a winner and I would recommend it highly as an introductory wargame that plays in 90-120 minutes but gives some real meat to chew on.
We did a full video review and you can watch that at the following link:
Chicago ’68 pits revolutionary spectacle against civil order at the Democratic National Convention riots of 1968. Players take the role of either the Establishment, consisting of the Chicago PD and Mayor Daley, or the Demonstrators, including the Yippies and MOBE, and is a fast-paced game of street battles and political maneuvers.
Each side plays from two asymmetric decks of action cards. The Establishment positions tactical forces and police platoons to co-ordinate mass arrests while working the convention floor. The Demonstrators, on the other hand, can pivot from direct clashes to radical street theater; their tactics can be reactive and unpredictable, allowing for wild cat-and-mouse chases and mischief-making across the tear-gassed avenues of downtown Chicago.
This game is an area control/area influence game that uses cards to take a predetermined set of actions that can be upgraded and replayed with better actions as the game progresses. Each player will fight for control of the delegates to the convention as well as exposure to the nation through the media. Just a very well designed game that was a ton of fun to play.
There I am finally done. My list of the Top 10 Wargames published in 2025. I had fun playing them and putting this list together as I got to revisit each of the games and think about why they were included on this list.
Please let me know what your top games of the year were and what you think of my choices and what games you would have placed on such a list.
With this My Favorite Wargame Cards Series, I hope to take a look at a specific card from the various wargames that I have played and share how it is used in the game. I am not a strategist and frankly I am not that good at games but I do understand how things should work and be used in games. With that being said, here is the next entry in this series.
#81: Baron von Steuben Trains the Continental Army from Washington’s War from GMT Games
Washington’s War is a war game, make no mistake about that. But, it is virtually impossible to win the game by focusing only on the field of battle. For that to happen, the Patriots need to completely drive the British forces out of the 13 colonies or the British need to wipe the American forces off the map. Both are extremely difficult and I would be surprised if any more than 1 out of 30 games ended in such a way. Rather, the ultimate goal of the game is to have political control of the colonies. If at the end of the game the Patriots control 7 colonies, while holding the British to control of less than 5, they win. If not, the British win. Simple as that. So, you can see that battle is not the main goal but control is. And more importantly political control.
I really like this about the design and feel that the real core of the American Revolution was the groundswell of patriotism and the desire to live free from the shackles of an overseas monarch who cared little for the American way of life. This desire led great men of the time to sacrifice themselves, their livelihood and their families to further the true cause of liberty and build a truly free and democratic nation where individual liberty and freedom was prioritized over anything else. And yes, I realize that this nation was not perfect, not without contradiction but the concept of liberty helped to form a country that would lead to the ultimate freedom of all people.
Washington’s War is a Card Driven Game, and as such, relies on cards to provide to players the actions needed to play the game. The cards contain OPS Points which can be used to drive various actions, including such things as activating leaders, who in turn will then move with forces to attack, and also contain written text in the form of events. These events can be played only by the side they are intended for and if drawn and played by the opposing side, they can only be thrown away while granting a few possible actions, such as placing or removing Political Control markers.
In today’s entry, I have chosen this card to showcase one of my favorite events from the history of the American Revolution. The card for today is called Baron von Steuben Trains the Continental Army and has a dual focus. It will add Combat Units or CU’s to go along with General Washington but most importantly changes the balance of the game for battles. The card text reads “May be played by the American player in any Strategy Phase. He immediately places two CU’s with George Washington. The British Regulars’ Advantage combat DRM is permanently lost”. Now don’t get me wrong, gaining a free injection of 2 CU’s worth of fighting forces is a nice bonus for the Patriots but the real benefit of the card is that it changes the game. At the start of the game, the British receive a +1 Dice Roll Modifier (DRM) in all battles until what is called the British Regulars’ Advantage is lost. The British Regulars’ Advantage will be lost immediately if the British lose 3 or more CU’s in a single battle and of course, the British may also lose the British Regulars’ Advantage as a result of the play of this card. I very much like this card and it is very important for the hopes of the rebellion. I have found that the +1 DRM is really difficult to overcome for the Patriots and I found that my hopes in combat at the beginning of the game are almost always a 50/50 proposition. But once this card is played, that changes and I feel like the Patriots can better go on the offensive and openly hunt down and attack the British with confidence.
I have always been impressed with the Patriot effort to bring in professional soldiers from Europe to assist them in training and leading the Continental forces. Names like Marquis de Lafayette (France), Baron von Steuben (Prussia), Casimir Pulaski (Poland), Tadeusz Kościuszko (Poland) and Baron de Kalb (Bavaria) to name just a few. These European Generals had experience and knowledge, which were commodities that the Patriots didn’t have a lot of.
Friedrich Wilhelm August Heinrich Ferdinand Fresher von Steuben was a Prussian-born army officer who played a leading role in the American Revolutionary War by reforming the Continental Army into a disciplined and professional fighting force. His contributions marked a significant improvement in the performance of Patriot troops and he is consequently regarded as one of the fathers of the United States Army.
Born into a military family, Steuben was exposed to war from an early age; at 14 years old, he observed his father directing Prussian engineers in the 1742 siege of Prague. At age 16 or 17, he enlisted in the Prussian Army, which was considered the most professional and disciplined in Europe. During his 17 years of military service, Steuben took part in several battles in the Seven Years’ War, rose to the rank of captain, and became aide-de-camp to King Frederick II of Prussia, who was renowned for his military prowess and strategy. Steuben’s career culminated in his attendance at Frederick’s elite school for young military officers, after which he was abruptly discharged from the army in 1763, allegedly by the machinations of a rival.
In 1775, as the American Revolution had begun, Steuben saw a reduction in his salary and sought some form of military work; unable to find employment in peacetime Europe, he joined the Patriot war effort through mutual French contacts with American diplomats, most notably ambassadors to France being Silas Deane and Benjamin Franklin. Due to his military exploits in Europe, and his willingness to serve the Americans without compensation, Steuben made a positive impression on both Congress and General George Washington, who appointed him as temporary Inspector General of the Continental Army.
Appalled by the state of Continental forces, Steuben took the lead in teaching soldiers the essentials of military drills, tactics, and discipline based on Prussian techniques. He wrote Regulations for the Order and Discipline of the Troops of the United States, which remained the army’s drill manual for decades, and continues to influence modern U.S. army manuals. Steuben also addressed widespread administrative waste and graft, helping save desperately needed supplies and funds. As these reforms began bearing fruit on the battlefield, in 1778, on Washington’s recommendation, Congress commissioned Steuben to the position of Inspector General with the rank of major general. He served the remainder of the war as Washington’s chief of staff and one of his most trusted advisors.
Baron von Steuben drilling American recruits at Valley Forge in 1778 by Edwin Austin Abbey.
According to Peter Stephen Du Ponceau, Steuben’s personal secretary and interpreter, “The Baron loved to speak of…his sansculottes (radical partisans, urban laborers, and common people of the lower classes during the French Revolution), as he called us. Thus the denomination was first invented in America…when, it could not be foreseen, that the name which honoured the followers of Washington would afterwards be assumed by the satellites of a Marat and a Robespierre”.
After the war, Steuben was made a U.S. citizen and granted a large estate in New York in reward for his service. In 1780, he was elected a member of the American Philosophical Society, a learned society that included many of the nation’s most prominent Founding Fathers.
Here is a link to our full video review of the game:
Whenever people liberally throw around words like “innovative” or “unique” with recently published games, I can’t help but clench my jaw. It’s a difficult pothole to avoid, as the promises spat by titles in the crowdfunding era are necessarily braggadocios. We’re all guilty of this from time to time. It’s natural to pile on superlatives…
While attending Buckeye Game Fest this spring, we were gifted a copy of a newly published game called And the War Came: American Civil War 1861-1865 from Pinkerton Games, which is published by Blue Panther LLC and Steve Jones. The designer and owner of Pinkerton Games Larry Pinkerton had been their earlier but had to leave due to some other pressing business and we were unable to meet but were very grateful for the game. Upon returning home, I reached out to Larry to see if he would give us a bit of an inside look at the design and he was more than willing to discuss the game.
Grant: Larry welcome to our blog. First off please tell us a little about yourself. What are your hobbies? What’s your day job?
Larry: Grant and Alex, first, thanks for the opportunity to tell you about myself, and my game, And The War Came. I’m a lifelong resident of southwest Ohio, from the Dayton area. I’ve got three great adult kids, each working on their families and/or careers. I’m now retired from both my civilian job, and my almost 34 years as a traditional Ohio National Guard member-last duty assignment as an Air Defense Brigade Commander-so now more time for hobbies.
Now that And The War Came is finally done, I enjoy hanging with my kids, playing music, and traveling. I still do part time contract work in support of US Army training events, which I enjoy as well. And I hope to find more time for playing other wargames too!
Grant: What motivated you to break into game design? What have you enjoyed most about the experience thus far?
Larry: I’ve always been interested in the American Civil War, and many years ago it came to me that a block style game and a strategic level treatment of that war would make a great game-one that didn’t really seem to be available, at least for what I was looking for. I’ve really enjoyed developing the game, adopting, changing or dropping processes, seeking to get at the right balance of playability, workable mechanics and good history. It took a while, but I’m happy with the results.
Grant: What is your upcoming game And the War Came about?
Larry:And the War Came is a strategic level American Civil War game, focused on the southeastern United States. It started life as a block game, but when I decided to self-publish, I switched to rotatable counters due to cost. But play is similar-it’s area movement and card driven, so those familiar with Columbia style block games will recognize some of the mechanics.
Grant: What does the title mean in relation to the history of the American Civil War?
Larry: I bounced so many title ideas and finally settled on And The War Came, which is a sentence in Lincoln’s 2nd inaugural address (March 4, 1865). I felt that line summarized how the United States stumbled and staggered into civil war. And the wonderful Carte de Visite Collection images from the US Library of Congress I chose for the game box spotlight who the actual participants really were.
Grant: What games gave you inspiration for your design?
Larry: Columbia Game’s Hammer of the Scots and Victory Game’s The Civil War 1861-1865 were by far the strongest influences.
Grant: What is important to model or include in a game about the American Civil War?
Larry: Above all, I think it is leaders and leadership at the corps and army level. Any discussion of ACW campaigns seems to hit on the “what ifs” of senior leaders. There were simply so many generals I could have chosen to model in the game, but I finally settled on 22 Union and 19 Confederate leaders that did or could have risen to army or independent command. The formations on both sides were so similar, in my opinion it was the leadership that was truly decisive.
Grant: What challenges did you encounter in the design? How have you overcome them?
Larry: Wow, there were a lot; game flow, simple but historically accurate mechanics, relative strength and play balance, rail and naval capacity, re-playability, map scale-all had to be refined through trial and error, playtesting and compromise. And countless rulebook edits! Rules concepts I thought made perfect sense in my head and on the page drew several questions when reviewed by others. But I think it’s a pretty good final product.
Grant: What is the scale of the game? Force structure of units?
Larry: Regional area movement, and seasonal turns, representing three months. The map is bounded by eastern Kansas to eastern Texas on the western edge, New Jersey to northern Florida along the Atlantic Coast, lower Midwest on the northern edge, and Gulf of Mexico on the southern. Most states contain 4 to 10 areas-states with better road networks tend to have less areas. But there is more territory than units to control it. Fortress cities (i.e. Washington, D.C.), major railroads, navigable rivers, and mountains and swamp areas are also portrayed on the map. Rail and naval support capacity change each year.
Units represent infantry or cavalry corps, with a strength of from 1 to 4 divisions, or forts representing 1 to 4 installations. Unit count is: Union-33 Infantry counters, 10 Cavalry counters, 5 Fort counters, Confederate-26 Infantry counters, 8 Cavalry counters, 8 Fort counters.
Grant: What is the counter anatomy?
Larry: Very straightforward if familiar with Columbia style block wargames-a mechanic I have always admired for simple and clean fog of war, step reduction, and ranged or initiative combat. \Counters are square with strength point symbols (divisions) arrayed along each edge, plus movement and combat ratings. Infantry has a combat value of C2 with a move allowance of 1. Cavalry has a combat value of B1 with a move allowance of 3. Forts have a combat value of A1 with a move allowance of 0-they are stationary. There are also corps insignia (Union) or battle flags (Confederate) just to add historical flavor, and the branch insignia of the period for infantry, cavalry or forts. Ultimately, I chose to give similar units of both sides the same combat or movement ratings (since both Union and Confederate formations grew from the same organizational foundations and traditions), but those ratings can be modified by the leaders who command them, both at corps and army levels, and/or the battlefield terrain.
Grant: What does it mean the “game is We Go turn based”?
Larry: Most functions are conducted by both players at the same time. For example, in the Administration Step, both players recruit (buy) their new units/strength points, enter new or recovered from wounds generals, or administratively move/transfer generals already on the map to new assignments/commands. When both players are done, they go to the next step, (Operations), with Action Phases where each plays a card to determine who moves first, they complete their moves and then resolve any battles that result from movement. The Logistics Step and Victory check complete a turn.
Grant: What type of experience does this approach create?
Larry: It minimizes down time for one. Actions in the Administration Step, Operations Step, Logistics Step happen simultaneously. Only in the Operations Steps’ Action Phase (or depending on the season, phases) does movement happen sequentially. This limits the action/reaction dynamic to operations, where maneuver happens in small chunks due to the seasonal card play. Neither side is able to make big sweeping moves, while the other side can only watch-the mechanic enables campaigns like Gettysburg or Vicksburg, although they may not necessarily occur during the course of play.
Grant: How does the game use cards?
Larry: Cards list the number of “orders” you can issue to units in order to conduct movement or other actions. There are also cards with both events and orders where players must choose which to use. And most cards have a bonus action (improved combat, movement, or leader promotion) to spice things up. The season determines the number of cards each player receives that turn. The Winter season/turn, each player receives only one card-in the single Action Phase, each player compares their card to the other player’s to determine who moves first (initiative), then second, then resolve any combats. This makes for a short turn. In both Spring and Fall seasonal turns, players receive two cards each, then play their cards against each other in each of the two Actions Phases, conducting moves and combat. In the Summer seasonal turn, three cards are dealt to each player-thus there are three Action Phases that turn.
Grant: What type of cards are included? Can you share a few examples?
Larry: There are 30 cards in the common game deck (there are not separate unique decks for Union or Confederate players). The deck includes 22 orders cards, each card with a value of 1, 2, 3, 4 or 5 orders. The orders determine how many units (corps) or commands (see Leaders below) can be moved with that card-a card with only one order allows the movement of only one unit, etc. Orders can also be used to promote generals or repair rail roads, etc. Again, most, but not all of these 22 cards also have a bonus that improves movement, or combat for a unit, or gives a free general promotion.
There are also 8 cards that include a combination of orders and events such as blockade impacts, partisan activities, native uprisings, surprise attacks, diplomatic incidents, immigrant or native recruits, or spy activity-each event with favorable impacts for themselves, or negative impacts for the opposing player. I chose for the event cards to be generic in nature and usable for both sides, verses specific events (i.e. Trent Affair) scripted events. For these 8 cards, players have the option to play the event and still have two orders to move other units, or not play the event at all, and have all three orders for movement.
The entire deck is reshuffled at the start of a new year. Since each player only receives 8 cards in a four season/turn year, only 16 of the 30 cards are played each year-some cards may not get played during the entire war, while others may reappear several times.
Grant: How does combat work?
Larry: Again, similar to other Columbia style block games.
Paraphrased from the rulebook:
Units Fire or Retreat in a combat round. The sequence of combat is A class units fire/retreat first, before B class units, followed by C class units which fire/retreat last. If both sides units are the same class, the defender has the advantage, and fire/retreat before attacking units of the same class. A general’s initiative rating may change who has the first shot advantage. To Fire, roll as many dice as the unit’s current strength points (SP). A hit occurs for each die roll equal to, or less than the unit’s combat number rating. Hits on the enemy take effect as they happen, each hit immediately reducing the enemy unit strength point count by one. Say a 3 division (SP) infantry corps has a combat rating of C2-that corps rolls 3D6 dice and every “1” or “2” rolled is a hit, reducing enemy strength and effectiveness when returning fire. In a battle between a B1 cavalry unit and a C2 infantry unit, the B1 rolls first, but only scores a hit for each 1 rolled. The C2 rolls second and scores a hit for each 1 or 2 rolled. One round of combat is complete when each unit fires or retreats.
Some unit strength may be recovered at the end of combat if the unit is not destroyed-with this recovery rule I’m trying to account for after the battle return to duty wounded, stragglers, local prisoner exchanges, etc. I was aiming for about 20% casualty rates in combat.
Grant: How do Leaders work? How are they killed or wounded?
Larry: Leaders are used to command corps or armies (units under the command of a general are actually called “commands”, i.e. Sherman’s command). A leader imparts his initiative (A, B, or C class) and tactical ratings to the unit or units he commands. In Sherman’s case, he changes a C2 infantry corps under his command to a B2. A leader’s initiative and tactical ratings may change at different ranks. And I’ve added optional rules to randomize when leaders enter the game, and their ratings.
Leader counters also rotate-they all enter the game as a one star general. They may be promoted to two or three star rank. Grant and Sherman can even be promoted to four star (GEN) rank as they historically became army group commanders. A one star general (BG) controls one corps counter; a two star (MG) may command one or two corps.
The only way a leader can be promoted to three stars (LTG) rank is to take command of one of the 5 named armies: Potomac, Cumberland, and Tennessee for the Union; Northern Virginia and Tennessee for the Confederacy. Named armies may contain four or more corps, depending on the army. And only named armies may have subordinates of one or two star rank. If a three star army commander is relieved of command, there is a political cost, and the leader reverts to one or two star rank.
Leaders also represent staffs and logistics trains, so commanded units may engage in two rounds of combat, whereas corps without a commander may only initiate one round of combat-so even lower quality leaders can be beneficial since they allow you to fight an additional round. Most leaders also increase the movement allowance for infantry to 2 instead of the base 1.
And yes, leaders may be wounded, killed or captured. At the end of each combat which involved leaders, a leader casualty assessment is rolled-lower ranked leaders are more likely to be casualties. If assessed as a casualty, another D6 is rolled for severity of wound. Rolls of 1 through 5 indicate the leader is out for that many turns. A roll of 6 means the leader is killed. And if a commanded unit is destroyed but the leader is not killed or wounded, the leader is captured. Captured leaders may be exchanged as prisoners.
Grant: How does the design create fog of war and uncertainty?
Larry: The counter covers hide counter information until opposing units engage in combat. Of course, leader losses will occur, which adds to uncertainty. The cards also provide for a lot of variability in maneuver. And the strength replacement recruiting is a combination of fixed values for the year, plus a die roll for variable recruits each season. Recruitment strengths diminish for both sides over the course of the game. There’re several optional rules that address the Emancipation Proclamation, Drafts, Leader randomization, etc. to add historical flavor or variability to the game.
Grant: Who is the artist for the game?
Larry: I did the artwork…in MS PowerPoint. Whew, not the easiest thing to do! But I’m happy with the results. I used public domain art and was able to generate nice graphic quality with the tools available. And I found you can only go so far in development before you have to start addressing production concerns. And the War Came is definitely a game on a budget!
Grant: How is victory achieved?
Larry: Quite simply, players must accomplish more than their historical counterparts in the same period, for example the 1862 scenario, when the Border States, most of Tennessee and New Orleans were in Union hands by year’s end. So, victory usually means holding more territory, but there are also war weariness and political factors that contribute to, or detract from, victory. Examples are the midterm elections of 1862, Presidential elections of 1864, and weariness of the northern population.
Grant: What do you feel the game models well?
Larry: The overall ebb and flow of the conflict-using corps formations on a large area map just works well. And although there are abstracted naval and logistics rules that function well, I chose to focus on the senior commanders and Lincoln’s and Davis’s struggles to find effective military leadership for their troops at corps and army levels. And I think I’ve got the right level of political factors that contributed to the War’s outcome factored in. It’s hard for the CSA to win, but if the USA sits on it’s hands to build strength and perfect its leadership, the USA will lose. The USA must take the fight south early and often-and that’s a lot of territory to cover.
Grant: What are you most pleased about with the design?
Larry: There’s so many classic ACW titles out there that cover the entire scope of the war in great detail, and yet I think And the War Came fills a niche. For those familiar with board wargames, it’s not overly complex and it plays fairly quickly. I like the unknowns and fog of war, and think the re-playability is there. The historical framework is solid. I tried to not model for effect, so historical campaigns and outcomes are certainly possible, but not preordained. I wanted an interesting beer and pretzels game, one that both those familiar and unfamiliar with the ACW could enjoy. Again, I’m satisfied with the results.
Grant: What other designs are you contemplating or already working on?
Larry: I think if there’s another one in me, it’ll be a strategic treatment of the American Revolution-but to model that conflict will take some work, initially just to get the scope right, and factor in the interrelationship with the wider Anglo-French conflict.
Oh, and I must add a hearty thanks to Blue Panther Games, for their great production and distribution support! I just couldn’t nail down a publisher-but after consulting with Steve Jones (BPG) I realized I could partner with Blue Panther and do it myself! I would recommend them to any aspiring designer who’s interested in self-publishing.
If you are interested in And the War Came: American Civil War1861-1865 from Pinkerton Games, you can order a copy for $65.00 from the Blue Panther LLC website at the following link: https://www.bluepantherllc.com/products/and-the-war-came
A group of black-hat hackers known as POSIWID plots to hijack the moon Io and hold the entire Jovian power grid to ransom. Standing in their way are the ultra-corporate LFA, the constructors of the lunar energy facilities. Both sides have engaged a fleet of ROV – advanced remotely-operated robots — to battle across the treacherous landscape.
The machines are activated. Initiate combat sequence. The battle for Io has begun.
Line of Fire: Burnt Moon is a standalone 2-player card game that fuses the lean deck-building of the award-winning UndauntedSeries with fast-paced lane battling. Sharp decision-making and clever positioning combine in a nail-bitingly tense, endlessly replayable, and lightning-fast experience.
Small Wars: Mohicans is the first game of the Small Wars Series and covers the French & Indian War of the mid-18th century, and is based on a popular 1983 Canadian boardgame called Mohawk. Mohicans starts in 1754 and continues to 1760, which historically was the year after the conquest of Quebec by British forces (a founding event in the creation of modern Canada).
In Mohicans, the powerful regular forces of Britain fight for control of north-eastern North America against the mixed regular and irregular forces of the French and their local allies. The forces of both sides are bolstered by local militia units and other irregular forces, such as the famous French Couriers des Bois or British Rangers, and the arrival each year of more regular reinforcements from Europe.
While the British have the edge in firepower and numbers, the French have better mobility and their Indigenous allies can make effective use of terrain, particularly the massive forests that covered eastern North America at the time. The British are also more vulnerable to having their supply lines cut off.
Both sides seek to curry favour with the powerful but neutral Iroquois Confederacy, as an alliance with them is an enormous strategic advantage. With each major victory on the battlefield, one of the six tribes of the Iroquois will offer its support to the winning side. Get the support of all six tribes, and the Iroquois will join the fight.
To win the game, the British must hold three of the French cities and towns of Louisbourg, Frontenac, Duquesne, Montreal and Quebec (and at least one must be Montreal or Quebec). If they don’t do this by 1760, the French win by default.
The French can also win by holding the British cities of Albany and either New York, Boston or Philadelphia. This will be a tall order for the French but they can take comfort in the fact that the British, like NATO 250 years later have the watches, but the French have the time…
Combat occurs at the different locations, after the seasonal movement has been processed. It covers different battles, such as ambushes in woods, landings, raids on enemy villages and towns, field battles or forts assaults.
During the Winter between each of the 7 years of the war, reinforcements are received, militias and Indians are mustered and forts can be built.
An Impossible War: The First Carlist War in the North, 1834-1838 from Bellica Third Generation is a block wargame that recreates the First Carlist War in the North of Spain which was a civil war between the Carlists who supported the succession of the late king’s brother Carlos de Borbón and the progressive and centralist supporters of the regent Maria Christina acting for Isabella II of Spain who were referred to as the Liberals. The game uses blocks representing units but also includes counters and uses cards. I was able to play the game about a month or so ago with Francisco Ronco who owns the publishing company Bellica Third Generation and very much enjoyed the game and how it represented this interesting struggle.
In Action Point 1, we took a look at the Game Map, discussing the point-to-point movement configuration, the various spaces and the delineation of the Carlist versus the Liberal Zones, as well as explained the use of the Rest of Spain smaller map. In Action Point 2, we examined the units available to both sides and covered the importance of Supply. In this Action Point, we will take a look at the Carlist Uprising Phase and what it means for the game.
Carlist Uprising Phase
The map of the Regions of Spain, or Rest of Spain Map as it is referred to in the rules, is smaller and simpler than the Game Map itself and is a separate board that plays along side the main board. It consists of 9 large regions that cover large territories of Spain. This map’s purpose is to record the spread of the Carlist Uprisings, to enable Carlist expeditions to operate and for the Liberal player to chase and hunt these expeditions down. The Rest of Spain Map is divided into regions and each region has a Carlist Uprising Level of between 0-3. Also, there are 2 regions, including Valencia-Murcia and Catalonia, where the Carlist Uprising Level cannot fall below 1, reflecting the intensity of Carlism in these regions. The Carlist Uprising Level cannot ever be less than 0 (or less than 1 in Valencia-Murcia and Catalonia which is the printed value on the Rest of Spain Map) or more than 3. Any effects that change the Carlist Uprising Level below or above these numbers is simply ignored.
The Carlist Uprising Phase begins with a roll on the Carlist Uprising Table to determine any effects that will be carried out this turn. Then, if there is an existing active Carlist Expedition on the Rest of Spain Map, the Carlist player may attempt to increase the Carlist Uprising level in its region. This increasing of the Uprising Level is like a wave. A wave that starts out small with presence of unrest being only in a few spaces on the Rest of Spain Map, but it will soon get out of control and turn into a tidal wave that can crush the Liberal player if they have not being paying attention to the situation on the board.
The Carlist player will roll 2D6, sum the result of both of the dice, and then will consult the Carlist Uprising Table found on the Rest of Spain Map to find and then apply the result. If you know anything about the probability of the outcome of this 2D6 roll, the most likely outcome is 7. There are 36 total possible combinations when rolling 2D6 and there are 6 different ways to get to a result of 7 including 1+6, 2+5, 3+4, 4+3, 5+2, and 6+1. So generally your spread will be around that 5-8 range, which according to the Carlist Uprising Table means that you will see the Uprising Level increase in places like Castile-León (result of 5), no increase (result of 6), Valencia-Murcia (result of 7) and Catalonia (result of 8). But it is also important to remember that the highest a region can attain is 3 and if it is rolled then the Carlist player will choose to increase the Carlist Uprising Level in 1 adjacent region.
The next step of this phase is the Expedition portion. If there is any active Expedition on the Rest of Spain Map then the Carlist player can attempt to increase the Uprising Level in each region where there is an Expedition, as long as there are more Carlist units than Liberal units there. The number of Liberal Infantry and Cavalry units in the region is subtracted from the number of Carlist Infantry and Cavalry units forming the Expedition. The Carlist player then rolls a die, and if the result is equal to or less than this number, the Uprising Level increases by +1. An Expedition cannot increase the Uprising Level in a region where the level is already 3 and there is no adjacent spill over of this furor.
The units of the Liberal player can move on this map at all times. The units of the Carlist player cannot enter the Rest of Spain Map before 1835. It is important to keep in mind the Carlist player can only have a single active Carlist Expedition on the Rest of Spain Map in 1835, and a maximum of 2 Expeditions from 1836 onwards.
So why is this part of the game important? Uprisings can provide Victory Points to the Carlist player. In addition to VP’s, Uprisings provide replacements for Carlist Expeditions and feeds the spread of rebellion on the Rest of Spain Map. There is a track on the map where the Carlist player keeps an accounting of the the Carlist Prestige marker to gain VP’s. If the amount of regions with an Uprising Level of 3 is at 3 or 4 regions, the Carlist player will gain 1 VP. If there are 5 or more, the Carlist player will receive +2 VP’s.
But there are other benefits to the players that come as a result of the Uprising Level on the Rest of Spain Map. For the Liberal player, at the end of each year for each region that is empty of Carlist Expeditions and has an Uprising Level of 0 or 1 (no 2’s or 3’s), they gain 1 Replacement Point in 1834-1835 and 2 Replacement Points in 1836-1837. Think of it this way. If there are no Carlist troops threatening the local Liberal supporting public, they are more willing to provide their sons to the military to fight the rebellion. But, if the Carlist fire of uprising has spread and there are active Carlist troops in the streets there will be less support for the Liberal cause.
Also for the Carlist player, if at the start of their turn there is an Expedition on the Rest of Spain Map and there are 5 or more regions with an Uprising Level of 2 or 3, they will gain +1 Action Point that can only be used to move or recruit Expeditions. Once again, if the groundswell of support is leaning toward the Carlist, the local populace are more in favor or supporting these Expeditions and expelling the Liberal from the region.
As you can see, there are a great deal of benefits for both players from the Uprising Level but there seem to be more impactful benefits for the Carlist player. If they can control the Rest of Spain Map, and dot the landscape with support and uprisings, they can win the game handily. But don’t worry, the Liberal player has an action available to them for combating and reducing the Carlist Uprising level in a region. This action is called Suppress Uprising.
Suppress Uprising is where the Liberal player can attempt to reduce the Carlist Uprising Level in a region by spending 1 Action Point and rolling 1D6. If there are no Liberal Infantry or Cavalry unit in the region, or if no unit takes part in the action, if the result is equal to or less than the Carlist Uprising level, then the attempt has no effect. If the result if higher than the Carlist Uprising Level, then the level is reduced by -1. If there is at least 1 Liberal Infantry or Cavalry unit in the region that takes part in the action, for each Liberal Infantry or Cavalry unit after the first that participates in the action, the Liberal player adds +1 to the roll. But there are possible losses that come with using your troops in this manner.
If the result is less than the Carlist Uprising Level, then the attempt has no effect. If the result is equal to the Carlist Uprising Level, then the level is reduced by -1, and one Liberal Infantry or Cavalry unit loses 1 strength point. If the result is 6 or more, then the Uprising Level is reduced by -2. So there is incentive to make sure you use your troops in this action. A bit risky but useful and definitely worth the risk.
An Impossible War is a fantastic design that attempts to capture the historical aspects of this titanic struggle for the throne of Spain in the mid 19th century. Historically, the Carlist forces who were defenders of traditional monarchy, regional privileges, and the Catholic Church, were a minority faction fighting an overwhelmingly larger, richer liberal government. The uprising phase reflects how the Carlists compensated for this disparity by forcing the Liberal government to fight on multiple fronts and suffer from logistical nightmares across hostile terrain. The Carlist Uprising Phase, and the use of its auxiliary Rest of Spain regional map, forces some really tough dilemmas on the Liberal player. They must attempt to divide their forces between the main Game Map and the Rest of Spain Map to prevent the opposition Carlist forces from overwhelming the home territory in the north. It serves as a vital strategic balancing act for the Liberal player that cannot be ignored and must be dealt with systematically and somewhat evenly. Too much focus on the Rest of Spain Map and the situation on the Game Map will quickly snowball and they will lose control. Focus on the situation on the Game Map and the protection of Cities and Towns and the Carlist Expeditions will gain momentum and turn the countryside red. While the primary war centers on the rugged terrain of northern Spain (Navarre and the Basque Provinces), the uprising mechanic abstractly models scattered insurgencies across the rest of the country. And as you know, insurgencies can be very unpredictable and difficult to contain. You stamp out one area only to see a fire start in another. The Liberal player must divert troops and supply resources to the secondary map to quell these localized rebellions and hunt down Carlist expeditions originating from the north. And, the important thing for the Carlist player and the expansion of the uprisings and the success of their expeditions is the possible generation of generation of Prestige and Victory Points, which is really crucial to their path to victory.
In Action Point 4, we will take a look at the activation system and the use of Action Point Markers.
With this My Favorite Wargame Cards Series, I hope to take a look at a specific card from the various wargames that I have played and share how it is used in the game. I am not a strategist and frankly I am not that good at games but I do understand how things should work and be used in games. With that being said, here is the next entry in this series.
#80: Rome Offers Settlement from Barbarians at the Gates, The Decline and Fall of the Western Roman Empire 337 – 476 from Compass Games
Barbarians at the Gates, The Decline and Fall of the Western Roman Empire 337 – 476 from Compass Games is a Card Driven Game for two players set during the final hundred plus years of the Western Roman Empire as the Barbarian tribes in the north came down with a vengeance as they clashed with civilization and carved out their place amongst it. The time period covered in the game is from the death of Constantine the Great (337 AD) to the deposition of the last Western Roman Emperor by Odoacer in 476 AD. The Roman player will command the Roman Legions loyal to the failing central authority and those Germanic peoples who have settled peacefully inside the Roman Empire, while the Barbarian player leads Usurper Emperors, and controls the migrations of the Germanic peoples, who are the Barbarians at the Gates. This game is really quite good and feels very much like a wargame even though it is a Card Driven Game. There are lots of opportunities for troop movement, combat and maneuver. And I really liked that. The game is a Card Driven Game and the use of cards is all important and very well done. Each player has their own unique deck of cards that are used and these cards are sometimes removed from those decks when played for an event and also new cards will be added to the deck after each turn. The cards played during a player’s impulse which are not used for the Event are then used for their Operation Points value. These Operation Points can be used for many purposes including Activating a leader, Forced Marches, Raiding, Reinforcement, Migration and Successful Usurpation.
The real trick to the cards is to plan out how you are going to use them to your advantage but also how best to use them. Activating Leaders is very important as you can then move them to attack, defend, change control of areas and other actions. Activating a leader depends on their strategy rating (the lower the strategy rating, the better). When a leader activates from a card, they receive a number of Action Points which can be used for movement (1 over highway, 2 over rough or river connections, 3 over strait or for naval movement), continuation after battle (a kind of advance after combat), changing control over unfortified spaces and sieges of fortified spaces. But the cards also are very mean spirited. What do I mean by this? Well, in our first play, I was carefully using my cards to build up my armies to fend off the initial attacks of the Barbarian hordes. I also had begun to build somewhat of a super stack as well to attempt to foray into England and take on the Barbarians there. As I did this building up, I was unaware of the nasty nature of some of the cards. Some of the cards, both for the Barbarians and Romans, allow a play that will turn a single leader and their entire stack into either a Usurper or a Pacified Barbarian Settlement. Both are equally nasty and you have to keep in mind that you can have your best armies simply taken from you and turned to your enemy.
And this concept of taking your best armies away from you, either as the Roman player or the Barbarian player, is well demonstrated with the play of the Rome Offers Settlement card. This card literally allows the Romans to resettle a Barbarian Tribal Marker, along with any combat units with the marker to a Loyalist Provincial Capital. The play of this card at the right (or wrong) time can lead to serious issues on the front lines. Playing the Rome Offers Settlement card simulates foederati diplomacy, allowing the Roman player to integrate migratory tribes into the empire and to gain access to additional manpower to defend the frontier. The mechanical effects include that the selected Tribe will now be aligned with Rome and becomes allied to the Romans. This will lead to the Barbarian Control Marker being removed from the target tribe’s space on the Tribal Alignment Track. The real benefit is that the Roman armies don’t have to risk loss and time in fighting the Barbarians targeted but also provides somewhat of a defensive buffer as the settled tribes will serve as a guard on the frontier, protecting specific Roman provinces and providing a strategic military advantage against other hostile invaders. This card is very important and can be considered essential for the Roman player, as allying with these tribes limits barbarian raiding opportunities and provides crucial resources needed to survive later waves of invasions. Also the preservation of army strength gives an immediate benefit to other ongoing campaigns against other invading tribes. I love this card and the concept from history that it attempts to inject into the gameplay.
Foederati were peoples and cities bound by a treaty, known as foedus, with Ancient Rome. During the Roman Republic, the term identified the socii, but during the Roman Empire, it was used to describe foreign states, client kingdoms or barbarian tribes to which the empire provided benefits in exchange for military assistance. The term was also used, especially under the empire, for groups of barbarian mercenaries of various sizes who were typically allowed to settle within the empire.
The term foederati had its original usage and meaning extended by the Romans’ practice of subsidizing entire barbarian tribes such as the Franks, Vandals, Alans, Huns and the Visigoths, the last being the best known, in exchange for providing warriors to fight in the Roman armies. Alaric I began his career leading a band of Gothic foederati. At first, the Roman subsidy took the form of money or food, but as tax revenues dwindled in the 4th and the 5th centuries, the foederati were billeted on local landowners properties, which became identical to being allowed to settle on Roman territory. Large local landowners living in distant border provinces on extensive villas, which were largely self-sufficient, found their loyalties to the central authority, which were already conflicted by other developments, further compromised in such situations. As loyalties wavered and became more local, the empire then began to devolve into smaller territories and closer personal fealties.
A 20th-century depiction of Alaric parading through the streets of Athens after conquering the city in 395 AD.
Here is a look at our unboxing video:
We also did a video review and you can watch that at the following link:
We have played 2 of Tompet Games previously released games with the only not having been played called Kill the King from 2016. First was Donning the Purple, which is an asymmetrical king of the hill game with a bit of worker placement that deals with the players managing the glory of wealthy and powerful Roman families, and their second game called Halls of Hegra, which is a solitaire-only wargame in the same vein as Euro-based games such as Robinson Crusoe, This War of Mine and Dead of Winter. The mechanics include worker placement, bag building, and area control/tower defense and the goal of the game is to survive wave after wave of German troops as they assault the secluded mountain fortress at Hegra.
Both of these games are excellent and they are now embarking on their fourth game called Crown & Courage that tells the story of the German invasion of Norway in 1940 and the royal family’s defiance and ultimate escape from the country to avoid capture and funding of the German war machine. We asked the designer Petter Schanke Olsen if he would be up for one of our interviews and he was more than happy to share.
Grant: Petter welcome to the blog. First off please tell us a little about yourself. What are your hobbies? What’s your day job?
Petter: Thank you for having me. It’s an honor to be featured here. I have been a big fan of The Player´s aid for many years.
I’m a 40 year old geek from Norway. I’m very interested in history. Mainly WWII and Ancient Rome. So I try my best to make games from those eras.
During my day job I work for the government, making educational material for kids who are deaf or hard of hearing. My main area is video production.
Grant: What motivated you to break into game design? What have you enjoyed most about the experience thus far?
Petter: I have always liked to make things. One day, many years ago, I was thinking about flanking on medieval battlefields and thought that would make an interesting game mechanic. I made a small prototype for a boardgame based around that called Kill the King. 6 months later I ran a small but successful Kickstarter for it and I have never looked back. The feeling of seeing random people enjoying a game I have made is very rewarding.
Grant: What is your upcoming game Crown & Courage about?
Petter: Crown & Courage is a solo game where you step into a desperate race against time as Norway collapses under the pressure of the German invasion during the early days of WWII. Your goal is to guide the King and the royal family to safety while evacuating as much of the nation’s gold as possible.
Grant: Why was this a subject that drew your interest?
Petter: When I was 18 I spent a year in the royal guard here in Norway and during that period we learned a lot about these events. I have always wanted to make a game about this subject but I have been skeptical about doing games based on Norwegian history because it is a little known story internationally. After seeing the international success of our previous game, Halls of Hegra, I realized that I don’t need to worry about that so here we go!
Grant: What is your design goal with the game?
Petter: My design goal for this game is the same as all my other games. I want the player to feel the same level of stress and weight of making the right decisions with limited resources as the real people in history. In Donning the Purple for example, a game about being the roman emperor, I wanted the players to feel the burden of everyone trying to kill you so they could be the new emperor. In Crown & Courage I want the player to feel the pressure of seeing the Germans advance through Norway, trying to capture you and occupy the towns while you have to make hard decisions about what to do next.
Grant: What from the German invasion of Norway in 1940 was most important to model?
Petter: It was important to model how poorly prepared and equipped the Norwegian army was for an invasion. The Norwegian troops in the game for example, can only defend and not counter attack. But they were good at slowing down the enemy by sabotage, and that is a big part of the game (and also one of my favorite mechanics)!
Grant: What sources did you consult about the details of the history? What one must read source would you recommend?
Petter: I have read several books about the topic and biographies of King Haakon. But I would actually recommend watching a movie about the same topic called The King’s Choice. It’s great!
Grant: What is the goal of the game?
Petter: To reach safety with the royal family at the northern part of the map. And at the same time successfully evacuate Norway’s gold reserves. Historically the evacuated gold was used to fund the government in exile and the Norwegian trade fleet.
Grant: What is the layout of the board?
Petter: The two main components of the board are the map over southern Norway and the grid where you place your actions. There are also other minor tracks and systems. I also try to include much of the rules on the board itself so you don’t have to look in the rulebook all the time. This aids the players in playing the game.
Grant: How important are the cities and what happens when they become German occupied?
Petter: The cities are very important. If all of them are occupied you lose the game! Every time a city is occupied you have to resolve everything that is revealed on the Occupation Track, and that becomes increasingly bad as each new city is occupied.
Grant: How do the Norwegian troops defend against the Germans?
Petter: The battle system is kind of like our first game Donning the Purple. The Germans only move forward into battle if they have more strength than you. You can however spend action cards to boost your strength. You can also choose to spend extra morale in each battle to make a valiant defense and take out more German soldiers.
Grant: Can you talk about the grid system in the game called the Order Grid?
Petter: This is the main mechanic of the game. You choose an order tile and place it into a space on the 3×3 grid. This is your primary order this turn. Now you must choose the horizontal or vertical line that intersects with the chosen primary order. If the line you choose has other order tiles you will also resolve them. This makes your turns more powerful over time and can make for some interesting combos. Some of the orders you can choose among are Evacuate, Rest, Inspire, Sabotage, Upgrade and Strategize.
Grant: What are the difficulties the player must deal with in the form of Stress, Morale and Threats?
Petter; Stress is something that the King will gain throughout the game. When the Stress Level is too high you will lose Willpower. Willpower is used to decline demands from the Germans each round. If the Willpower runs out you lose the game. After you lose Willpower the Stress Marker resets but it can never be lower than the current Threat Level, so it might not reset as low as before. Morale reflects the morale of your troops and population. You can also use morale to draw extra cards or be more efficient in your defense
Grant: How does the player manage these?
Petter: Stress is reduced by taking the Rest Order. Morale is increased by the Inspire Order and Threat is lowered by Discarding Cards.
Grant: What are the German Demands?
Petter: At the end of each round the Germans will send demands. They will for example demand that the King resign. You can choose to ignore this at an increasing cost or decline the demands but that costs Willpower and is a diminishing resource. Historically, Germany demanded that Norway cease all resistance and submit to a German military occupation. Specifically, they demanded that the Norwegian government allow German troops to land unopposed to establish naval bases, secure vital Swedish iron ore shipments, and prevent the Allies from using Norway as a battlefield.
Grant: How does the German bot work?
Petter: The Germans are controlled by the grid system. Their actions are placed around the 3×3 grid. When you choose and place your primary order the Germans will resolve their actions (which is framing the grid system) that intersect with the primary actions. Each action will resolve 1 time per revealed German symbol on the grid. It is a pretty cool system and I’m pretty pleased with it.
Grant: What type of challenge does it create?
Petter: Lots of challenges! Basically, when you place your orders you are deciding which actions you AND the Germans will take. It is quite a puzzle.
Grant: How is victory achieved?
Petter: You win by getting the King to freedom in the northern part of the map. This is the main goal. If, as part of the Evacuate action, you move the King into the space marked Freedom, you win the game. You must still complete the entire Evacuate action before you win the game though. Keep in mind that the game is very difficult to win, but if you do manage it and want to gauge your success, your score is equal to the number of Gold Reserve cards you have successfully evacuated.
Grant: What type of an experience does the game create?
Petter: I like to think it creates a stressful but thematic experience where you are making tough decisions while exploring the Norwegian countryside!
Grant: What are you most pleased about with the design?
Petter: I’m most pleased about the Grid Order system! But the Evacuation and Sabotage mechanics are pretty cool as well.
Grant: What other designs are you working on?
Petter: I have several WWII themed designs in various stages but it is too early to say what will happen next.
We were able to play a prototype copy of the game and very much enjoyed it. We played it cooperatively, even though the design is a solitaire game, and had a great time strategizing and considering our options together and were very impressed with the maturation of the game mechanics and flow of the game. Here is a link to our preview video from that experience:
We have played 2 of Tompet Games’ previously released games with the only not having been played called Kill the King from 2016. First was Donning the Purple, which is an asymmetrical king of the hill game with a bit of worker placement that deals with the players managing the glory of wealthy and powerful Roman families, and their second game called Halls of Hegra, which is a solitaire-only wargame in the same vein as Euro-based games such as Robinson Crusoe, This War of Mine and Dead of Winter. The mechanics include worker placement, bag building, and area control/tower defense and the goal of the game is to survive wave after wave of German troops as they assault the secluded mountain fortress at Hegra.
Both of these games are excellent and they are now embarking on their fourth game called Crown & Courage that tells the story of the German invasion of Norway in 1940 and the royal family’s defiance and ultimate escape from the country to avoid capture and funding of the German war machine.

 Anmelden