An Impossible War: The First Carlist War in the North, 1834-1838 from Bellica Third Generation is a block wargame that recreates the First Carlist War in the North of Spain which was a civil war between the Carlists who supported the succession of the late king’s brother Carlos de Borbón and the progressive and centralist supporters of the regent Maria Christina acting for Isabella II of Spain who were referred to as the Liberals. The game uses blocks representing units but also includes counters and uses cards. I was able to play the game about a month or so ago with Francisco Ronco who owns the publishing company Bellica Third Generation and very much enjoyed the game and how it represented this interesting struggle.
In Action Point 1, we took a look at the Game Map, discussing the point-to-point movement configuration, the various spaces and the delineation of the Carlist versus the Liberal Zones, as well as explained the use of the Rest of Spain smaller map. In Action Point 2, we examined the units available to both sides and covered the importance of Supply. In Action Point 3, we took a closer look at the Carlist Uprising Phase and what it means for the game. In this Action Point, we will take a look at the activation system and the use of Action Point Markers.
Activation System
The main focus of the activation of units is the concept of Action Points. These Action Points are used to take various actions such as to activate units for movement, build fortresses, destroy enemy fortresses, obtain replacements, recruit units into Expeditions, suppress uprisings and enter into combat as a part of activation for movement. Both the Carlist and Liberal player has Action Point Markers in the color of their side and each year they can use a specific number of each value of marker. This is determined at the outset of each year according to the Action Point Marker Table.
After the number of Action Point Markers used is determined, the players will each build a chit draw cup for their own Action Point Markers. This should be an opaque container that obscures the identity of each marker as the draw is supposed to be random and is really part of the fun of the design. Then at the start of their Activation Phase, the player will randomly draw an Action Point Marker and then mark their Action Point Track accordingly. As already mentioned, these Action Points are the “fuel” spent to perform actions.
As you can see in the chart above, each year the players both have access to the same amount of overall Action Point Markers with 6 but the makeup of these markers will be different ranging from 2 points to a maximum of 4 points. For example, in 1834 the Carlist player will have three 2-point markers and three 3 point markers while the Liberal player will have access to three 2-point markers, two 3-point markers and one 4-point marker. This is an interesting point as the Liberal player has the potential to obtain more Action Points in 4 of the 5 years covered in the game. This is random of course and fate can decide that the Carlist player will get the most Action Points each year but the potential is there for the Liberal player to have the advantage.
As mentioned, these Action Points are the currency used to take various actions and in most instances they will be used to Activate units on the board. Activated units can then move and their movement allowance will depend on how many units move together and the roads used, either main or secondary.
But one of the more interesting ways that Action Points can be used is to convert them into Command Points. The player may choose to convert as many Action Points as desired each year into Command Points, noting them on the Command Points Track. A player may have no more than 5 Command Points. Command Points are flexible currency that will not be lost and can then be used to contest initiative, as Action Points or even to attempt an interception of enemy units. These Command Points are vital and should be something that players invest into as they are very flexible and also allow for the taking of actions during the other players activation. I like the way the game uses this random activation concept and currency for those actions. In reading the designer notes in the Playbook, the designer David Gómez Relloso emphasized the fact that the war was brutal, difficult and that communication and distribution of orders was very difficult, particularly for the Liberals as they were operating in hostile territory where the locals continually harassed and denied them of provender as they would flee taking their livestock with them to keep them out of enemy hands. This random number of Action Points, and thereby a varied number of points to do things with on the board, really is central to the design and can make for a very interesting challenge for those that are unlucky like me. While the differences in the values of the Action Points are not that far apart, a few extra or less than your opponent can cause great difficulty as you will simply not be able to perform what you need to each turn. This boils down to a prioritization of goals and will lead to some very tough decision having to be made about activating units versus recruitment of new units or focusing on the game board state versus the state of the Rest of Spain Map and the Carlist Uprisings and Expeditions.
I also was able to shoot a fairly short video summary of my game play with Francisco Ronco who is the owner of Bellica Third Generation and you can watch that at the following link:
In Action Point 5, which is the conclusion to the series, we will cover some examples of Battle, focusing on the tactical aspect of combat with the use of the Battlefield Board, as well as an example of a Siege.
I know it is now June….I am usually done with this post by mid-March but this year we had a bunch of great games that came out in November and December and we just had to get several of them to the table before we shut 2025 down. Our opportunity to do so with full tables as there were several multi-player games in that bunch, was during Buckeye Game Fest in mid-March where we played lots of great games including Werwolf: Insurgency in Occupied Germany, 1945-1948 from Legion Wargames, Cross Bronx Expressway from GMT Games and Imperial Elegy: The Road to the Great War 1850-1920 from VUCA Simulations to name just a few. And now, with those final games getting played, comes the impossible task of distilling an entire year’s worth of gaming down to a list of the 10 games that we most enjoyed. I hate doing this. I love writing about, thinking about and sharing my experiences about the games we have played but hate having to make somewhat objective choices about which is better and which games should even be considered for the list. The first comment I would have is that not all games are the same. Not the same scale, the same play time, the same mechanically or even historically. Each game is unique and in my opinion, all games have something objectively good about them. Secondly, we didn’t get around to playing some of the new releases in 2025. I say some but we actually didn’t play a lot of the new releases and did the best that we could to play as many as possible. So we might leave off a game that you thought was very good and deserving and it probably is but we either didn’t get around to playing it or it just didn’t hit with us. But, in the end, I have to make this list and this is my best effort at doing just that!
In 2025, we played 33 unique titles from 22 different publishers. Some were operational, strategic or tactical scale and in the list this year I didn’t include any solitaire games. Some used counters. Some used cards. Some used wooden bits and some used miniatures. Some were only card games with no other components and some were cooperative. At the end of the day, in 2025 we played a lot of games! And here I present to you my list of the Top 10 Wargames of 2025!
10. China’s War: 1937-1941 from GMT Games
This is a game that I have been awaiting for a long, long time. Really since it was announced nearly 7 years ago in 2019. Yes you read that right…2019! And I am happy to report that the wait was definitely worth it as the game feels fresh and is a very worthy addition to the COIN Series. China’s War: 1937-1941 from GMT Games, which is volume 13 in the well respected and venerable COIN Series, examines the first five years of the 2nd Sino-Japanese conflict, when China stood alone against the whole of the Japanese Empire. Each player takes on the role of 1 of 4 Factions seeking to attack or defend the Republic of China including the aggressive and powerful Japanese, the harried Government represented by the Guomindang party, the rebellious Chinese Communist Party, or the unruly and fractious Warlords who are obedient when convenient but have their eye on gaining state power. Using military, political, and economic actions and exploiting various events, players will build and maneuver forces to influence or control the population, extract resources, or otherwise achieve their Faction’s goals and victory conditions. As with all COIN Series games that are Card Assisted rather than Card Driven Games, the deck of cards will regulate turn order, inject historical events into the game with major benefits or consequences, cause victory checks and other in game processes.
China’s War feels like a classic COIN Series game but in my opinion has 3 insurgent style factions against the powerful Japanese who don’t really act like the large Government factions in previous entries in the series. The focus really centers on the control of the Lines of Communication or LoC’s on the game board, which was a very refreshing approach that created some really interesting interplay and caused me to think differently about how I would go about achieving my Victory Conditions.
We find that Brian Train’s designs are just fantastic. I think that sometimes they can be a bit opaque, meaning that their true genius cannot be seen with just a few plays but will be unlocked over 4 or 5 plays as we have found with A Distant Plain, which has continually moved up on my list of favorite COIN Series games with each play that now numbers around 5. But China’s War was just special. It is totally unique as to its take on insurgency within the COIN Series, is really frenetic and active and gives the feeling of classic COIN while really turning things a bit upside down with the way the powerful faction works in the Japanese as they really only care about maintaining and cleaning off their Lines of Communication. In fact, they are so unique that they are the faction that will place Terror on the board, which is typically reserved for the insurgent factions to sway Support and Opposition.
We very much enjoyed the game and had a good time with it. We had a newer COIN Series player and they seemed to take to the game quickly and understood what it was that they were supposed to be doing. With that being said, with only the 1 play, I am sure that there are lots of things that we didn’t experience and will be able to discover those in future gaming opportunities. Suffice it to say that we can’t wait to play the game again and I am planning to bring this one along with me to the World Boardgaming Championships at the end of July.
We recently shot a First Impression/review video and you can watch that at the following link:
9. Imperial Elegy: The Road to the Great War 1850-1920 from VUCA Simulations
This spring, while attending Buckeye Game Fest in Columbus, Ohio, we were able to coordinate a 6-player game of Imperial Elegy: The Road to the Great War 1850-1920 from VUCA Simulations. Imperial Elegy is a card driven game that blends diplomacy, warfare, and statecraft and feels a bit akin to games like Here I Stand and Virgin Queen from GMT Games. Grand scale sweeping epics that play multiplayers and take a day to play. Players play as 1 of 6 unique major powers in the game including Germany/Prussia, the United Kingdom, France, Austria-Hungary, Russia and the Ottoman Empire.
Imperial Elegy is a fantastically themed game that takes place over 7 turns, with each of the turns representing approximately a decade. If the Great War breaks out due to the World Tension Track reaching a certain level, the game can be extended by an additional 6 shorter turns. A turn in the game consists of player impulses that is driven by the play of action cards for their Command Points or for the printed events. Players will use CP and events to take actions like colonize, conduct diplomacy with minor nations, fight wars, as well as hinder their opponents by playing events that take away their actions or resources. A turn will end once all players have consecutively passed or when all players run out of cards.
The game is somewhat of a sandbox style game as you have so many options and choices about what to do during the course of the game. Obviously, your faction has some direction about what you should be doing but really it is up the player to spend their resources how they will to accomplish their ultimate goals and score Victory Points. I truly love that aspect about this game and as we played we saw that sandbox and the asymmetry between the various factions. Particularly at the start, each country has some specific goals that they have drawn from the National Goals Deck that are a source of Victory Points, in fact a major source of Victory Points, and players will need to prioritize these cards and decide which ones to attempt to go after from the start. With only 7 turns, they will have to make progress on these National Goals if they have any hope of actually achieving them.
Each of the represented nations in the game have their own special player board that contains various tracks that keep various information readily available to the players. Here is a look at the German player board. I very much enjoyed that they have gone to a great deal of effort to make these player boards and also that they gave each of the nation’s Stability, which decides whether various actions like war can be taken or if there are various positive or negative modifiers, the available Manpower that will determine how many armies can be built, Industry that tells how many action pointed you will have to spend during war to maneuver units, attack and replace losses. The focus of the game is about the control of territories both in Europe as well as colonies abroad and there is an automatic victory if a certain target number is met, in the case of Germany 15.
As we played, I started to realize that the key focus of the overall world stability and things like the Domestic Stability Tracks, which are focused of both the internal and external pressures faced by the powers. I really very much liked this thematic inclusion as no one wants to start a major global conflagration and there are steps that players have to take to skirt the inevitable troubles that result in their own actions and how they are seen by the other players in the game. But in our limited play, I never really felt threatened by this concept. Either our group was super skilled at avoiding the inevitable increase in tension or due to our short play we didn’t really experience some of the events that would have tipped this over the edge. I think that we say small increases in our full turn play but nothing that seemed unmanageable and we actually had an event that lowered it so it never became an issue. The game is about spending your resources wisely, in the form of your cards and your aspects like Stability, and to use your cards to do the events that could increase tension didn’t seem to be in our best interest, at least not in the 1st decade of the game. But maybe that will come later.
8. An Impossible War: The First Carlist War in the North, 1834-1838 from Bellica Third Generation
Earlier this year, I was able to host Francisco Ronco at my home to play a few games together. One of the games we played was published by his company Bellica Third Generation and was called An Impossible War. An Impossible War: The First Carlist War in the North, 1834-1838 is a block wargame that recreates the First Carlist War in the North of Spain which was a civil war between the Carlists who supported the succession of the late king’s brother Carlos de Borbón and the progressive and centralist supporters of the regent Maria Christina acting for Isabella II of Spain who were referred to as the Liberals. The game uses blocks representing units but also includes counters and uses cards.
An Impossible War is a fantastic design that attempts to capture the historical aspects of this titanic struggle for the throne of Spain in the mid 19th century. Historically, the Carlist forces who were defenders of traditional monarchy, regional privileges, and the Catholic Church, were a minority faction fighting an overwhelmingly larger, richer liberal government. The uprising phase reflects how the Carlists compensated for this disparity by forcing the Liberal government to fight on multiple fronts and suffer from logistical nightmares across hostile terrain. The Carlist Uprising Phase, and the use of its auxiliary Rest of Spain regional map, forces some really tough dilemmas on the Liberal player. They must attempt to divide their forces between the main Game Map and the Rest of Spain Map to prevent the opposition Carlist forces from overwhelming the home territory in the north. It serves as a vital strategic balancing act for the Liberal player that cannot be ignored and must be dealt with systematically and somewhat evenly. Too much focus on the Rest of Spain Map and the situation on the Game Map will quickly snowball and they will lose control. Focus on the situation on the Game Map and the protection of Cities and Towns and the Carlist Expeditions will gain momentum and turn the countryside red. While the primary war centers on the rugged terrain of northern Spain (Navarre and the Basque Provinces), the uprising mechanic abstractly models scattered insurgencies across the rest of the country. And as you know, insurgencies can be very unpredictable and difficult to contain. You stamp out one area only to see a fire start in another. The Liberal player must divert troops and supply resources to the secondary map to quell these localized rebellions and hunt down Carlist expeditions originating from the north. And, the important thing for the Carlist player and the expansion of the uprisings and the success of their expeditions is the possible generation of generation of Prestige and Victory Points, which is really crucial to their path to victory.
I very much enjoyed the asymmetry between the Carlist and Liberal forces in the game. It made for a very interesting tactical challenge for both sides as they have to play to their strengths and not get too overly concerned with the numbers. The Carlists will be much more mobile in their defense and look to exploit every gap in a supply line to move around and stay away from the numerically superior Liberal forces, whereas the Liberal player will have to move more methodically to take outlying towns and settlements to be able to shore up their lines and create less opportunities for end arounds by the Carlists. The disparity in the forces was a very interesting choice by the designer David Gómez Relloso and I am sure is reflective of the historical reality of the First Carlist War.
I very much enjoyed An Impossible War, even though I played just a few turns of a smaller scenario with Francisco Ronco. He was a master at the game, as obviously as the publisher and a playtester he is intimately familiar with the rules and strategies, and I learned a lot from him about how the game should be played. I am looking forward to future plays as the game is just very good and has some interesting aspects that create a very tense and interesting game of maneuver and strategy. The Game Map is very well done, from an aesthetic perspective as well as functionally, and the board makes playing the game easier.
I also was able to shoot a fairly short video summary of my game play with Francisco Ronco who is the owner of Bellica Third Generation and you can watch that at the following link:
Also I have embarked on a series of written Action Point post highlighting the various aspects of the game. Those published to date are as follows:
If you are interested in An Impossible War: The First Carlist War in the North, 1834-1838, you can purchase a copy for 120,00 € ($139.08 in US Dollars) from the Bellica Third Generation website at the following link: https://bellica3g.com/en/product/una-guerra-imposible/
7. Blue & Gray Deluxe Edition from Decision Games
If you like classic wargames, and by that I mean simple I Go You Go Hex and Counter games from the 70’s and 80’s, then you are going to love Blue & Gray Deluxe Edition, which is a new updated version of 2 classic quadrigames from SPI covering several key battles from the American Civil War. Blue & Gray Deluxe Edition consists of the original eight games from the SPI Blue & Gray I & II Quadrigames but with massively upgraded components and counters and some better written rules. The key battles depicted are among the most important of the American Civil War and include Shiloh, Antietam, Fredericksburg, Chancellorsville, Gettysburg, Chickamauga, Chattanooga and The Battle of the Wilderness.
The Deluxe Edition part of the title is really just a few changes including a mounted board that is really gorgeous and pretty sturdy. The counters have been slightly enlarged and there are a few additional optional rules including things like night turns, fatigue, leader casualties. There also were some optional unit counters that could be used but overall this was an artist and layout reissue of the game with some other nice additions such as period fonts and a very solid choice of colors for the maps and the counters as they really compliment each other well. But the game is really extremely playable meaning that is doesn’t take long to pick up the rules and the system is very standard fair. The game mechanics used are based on the Borodino/Napoleon at Waterloo system and frankly are very easy to grock and to get into. I did very much like the back and forth of the scenarios as the players will tend to clash over control of certain key areas that have defensible terrain and that are only approachable from a few areas. But the game does have a few concerns for me such as generally no fog of war and no difficulty in activating any and all of your stacks. But that is what the system is and it will truly appeal to those that are looking for that nostalgic feeling from their childhoods.
But it plays well, fast and is solid and any good solid wargame is good with me.
6. Fighting Formations: US 29th Infantry Division from GMT Games
One of my favorite tactical systems of all time is Combat Commander designed by the late Chad Jensen. I had yet to play his other tactical combined-arms series called Fighting Formations until the newest release came out in 2025 called Fighting Formations: US 29th Infantry Division. Fighting Formations is intended to be an ongoing series of wargames covering WWII tactical combined-arms combat at the platoon and squad levels. Each game in the series will feature a distinct combat unit, highlighting battles in which that unit participated as well as its particular order of battle and fighting characteristics. In this second volume of Fighting Formations, GMT features the US 29th Infantry Division—“Blue and Gray”—as it fought from just after D-Day in June of 1944 to the end of the year.
The core mechanics from the original Fighting Formations remain unchanged in this volume. The difference from the original game is in the way the units will fight. The different costs on the matrix place an emphasis on certain actions and assets for the 29th ID that were different than the others games way of approaching a battle. This game is far from Combat Commander though as it uses cards but they are not the engine of the game. The game also has a very interesting and unique activation system where each of the orders cost a different amount of Initiative and tuns into and impulse-type back and forth where the various Orders carry with them a certain cost in Initiative. The game has a pool of 40 Initiative that is spent to give these orders and then to activate units for those orders. At the end of every order, the player with the most Initiative is able to give the next order. In response, the opponent can also spend Initiative to conduct both Opportunity Fire or Reactive Fire which keeps the game very dynamic and fluid. Just a really great way to approach this and if you have played Downfall from GMT Games you will notice similarities with the system.
The game also tells a great narrative of the differences between the US and German troops as the 29th had access to more battlefield support than their German counterparts and the card deck is tailored to that experience as well. The US player in the new game has access to more cards and at lower initiative costs, bringing artillery and air support to the forefront in a way that we have not seen before.
We did a RAW video after our 1st play and you can watch that at the following link:
The Rock of Chickamauga is the 2nd entry in the Black Swan Series from Flying Pig Games designed by Hermann Luttmann and follows closely on the heels of A Most Fearful Sacrifice. Using the same game system, which is based on the well received Blind Sword Series, The Rock of Chickamauga covers the entire Battle of Chickamauga, fought from September 18th through the 20th, 1863 in northern Georgia. The Union Army of the Cumberland, under William Rosecrans, is driving south from Chattanooga, hoping to envelop and trap Braxton Bragg’s Confederate Army of Tennessee. But Bragg anticipates the maneuver, pulls back and then counterattacks the overextended Union forces. They meet along Chickamauga Creek, nicknamed the “River of Death”, in an epic struggle.
The Black Swan Series uses a card-draw activation system that functions similarly to a traditional chit-pull system. This system is a core mechanic for introducing uncertainty, friction, and the fog of war into the gameplay. The cards themselves contain specific game information and orders, which streamlines play and reduces the need to look up rules or charts, saving time compared to traditional chit-pull systems.
I also very much liked how the confusion and true fog of war that existed at the battlefield was included in the game play. Not only do to the commanders’ lack precise information about their opponent but also the physical nature of the battlefield. Both sides basically went into battle stumbling and bumbling through the woods, searching out what they thought was the enemy’s flank and actually being way off in their assumptions. The woods themselves were so uniquely characteristic in that they were mostly thickly grouped with little undergrowth (being cleared by the local farmers and millers), but still displaying significant canopies. This canopy functioned like a tropical jungle “roof” and trapped smoke and dust within it. To add to that, there had been little rain in the area and the trails, lanes, and roads were exceedingly dry and produced clouds of dust. My main concern therefore was replicating all that confusion and ignorance of the location of opposing forces and thankfully, that’s what the entire Blind Swords/Black Swan System is modeled to reflect. Therefore, I just doubled-down on the inherent “chaos” elements of the core system and made those factors even more prevalent.
I also love how the system models the units and their fighting prowess referred to as Cohesion. The Cohesion Rating of a unit is essentially a catch-all for its morale, training and experience and includes what the unit’s intangible fighting qualities are, other than just sheer number of men. It is probably the most important aspect of the game engine as it is the key element that will determine how well a unit will fight – and survive – during the battle. It is used throughout the game to measure a unit’s ability to fight and endure on the battlefield. The CR will fluctuate during the entire game, and it will do so often. Units that are Shaken or Battleworn will have their CR suffer. Units can also raise their CR temporarily through the use of various events or by providing them with Unit Support. A low CR makes units more vulnerable and increases their risk during a Break Test, which will cause them to leave the game if they fail. You have to focus on this aspect or you will be unable to consistently move your attacks forward.
Just such a great system and I love Hermann’s attention to the historical details and the way he tells these ACW stories. I love this Black Swan Series and look forward to future volumes.
4. BCS Inflection Point: The Battle for Kalach and the Battle of Chir from Multi-Man Publishing
Over the past couple years, we have played a few venerated and respected series games from Multi-Man Publishing for the first time that frankly I had initially turned my nose up at for various reasons. These reasons were not really anything important or truly about the design or mechanics but included things like price, graphic design, style and somewhat because of the complexity and reputation of complexity of those systems. These series included first the Standard Combat Series (SCS) with our first game being Rostov ’41 and now the Battalion Combat Series (BCS) with our first game being Arracourt and since we have played several other volumes including Brazen Chariots and Baptism by Fire. I must admit here that I am actually embarrassed that I hadn’t played those series and readily admit that I just discounted and dismissed them out of hand. I am so very glad that we repented of our stubbornness and found this system because it really is very, very good at what it is trying to teach and demonstrate about warfare at this scale.
One of the best parts about this new volume in the series is that it is actually 2 games in the same box. One game which is smaller, with fewer counters and formations and that uses a smaller version of the board included in the game and one that is the full campaign with more counters and formations, a larger board and is much more involved. Overall, I would say that the BCS is a fairly straightforward series even for someone who is a beginner and has less experience with the BCS system like me. I think that I thought they were designing Arracourt as the entry to the series, and I still think that is the case, but this volume has some of the same flexibility and approachability that some of the larger titles don’t necessarily have. I feel that players can cut their teeth on this one using the smaller scenario while getting comfortable with the rules and system before you attempt the larger scenarior or even other larger games in the series. I also feel that the game requires somewhat of a paradigm shift before playing. What I mean by that is really two fold.
First, I really feel that usually these big hex and counter wargames are set in their combat methods, namely focused on odds based Combat Results Tables and counting up combat factors to get the perfect odds, and require a bit of calculation. But BCS doesn’t use a traditional CRT but breaks the combat down into more of a collection of DRM’s based on many factors.
Second, the game also has very low counter density, with the scenario we played having about 40 counters per side on the map at any given time, and stacking limits are just 2 combat units with other counters also allowed such as support units or HQ’s. There are not enough counters here to create the long contiguous line or wall of units that are typical in some of the larger systems, which lends this one to a bit more maneuvering of units to get into good position while using terrain to attempt to isolate and cut off units from supply or to prevent the enemy from doing the same to your units. This created somewhat of a back and forth dance for us that kept my focus and attention and was really quite entertaining. Supply is important to the system but not as focused on it as say the Operational Combat Series (OCS). The players must manage their HQ’s and their combat trains to keep their units in full supply and this becomes somewhat of a different type of dance that sees players cautiously keeping their units in a loose perimeter to prevent a freak breakthrough or run around to get to the back of the formations to take out supply sources and cut off units. I really liked the scale and feeling of this BCS system and had a very good time in trying to learn and understand it and also trying to figure out the best strategies to engage.
The counters included in BCS Inflection Point are dual sided but the back side is not to show a reduced unit as is normal with these wargames. The front side is the unit’s move side while the back side is its deployed side. Each of these stances is very important and must be used by each player to get the most out of their units and to take it to their opponent.
We also did a review video and you can watch that at the following link:
If you are interested in BCS Inflection Point: The Battle for Kalach and the Battle of Chir, you can order a copy for $112.00 from the Multi-Man Publishing website at the following link: https://mmpgamers.com/inflection-point-p-418
3. Close Quarter Battles: Waterloo from Lock ‘n Load Publishing
Close Quarter Battles: Waterloo was such a surprise of the year for us. It is a tactical level wargame that is truly intense and chaotic that attempts to, and does a fantastic job of accomplishing, the brutal, up-close engagements of Napoleonic warfare. The game puts players in command of elite British, French, or Prussian forces as they fight for control of key battlefield positions. The designer has chosen to center on the two strongpoints of the battle of Waterloo including the La Haye Sainte farm and the Hougoumont Farm. First off, the game is just gorgeous and the maps are stunning. In fact, they are so good that I am going to highlight them in an upcoming entry on the blog in the Beautiful Boards of Wargaming Series. But, the Waterloo battles here are skirmishes around and for the taking of these two farms. The game uses a grand tactical system that works to attempt to to simulate the interactions between infantry skirmishers of small groups, artillery sections and cavalry in a fortified area. This leads to the game being uber violent and bloody as assaults are common but difficult particularly for the attackers who will have to scale formidable walls and then take on the awaiting crack troops inside. Officers and generals are very important to the battle as they will influence the battlefield with their command range and other attributes to add DRM’s to the troops by issuing orders, rallying troops, and trying their best to maintain discipline.
I really like this one as it is really a game. Meaning that the rules are simple yet impactful and the game provides each of the players with a deck of cards that act as events to provide bonuses, allow for greater movement distance or to perform heroic acts. They also provide the chance to attack and eliminate leaders with sniper fire to cause even further chaos and blood.
We did a review video and you can watch that at the following link:
2. All Are Brothers: Solferino, 1859 from Legion Wargames
We very much enjoy the Blind Swords Series originally designed by Hermann Luttmann. We love it for its chaos, unpredictability and for is crunchy combat system. This past year, a new designer Bryan Armor took up the call and took this Blind Swords System and put it into action in the Second Italian War of Independence. All Are Brothers: Solferino, 1859 simulates the decisive battle of the Second Italian War of Independence at the Brigade-level, with some additional Regimental-size and smaller detachments included.
And the other part that is so good about this system and the game itself is the activation chit pull system. The chit pull mechanic also very much aids in solitaire play, as does variable activation rules and reinforcement tables but it really makes for a lot of uncertainty about how and what units will activate. No battle is in your full control and this system really reinforces that truth about the battlefield.
One of the best parts is the morale system. Each corps has an associated Corps Morale marker on the Morale Track. Each Corps Morale marker will be reduced by one when they activate including movement and fire attacks but also when Leaders take casualties or break tests are failed. This can all lead to the corps becoming demoralized which means they will be unable to offensively move and attack and will be relegated to a defensive posture. So you really have to make good choices about what units and when they will activate. You cannot just wholesale activate each formation every turn but must look at their status to decide how best to manage this aspect that was a very interesting and nice addition to an all ready proven and very good system. This means that units are also prone to attrition and need to be covered or supported by artillery fire. They can be used most effectively if massed at certain points. The chits also effected the corps’ stance switching between aggressive or defensive and this is a choice that must be made with a full understanding of a plan of attack.
Just a very solid and playable game that felt like a big wargame that played fairly quickly and easily and didn’t get bogged down too much.
We did a review video and you can watch that at the following link:
If you are interested in All Are Brothers: Solferino, 1859, you can order a copy for $58.00 from the Legion Wargames website at the following link: https://www.legionwargames.com/legion_AAB.html
1. Congress of Vienna from GMT Games
I am a big fan of the Great Statesman Series from GMT Games and several of its volumes including Churchill and Pericles are among my favorite wargames. But Congress of Vienna is a really great game, probably the best of the bunch, and has matured the system laid out by its found Mark Herman. Congress of Vienna has two different but related phases including the conference table where players first debate over the control of issues germane to the factions and the period of the war and second these issues are then used on the battlefield to recruit units, attack and take overall command of battles. The players will be playing cards from their hands to “debate” over the various issues that were placed on the table, which include all types of things such as Military Operations, Recruitment, who will lead the combined Coalition forces (Generalissimo), Future of French Government, British Financial Aid, Liberalism vs. Absolutism, Austrian Neutrality and several other issues, and then later the players will use their accumulated Resources gained from the issues to enact action on the Military Map and do things like mobilize troops, place Military Support Markers and the ultimately to conduct warfare.
The interesting thing about this mechanic is that sometimes the other players will win your issues by having them rest on their side of the conference table at the conclusion of the phase. In this case, the winning player will gain control of that issue and then will get the opportunity to choose where the issues will be placed on the Military Map, but the owner of the issue will still pay for it and must do where the placement is telling them to do, such as attack on a certain front. There also is a small area on the board where the Russian player must turn their effort to fight in Asia. This action has no real in game effect or benefit other than causing Russia to lose the choice of what they wanted to do in favor of doing something else. This can be a great tactic for the French player, or even for other Coalition players to spoil the plans of the Russian player and possibly box them out of gaining VP for military victories on various tracks.
The game relies on cards and cards can be used to negotiate, i.e. move an issue to your National Track. Cards can provide a particular issue with positive and negative DRM’s depending on which nation plays them and can also be traded with another player during the Diplomacy Phase. Certain cards are better than others for debating an issue moved by another player; and finally, if they are saved for the War Phase, staff cards can be used to modify dice rolling in battles. These are very versatile cards and the players will have to learn them and their benefits in order to be effective at the game.
But even though the game relies on cards and has an important Diplomacy Phase, without a doubt CoV is a wargame with DRM’s for units and military leaders, terrain, military support, a Casualties Table, retreat and advancing after battle, etc. However, both Phases are inversely related and if players use their Character Cards in the form of generals and military leaders for the Diplomacy Phase you will not have them available for the Military Phase. If you do not win enough issues during the Diplomacy Phase, you will not have recruiting or military operations where they are most important to your power.
I would say that the game is very involved and will take a few plays to really get comfortable with. I don’t want anyone to take this to mean that the game is overly complex and difficult to play. That is not the case. It is a very approachable system and game once you get the basics down through the play of a few turns. I would also say that there is a ton of differences and asymmetry with the nations and learning all of them well and understanding their tactics will take some time. But that is a good thing in my opinion and means that there is depth to the game and replayabilty is huge. And in my opinion, this was the best game that I played from 2025. Just fantastic!
Each year I feel compelled to tack on some games to this list just because they were so very interesting or dealt with unique settings that I feel they are worthy of mentioning. While they didn’t make the Top 10 list, they are each good games in their own right.
Alliance: Multi-Player Napoleonic Wargame from Columbia Games
All in all, we had a great time with Alliance. I think that we felt that the game was solid, with some great mechanics such as the card play and the block combat system, but was just missing some things. I would like to see what the community comes up with as far as variants and other changes over the next year. But the game delivers on its promise of a sandbox strategic level Napoleonic wargame with a focus on alliance building and maintenance. There is a lot to like and we plan to play this one again.
We also did a full video review and you can watch that at the following link:
If you are interested in Alliance: Multi-Player Napoleonic Wargame, you can order a copy for $99.98 from the Columbia Games website at the following link: https://secure.columbiagames.com/products/3221
Werwolf: Insurgency in Occupied Germany, 1945-1948 from Legion Wargames
Werwolf: Insurgency in Occupied Germany, 1945-1948 is a COIN Series adjacent game designed by Clint Warren-Davey and Benjamin Feine and is an alternate history game, but the story that is presented is entirely plausible. Werwolf was a real underground guerrilla group, comprised of SS and Hitler Youth members. It was intended to lead an insurgency against the invading Allies and Soviets when it became clear that Germany was losing the war in a conventional sense in the mid-1940’s. They did in fact have a few successes and American intelligence officer Frank Manuel said that the Werwolves were prepared “to strike down the isolated soldier in his jeep, the MP on patrol, the fool who goes a-courting after dark, the Yankee braggart who takes a back road.” The game allows players to take on the role of the occupying Soviets and Western Allies along with this Werwolf insurgency and the Edelweiss insurgency.
This game was very good and frankly was a breath of fresh air in the COIN Series or COIN Series adjacent arena. This game was very kinetic and each faction had a ton of combat and had to engage each other to accomplish their goals. The cards were fantastic and the additions to the system such as Research Tokens, Heavy Weapons in the form of leftover tanks, Wunder-waffen and the Cold War Tension Track, were really fresh and well integrated into the game play. I loved the game and would play it again in a heart beat!
If you are interested in Werwolf: Insurgency in Occupied Germany, 1945-1948, you can order a copy for $106.00 from the Legion Wargames website at the following link: https://www.legionwargames.com/legion_WER.html
Verdun from Dragon Dawn Productions
Verdun is a card game that is focused on the famous siege of Verdun during World War I. As player’s hands dwindle down as they play 2 cards per round but only draw 1, players will also have to play cards that help the other side, timing it strategically to minimize their own casualties. The teams alternate being the Attacker, and each card played leads to more and more deaths. You are fighting over positive victory points from trying to win several positions through over the top attacks that are worth a set amount of VP but that are hidden from view until they are taken so you never know if you are going for the high VP area or the low ones until you blow the whistle to initiate the attack.
A game of Verdun lasts about 16 rounds as players start with 12 cards, which they then play in a series of 12 tricks. When you win the trick, you gain the VP for the position but the winner will lose their lowest valued cards while the loser will lose their highest value cards to the dead pile representing mounting casualties. Low cards have fewer skulls on them representing deaths while higher cards have more. So even in victory you will be accumulating negative VP’s and this is one of the key aspects of the game…managing those deaths! Just like the high command.
In the end, the player with the highest score will win and this number will be very low or can even be negative. In our play of the game, my French defeated Alexander’s Germans by a final score of 3 VP to -14 VP. What a great little trick taking game! The really interesting part about the late game is that your hand has dwindled to being full of your worst cards as you have most likely used the good cards earlier to win tricks or cause losses to your opponent. The last few card plays just seem brutal and you are just hoping to not have to take a lot of skulls. This felt very fruitless and mimics the despair of commanders as they had to issue orders that they knew were not going to result in any positive gains but only the loss of life.
We did a full video review and you can watch that at the following link:
Drop Zone: Southern France from Worthington Publishing
Drop Zone: Southern France is a company-level wargame covering the Allied airborne assault that spearheaded Operation Dragoon, which was the invasion of Southern France or the Second D-Day on August 15, 1944. The history behind this operation is really very interesting as early on the morning of D-Day, the allied First Airborne Task Force (1st ABTF) parachuted a dozen miles behind the Riviera landing beaches to seize key towns and road junctions, to prevent the German occupation forces from counter-attacking the amphibious landing, and to facilitate the advance of Allied forces. The 4:00 AM parachute drop was badly scattered due to an unexpected dense fog bank that blanketed the battlefield. Drop Zone: Southern France covers the first two days of this airborne operation in six game turns, when the American and British paratroopers and glider-men fought surrounded and alone, supported only by French resistance bands. This game is very good and is just a solid wargame.
This game is surprisingly good and we had a great time playing it! There are just so many interesting elements to consider including the various operations, objectives and paths to take for the Allies to attempt to capture their objectives as planned. We found the game to be imminently playable and were very pleased with the strategy and planning required to do well. This one is a winner and I would recommend it highly as an introductory wargame that plays in 90-120 minutes but gives some real meat to chew on.
We did a full video review and you can watch that at the following link:
Chicago ’68 pits revolutionary spectacle against civil order at the Democratic National Convention riots of 1968. Players take the role of either the Establishment, consisting of the Chicago PD and Mayor Daley, or the Demonstrators, including the Yippies and MOBE, and is a fast-paced game of street battles and political maneuvers.
Each side plays from two asymmetric decks of action cards. The Establishment positions tactical forces and police platoons to co-ordinate mass arrests while working the convention floor. The Demonstrators, on the other hand, can pivot from direct clashes to radical street theater; their tactics can be reactive and unpredictable, allowing for wild cat-and-mouse chases and mischief-making across the tear-gassed avenues of downtown Chicago.
This game is an area control/area influence game that uses cards to take a predetermined set of actions that can be upgraded and replayed with better actions as the game progresses. Each player will fight for control of the delegates to the convention as well as exposure to the nation through the media. Just a very well designed game that was a ton of fun to play.
There I am finally done. My list of the Top 10 Wargames published in 2025. I had fun playing them and putting this list together as I got to revisit each of the games and think about why they were included on this list.
Please let me know what your top games of the year were and what you think of my choices and what games you would have placed on such a list.
An Impossible War: The First Carlist War in the North, 1834-1838 from Bellica Third Generation is a block wargame that recreates the First Carlist War in the North of Spain which was a civil war between the Carlists who supported the succession of the late king’s brother Carlos de Borbón and the progressive and centralist supporters of the regent Maria Christina acting for Isabella II of Spain who were referred to as the Liberals. The game uses blocks representing units but also includes counters and uses cards. I was able to play the game about a month or so ago with Francisco Ronco who owns the publishing company Bellica Third Generation and very much enjoyed the game and how it represented this interesting struggle.
In Action Point 1, we took a look at the Game Map, discussing the point-to-point movement configuration, the various spaces and the delineation of the Carlist versus the Liberal Zones, as well as explained the use of the Rest of Spain smaller map. In Action Point 2, we examined the units available to both sides and covered the importance of Supply. In this Action Point, we will take a look at the Carlist Uprising Phase and what it means for the game.
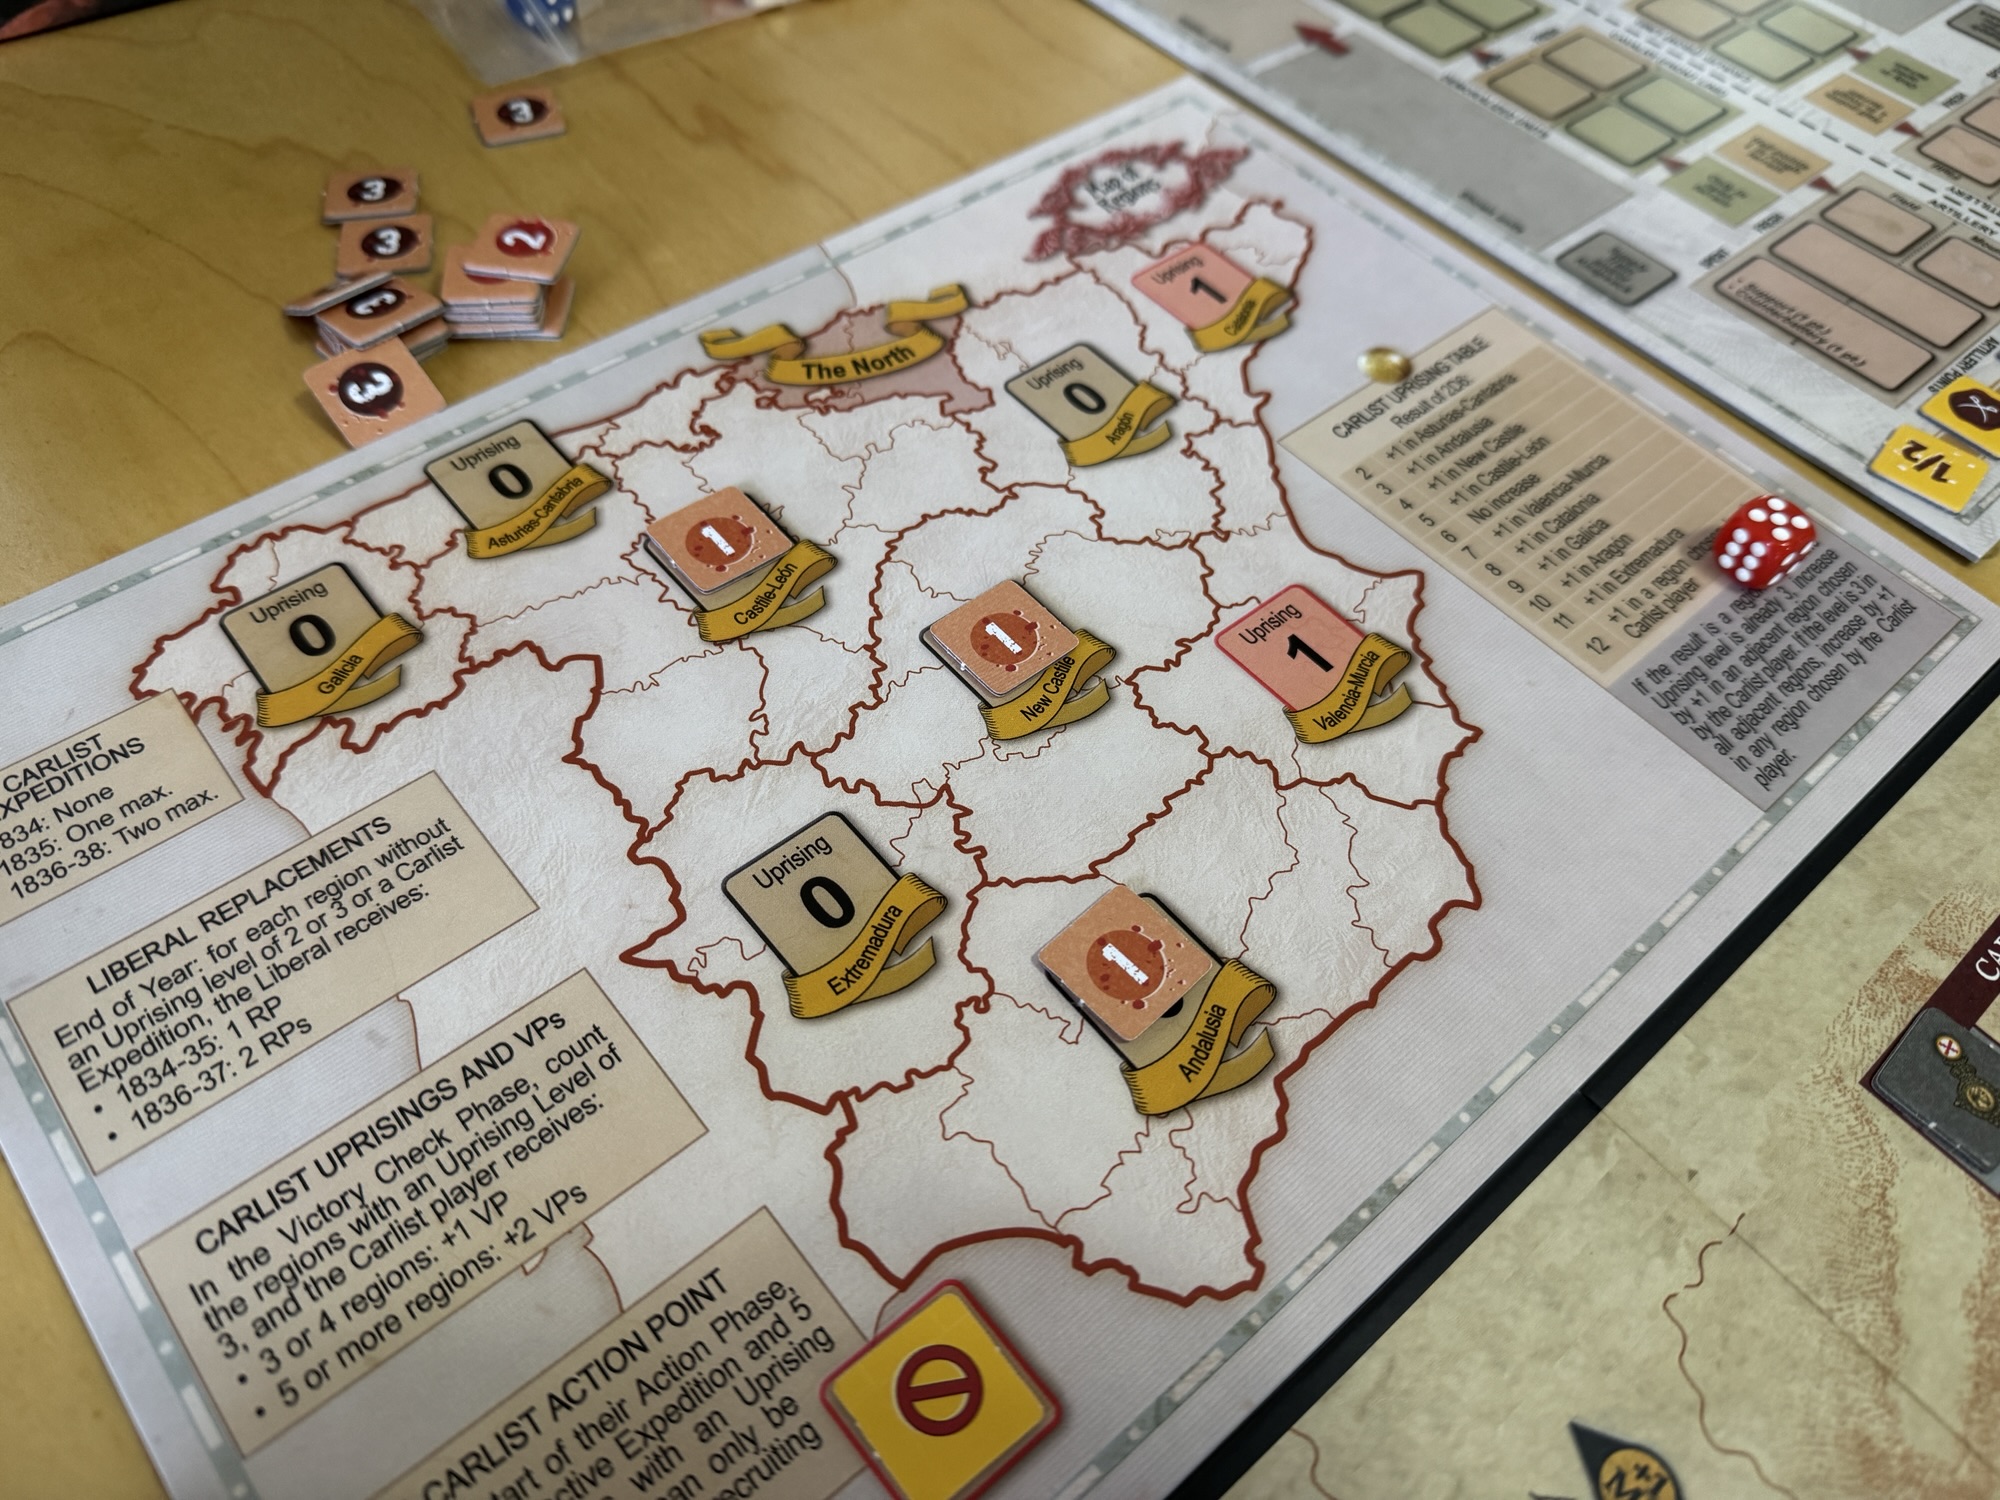
Carlist Uprising Phase
The map of the Regions of Spain, or Rest of Spain Map as it is referred to in the rules, is smaller and simpler than the Game Map itself and is a separate board that plays along side the main board. It consists of 9 large regions that cover large territories of Spain. This map’s purpose is to record the spread of the Carlist Uprisings, to enable Carlist expeditions to operate and for the Liberal player to chase and hunt these expeditions down. The Rest of Spain Map is divided into regions and each region has a Carlist Uprising Level of between 0-3. Also, there are 2 regions, including Valencia-Murcia and Catalonia, where the Carlist Uprising Level cannot fall below 1, reflecting the intensity of Carlism in these regions. The Carlist Uprising Level cannot ever be less than 0 (or less than 1 in Valencia-Murcia and Catalonia which is the printed value on the Rest of Spain Map) or more than 3. Any effects that change the Carlist Uprising Level below or above these numbers is simply ignored.
The Carlist Uprising Phase begins with a roll on the Carlist Uprising Table to determine any effects that will be carried out this turn. Then, if there is an existing active Carlist Expedition on the Rest of Spain Map, the Carlist player may attempt to increase the Carlist Uprising level in its region. This increasing of the Uprising Level is like a wave. A wave that starts out small with presence of unrest being only in a few spaces on the Rest of Spain Map, but it will soon get out of control and turn into a tidal wave that can crush the Liberal player if they have not being paying attention to the situation on the board.
The Carlist player will roll 2D6, sum the result of both of the dice, and then will consult the Carlist Uprising Table found on the Rest of Spain Map to find and then apply the result. If you know anything about the probability of the outcome of this 2D6 roll, the most likely outcome is 7. There are 36 total possible combinations when rolling 2D6 and there are 6 different ways to get to a result of 7 including 1+6, 2+5, 3+4, 4+3, 5+2, and 6+1. So generally your spread will be around that 5-8 range, which according to the Carlist Uprising Table means that you will see the Uprising Level increase in places like Castile-León (result of 5), no increase (result of 6), Valencia-Murcia (result of 7) and Catalonia (result of 8). But it is also important to remember that the highest a region can attain is 3 and if it is rolled then the Carlist player will choose to increase the Carlist Uprising Level in 1 adjacent region.
The next step of this phase is the Expedition portion. If there is any active Expedition on the Rest of Spain Map then the Carlist player can attempt to increase the Uprising Level in each region where there is an Expedition, as long as there are more Carlist units than Liberal units there. The number of Liberal Infantry and Cavalry units in the region is subtracted from the number of Carlist Infantry and Cavalry units forming the Expedition. The Carlist player then rolls a die, and if the result is equal to or less than this number, the Uprising Level increases by +1. An Expedition cannot increase the Uprising Level in a region where the level is already 3 and there is no adjacent spill over of this furor.
The units of the Liberal player can move on this map at all times. The units of the Carlist player cannot enter the Rest of Spain Map before 1835. It is important to keep in mind the Carlist player can only have a single active Carlist Expedition on the Rest of Spain Map in 1835, and a maximum of 2 Expeditions from 1836 onwards.
So why is this part of the game important? Uprisings can provide Victory Points to the Carlist player. In addition to VP’s, Uprisings provide replacements for Carlist Expeditions and feeds the spread of rebellion on the Rest of Spain Map. There is a track on the map where the Carlist player keeps an accounting of the the Carlist Prestige marker to gain VP’s. If the amount of regions with an Uprising Level of 3 is at 3 or 4 regions, the Carlist player will gain 1 VP. If there are 5 or more, the Carlist player will receive +2 VP’s.
But there are other benefits to the players that come as a result of the Uprising Level on the Rest of Spain Map. For the Liberal player, at the end of each year for each region that is empty of Carlist Expeditions and has an Uprising Level of 0 or 1 (no 2’s or 3’s), they gain 1 Replacement Point in 1834-1835 and 2 Replacement Points in 1836-1837. Think of it this way. If there are no Carlist troops threatening the local Liberal supporting public, they are more willing to provide their sons to the military to fight the rebellion. But, if the Carlist fire of uprising has spread and there are active Carlist troops in the streets there will be less support for the Liberal cause.
Also for the Carlist player, if at the start of their turn there is an Expedition on the Rest of Spain Map and there are 5 or more regions with an Uprising Level of 2 or 3, they will gain +1 Action Point that can only be used to move or recruit Expeditions. Once again, if the groundswell of support is leaning toward the Carlist, the local populace are more in favor or supporting these Expeditions and expelling the Liberal from the region.
As you can see, there are a great deal of benefits for both players from the Uprising Level but there seem to be more impactful benefits for the Carlist player. If they can control the Rest of Spain Map, and dot the landscape with support and uprisings, they can win the game handily. But don’t worry, the Liberal player has an action available to them for combating and reducing the Carlist Uprising level in a region. This action is called Suppress Uprising.
Suppress Uprising is where the Liberal player can attempt to reduce the Carlist Uprising Level in a region by spending 1 Action Point and rolling 1D6. If there are no Liberal Infantry or Cavalry unit in the region, or if no unit takes part in the action, if the result is equal to or less than the Carlist Uprising level, then the attempt has no effect. If the result if higher than the Carlist Uprising Level, then the level is reduced by -1. If there is at least 1 Liberal Infantry or Cavalry unit in the region that takes part in the action, for each Liberal Infantry or Cavalry unit after the first that participates in the action, the Liberal player adds +1 to the roll. But there are possible losses that come with using your troops in this manner.
If the result is less than the Carlist Uprising Level, then the attempt has no effect. If the result is equal to the Carlist Uprising Level, then the level is reduced by -1, and one Liberal Infantry or Cavalry unit loses 1 strength point. If the result is 6 or more, then the Uprising Level is reduced by -2. So there is incentive to make sure you use your troops in this action. A bit risky but useful and definitely worth the risk.
An Impossible War is a fantastic design that attempts to capture the historical aspects of this titanic struggle for the throne of Spain in the mid 19th century. Historically, the Carlist forces who were defenders of traditional monarchy, regional privileges, and the Catholic Church, were a minority faction fighting an overwhelmingly larger, richer liberal government. The uprising phase reflects how the Carlists compensated for this disparity by forcing the Liberal government to fight on multiple fronts and suffer from logistical nightmares across hostile terrain. The Carlist Uprising Phase, and the use of its auxiliary Rest of Spain regional map, forces some really tough dilemmas on the Liberal player. They must attempt to divide their forces between the main Game Map and the Rest of Spain Map to prevent the opposition Carlist forces from overwhelming the home territory in the north. It serves as a vital strategic balancing act for the Liberal player that cannot be ignored and must be dealt with systematically and somewhat evenly. Too much focus on the Rest of Spain Map and the situation on the Game Map will quickly snowball and they will lose control. Focus on the situation on the Game Map and the protection of Cities and Towns and the Carlist Expeditions will gain momentum and turn the countryside red. While the primary war centers on the rugged terrain of northern Spain (Navarre and the Basque Provinces), the uprising mechanic abstractly models scattered insurgencies across the rest of the country. And as you know, insurgencies can be very unpredictable and difficult to contain. You stamp out one area only to see a fire start in another. The Liberal player must divert troops and supply resources to the secondary map to quell these localized rebellions and hunt down Carlist expeditions originating from the north. And, the important thing for the Carlist player and the expansion of the uprisings and the success of their expeditions is the possible generation of generation of Prestige and Victory Points, which is really crucial to their path to victory.
In Action Point 4, we will take a look at the activation system and the use of Action Point Markers.
An Impossible War: The First Carlist War in the North, 1834-1838 from Bellica Third Generation is a block wargame that recreates the First Carlist War in the North of Spain which was a civil war between the Carlists who supported the succession of the late king’s brother Carlos de Borbón and the progressive and centralist supporters of the regent Maria Christina acting for Isabella II of Spain who were referred to as the Liberals. The game uses blocks representing units but also includes counters and uses cards. I was able to play the game about a month or so ago with Francisco Ronco who owns the publishing company Bellica Third Generation and very much enjoyed the game and how it represented this interesting struggle.
In Action Point 1, we took a look at the Game Map, discussing the point-to-point movement configuration, the various spaces and the delineation of the Carlist versus the Liberal Zones, as well as explained the use of the Rest of Spain smaller map. In this Action Point, we will examine the units available to both sides and cover the importance of Supply.
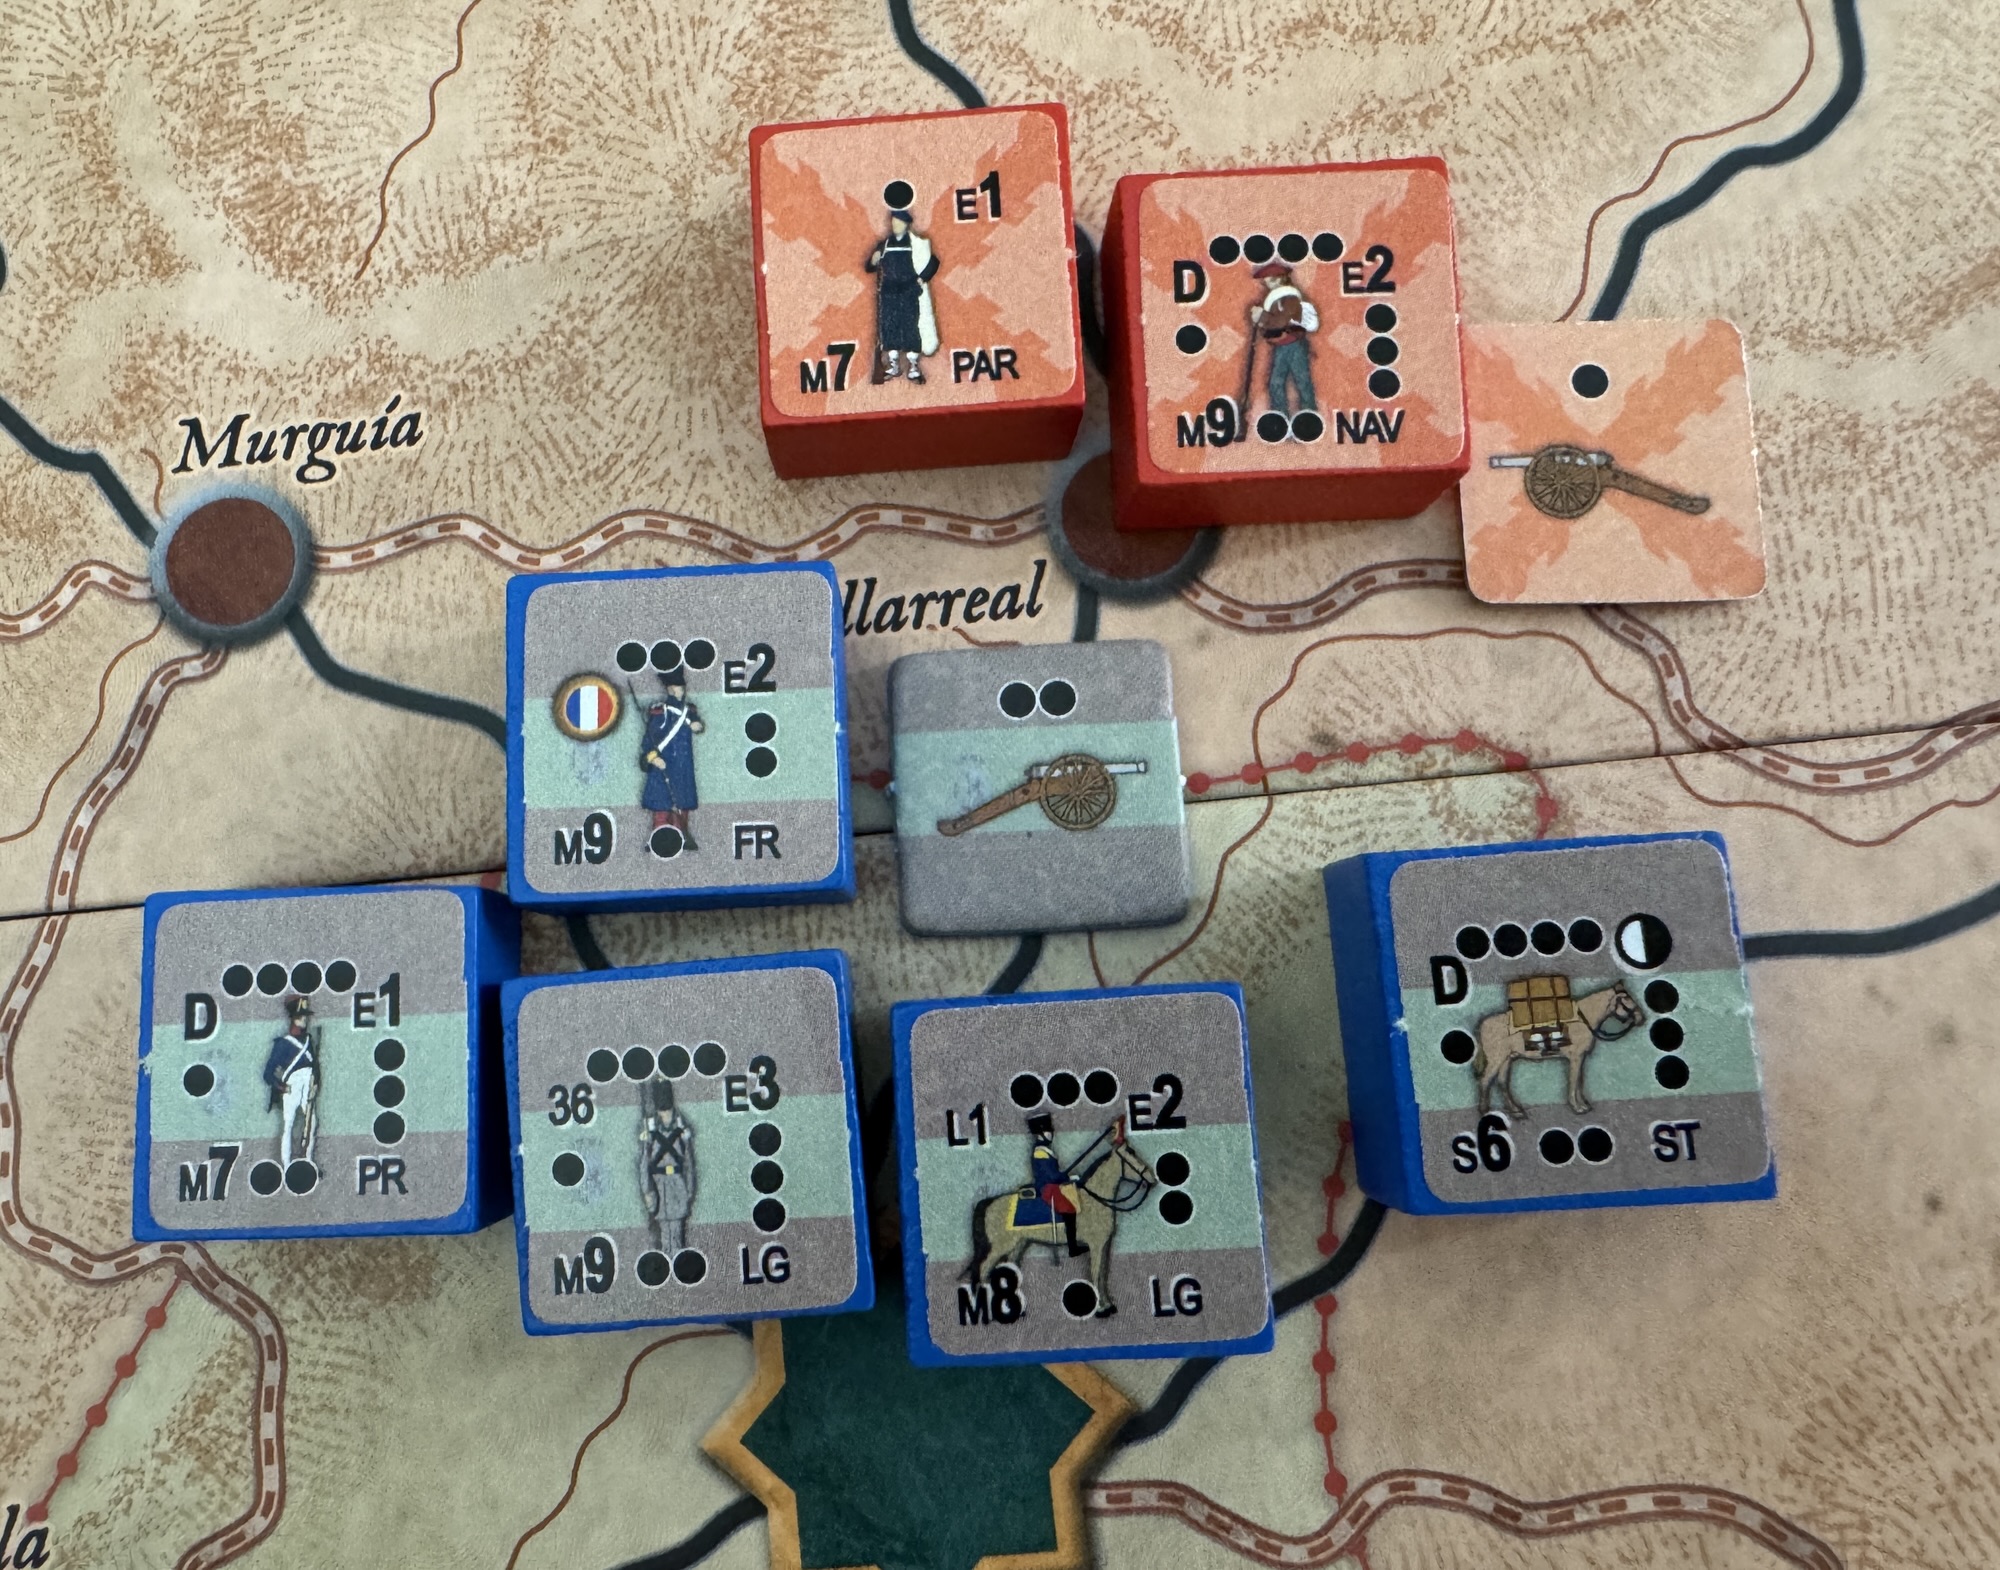
Units
Units in the game represent Carlist (red) and Liberal (blue) armed forces, as well as the logistics needed for these troops to operate in hostile territory. Most of the units are wooden blocks including Infantry, Cavalry, and Supply Trains but there are also cardboard counters representing Artillery, both Field and Mountain, and Knapsack units, which are limited and temporary supplies that are transported by the soldiers themselves.
Let’s first take a look at the scale of the game and the units. With Infantry, a single Strength Point is roughly equivalent to a battalion consisting of between 500 to 800 fighting men. The only difference in the Infantry scale between the sides is a Carlist Partida unit, which represents a variable number of local guerilla fighters who are loosely organized in the amount of about a hundred men. For Cavalry, a Strength Point is equivalent to a squadron consisting of about 100 horsemen. For Artillery, a Strength Point is equivalent to 1 or 2 batteries made up of between 4 to 12 cannons of different calibers. The Supply units for the game are a very interesting and granular approach to supply and I very much enjoyed the juggle of keeping these units in good shape and with large moving armies. A Supply Train, which is represented by a block unit with the picture of a pack horse on it, represents a group of carts and pack animals that transport the needed supplies to keep an army in the field including food, munitions, and baggage. On a smaller scale are the Knapsacks that represents the food and munitions carried by the soldiers themselves.
As a Block Wargame, the Infantry and Cavalry Blocks used have various dots located along the edges of the blocks. Some blocks have 4 steps while others have less but usually no less than 3 steps. The exception to this general rule is the Partida units that only have 1 step. The current combat strength of the units determines how many 6-sided dice will be rolled in combat. During combat, for each hit that a unit receives, its strength is reduced by 1, which is shown by simply rotating the block 90 degrees counterclockwise. If a block is reduced below 1 strength then it will be eliminated.
Supply Train Blocks also have pips located on the block which represent the units ability to provide supply to other units. When the Supply unit provides supply to friendly units located in its space, its strength will be reduced by 1 pip by rotating the block 90 degrees counterclockwise. If the block is reduced below 1 strength then it is eliminated. No dice are rolled for a Supply Train in combat as it is solely a logistics unit rather than a combat unit. Supply Capacity is indicated on the units by the letter “S” and a number, such as S6 or S2. The number is the amount of friendly Infantry and Cavalry units that a Supply Train or Knapsack can supply during the Supply Check. A Supply Train with S6 can supply up to 6 friendly Infantry and Cavalry units in its space. A Knapsack with S2 can only supply a maximum of 2 units
Artillery counters show the current strength with the number of pips on the visible side of the counter. The strength determines how many dice are rolled in a Skirmish and how many points of Artillery it will contribute to a Battle. Artillery units do not receive hits in combat, but they can be eliminated or captured if their side is defeated.
Now that you know the makeup of the units and the various forces represented, let’s take a very quick look at the statistics of each side’s combatants. Before we go any further, I am very hesitant to provide these details as I have gone over them about 10 times and am sure that I miscounted or left out certain units and their abilities. But, this look should give you an overall feel for the differences between the units and their general fighting abilities.
Carlist Units
The Carlist player will have access to a total of 26 units. These include 4 Cavalry, 21 Infantry, amongst this number are a total of 3 Partida units, and 1 Supply unit. The Effectiveness Rating for these units, which as described above equates to their fighting prowess with the higher the number the more likely they are to hit in combat, are shown in the below table with 5 units with an ER1 (20.0%), 16 units with an ER2 (64.0%) and just 4 units with an ER3 (16.0%). Keep in mind that Supply units do not have an ER as they are non-combatants.
Liberal Units
The Liberal player will have access to a total of 48 units. These include 10 Cavalry, 35 Infantry and 3 Supply units. The Effectiveness Rating for these units, which as described above equates to their fighting prowess with the higher the number the more likely they are to hit in combat, are shown in the below table with 12 units with an ER1 (26.6%), 29 units with an ER2 (64.4%) and just 4 units with an ER3 (8.9%). Keep in mind that Supply units do not have an ER as they are non-combatants.
By way of comparison, you can see that the Liberal Units have a slightly better average Effectiveness Rating (1.82 per unit) as compared to the Carlist Units (1.64). This difference is a bit deceiving though as the Carlist player actually has the same amount of ER3 units (4 for the Carlist player vs 4 for the Liberal player) but as a percentage of their total units they have 16.0% of their units as ER3 as compared to just 8.9% ER3 units for the Liberal player. This means that the Carlist units are a bit better and will generally have better units making up their forces than the Liberal player in any given battle.
The real comparison, and where the difference between the 2 sides stands out, is in the area of Morale. Morale is indicated by the letter “M” on the units and is shown as a number, such as M7, M8 or M9. This Morale number is the maximum result of the sum of 2d6 that gives a success in a morale roll. Each time during an activation that a unit receives 1 or more hits, it must then roll a Morale check. Morale checks are only made in Battle and never in a Skirmish, Assault, Pursuit, or Rout. If the Morale check fails, the failing unit will immediately be moved to the Demoralized Units Box. Morale is also key for Infantry that are being charged by Cavalry as they will make a Morale check and if they succeed they can initiate a counter charge. If they succeed the check then the attacking Cavalry will be spent and do no damage but if failed the attacking Cavalry unit fires and adds +1 to its Effectiveness Rating.
The Liberal player has an Average Morale value of their 45 units of 7.97 as compared to the Carlist player Average Morale value of their 25 units of 8.76. While not a huge difference, this slight edge to the Carlist player means that their units will be able to more often counter charge and stay on the battlefield as they will not break and become Demoralized as often.
Also, if you remove the 3 lowest value Carlist units, the 3 Partida units who each have a Morale Value of 7, this average becomes much higher at a 9.0 and really starts to show the significance of the Carlist advantage in Morale. In my play with Franciso Ronco, I felt like he definitely had the advantage on the battlefield, at least value wise in the area of Morale, but all it really took was for 1 of his better units to be demoralized and the odds became much more even.
The other advantage that the Carlist units hold is that they are typically fighting on their home turf and supply is much less stringent on their forces. The Liberal player must make consistent campaigns in the Carlist Zone of the board and this will require them to invest more into Supply units such as Supply Trains and Knapsacks.
I very much enjoyed the asymmetry between the Carlist and Liberal forces. It made for a very interesting tactical challenge for both sides as they have to play to their strengths and not get too overly concerned with the numbers. The Carlists will be much more mobile in their defense and look to exploit every gap in a supply line to move around and stay away from the numerically superior Liberal forces, whereas the Liberal player will have to move more methodically to take outlying towns and settlements to be able to shore up their lines and create less opportunities for end arounds by the Carlists. The disparity in the forces was a very interesting choice by the designer David Gómez Relloso and I am sure is reflective of the historical reality of the First Carlist War.
I also was able to shoot a fairly short video summary of my game play with Francisco Ronco who is the owner of Bellica Third Generation and you can watch that at the following link:
In Action Point 3, we will take a look at the Carlist Uprising Phase and what it means for the game.
An Impossible War: The First Carlist War in the North, 1834-1838 from Bellica Third Generation is a block wargame that recreates the First Carlist War in the North of Spain which was a civil war between the Carlists who supported the succession of the late king’s brother Carlos de Borbón and the progressive and centralist supporters of the regent Maria Christina acting for Isabella II of Spain who were referred to as the Liberals. The game uses blocks representing units but also includes counters and uses cards. I was able to play the game about a month or so ago with Francisco Ronco who owns the publishing company Bellica Third Generation and very much enjoyed the game and how it represented this interesting struggle.
In this series of Action Points, we will first take a look at the Game Map, discussing the point-to-point movement configuration, the various spaces and the delineation of the Carlist versus the Liberal Zones, as well as explain the use of the Rest of Spain smaller map, examine the units available to both sides and cover the importance of Supply, take a look at the Carlist Uprising Phase and what it means for the game, take a look at the activation system and the use of Action Point Markers, and cover some examples of Battle, focusing on the tactical aspect of combat with the use of the Battlefield Board, as well as an example of a Siege.
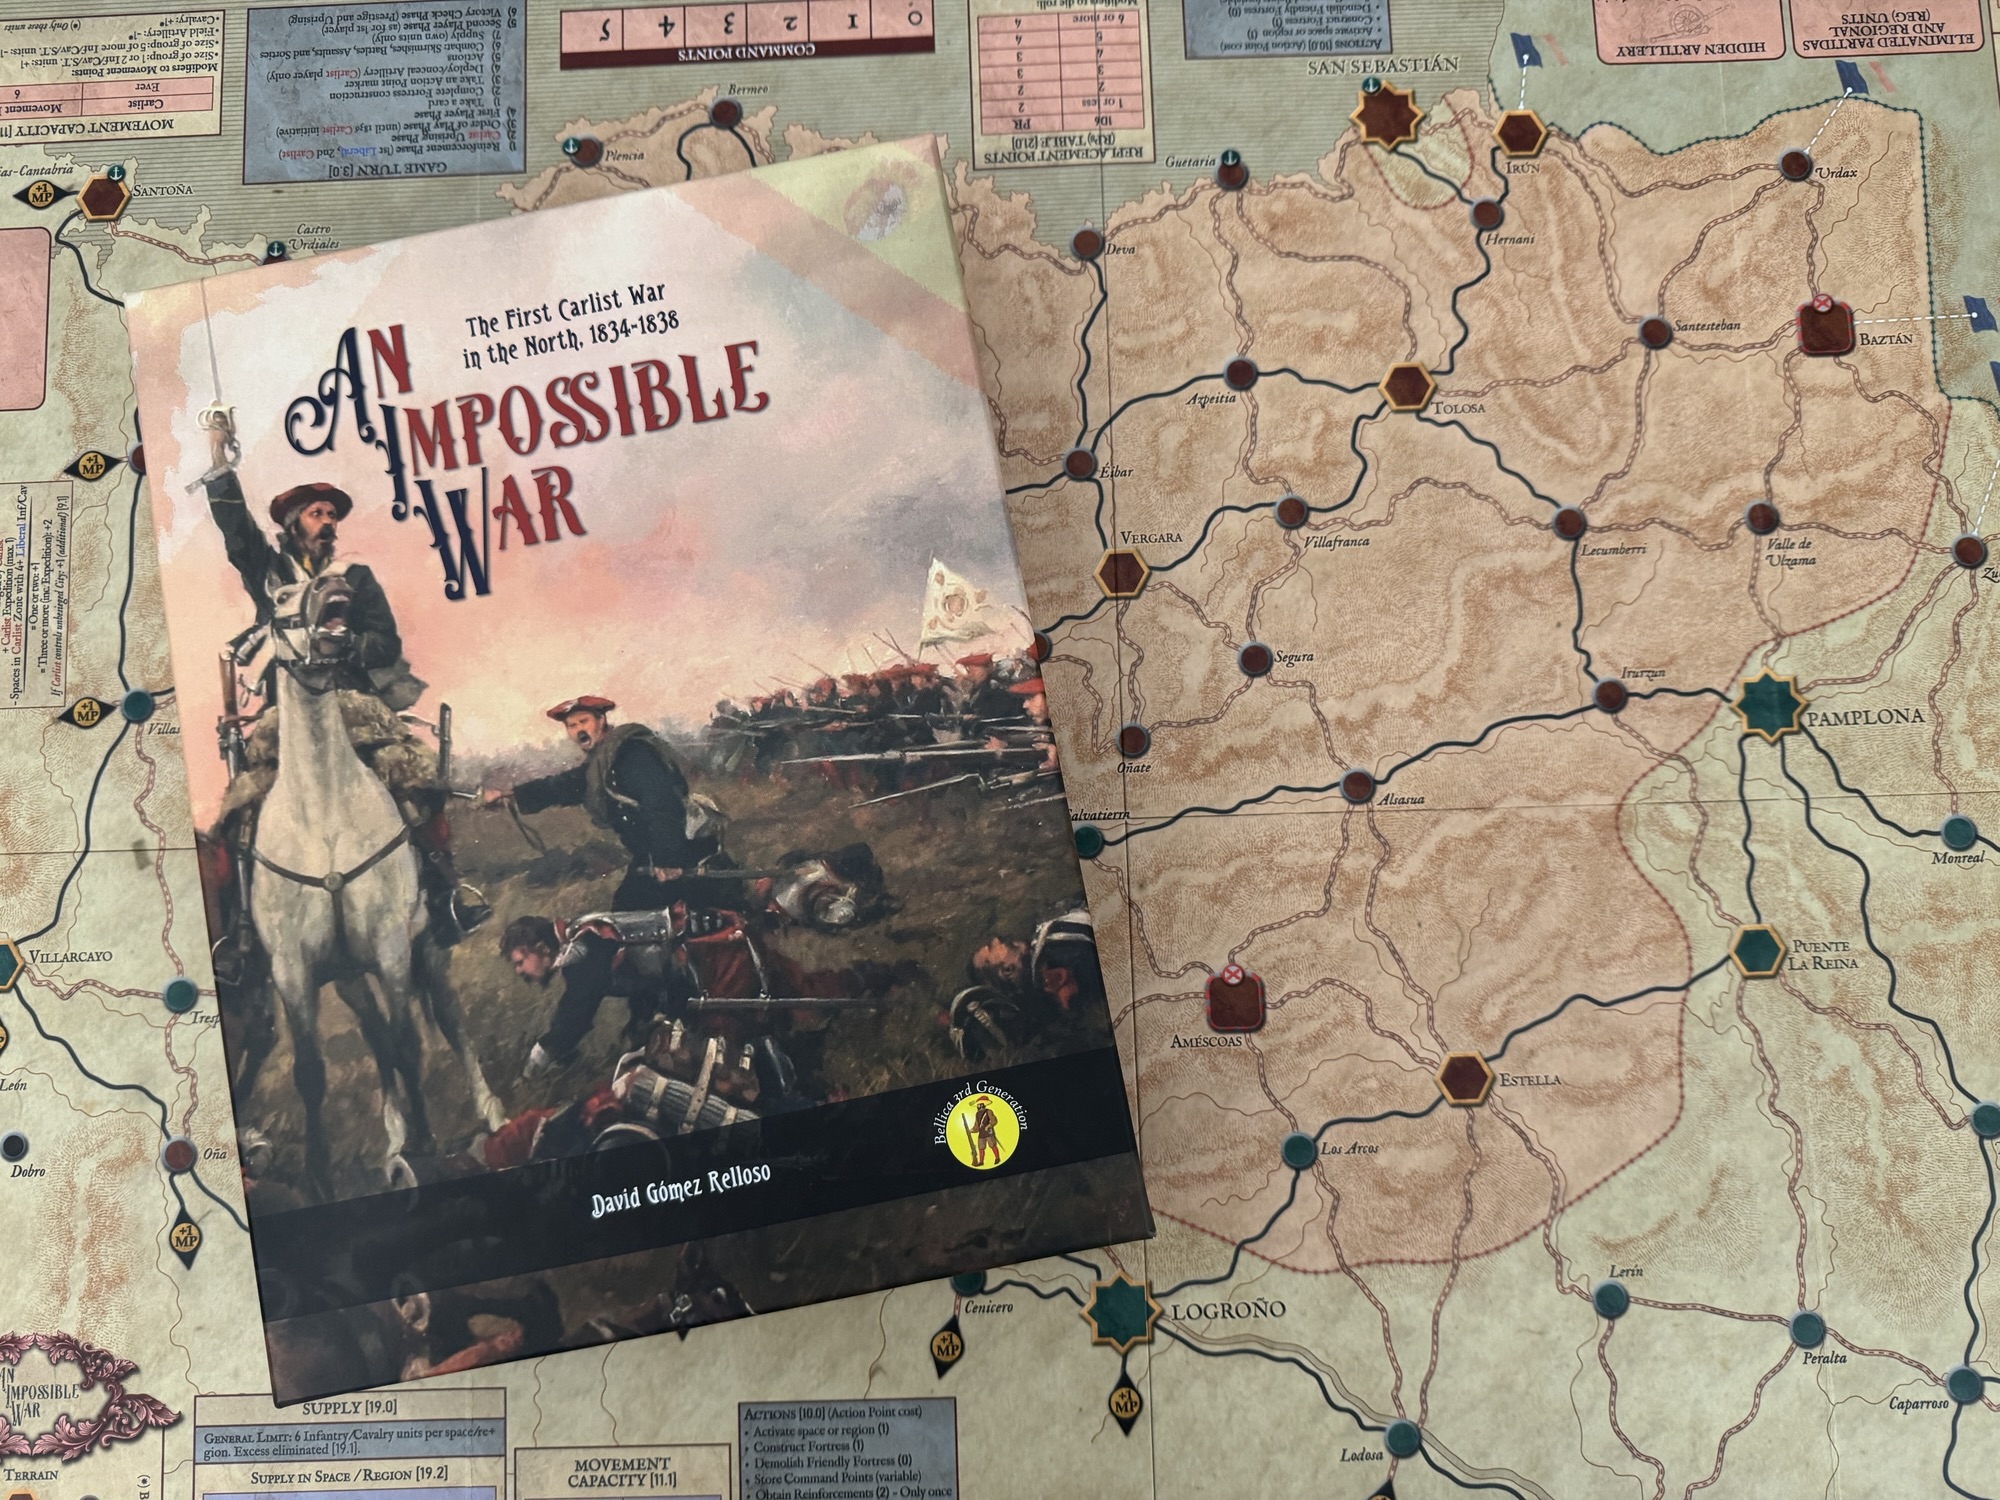
Main Game Map
There is a Main Game Map, which is commonly referred to as the Northern Map, shows the northernmost tier of Spain along the coast of the Cantabrian Sea including Navarre, the Basque Provinces and part of Cantabria, Burgos and La Rioja, and a small secondary Game Map that reflects the regions of the rest of the country, where Carlist uprisings break out and the expeditions sent from the North may operate.
The Main Game Map contains various elements including named settlements, such as Towns and Cities, and also identify key Carlist Refuges and has a clear demarcation of Carlist and Liberal territory. There are locations identified by the name of a settlement or area, which can be of greater or lesser importance and size. There are four types of spaces including Cities, Main Towns, Carlist Refuges and Other Spaces.
Cities
Cities are represented on the Game Map by an octagonal shape and the name of the city is capitalized. If the City is Liberal it will be colored turquoise and if it leans Carlist it is colored red. There are five Cities on the Game Map including Bilbao, San Sebastián, Vitoria, Pamplona, and Logroño. All of them have a permanent Fortress as well as an Intrinsic Garrison marker indicating the controlling side. Also, the Bilbao space has a Port, identified by the anchor symbol, because it is connected to the Cantabrian Sea via the River Nervión. If the Carlist player is besieging Bilbao, or controls or is besieging either of the two spaces located next to the river (Portugalete or Guecho), the Port of Bilbao is cancelled for the purposes of naval transport and supply.
Supply is also determined based on 2 things, a Region and then each of the Cities within that Region. A Region can supply up to 6 Liberal Infantry and Cavalry units. But, a Region does not supply any Carlist units, which must obtain supply from a Supply Train or Knapsack in the Region. Without a Supply Train or a Knapsack, in order for Carlist units to get supply they then must attempt to forage. Each space can supply a certain number of units, depending on whether the space is located in the Carlist or Liberal Zone, the type of space, and the side the units belong to. We will cover this a bit more in Action Point 2 when we discuss units.
A player will gain +3 VP’s for capturing a City during the game. These are the most important ways to score in the game and protecting them is vital to either side. It is also important to keep in mind that if the Carlist player ever gains control of 2 Cities at the same time that were initially held by the Liberal player, that player will immediately gain an automatic victory.
Connecting the various Cities and Towns are the Roads. Units can move along these roads and there are 2 types of Roads including Main Roads and Secondary Roads. The Main Roads are indicated by a continuous thick black line while Secondary Roads are indicated by dashed brown lines. The cost of moving along a Main Road is 1 Movement Point and along a Secondary Road is 2 Movement Points. I found it very important to properly plan out your movements to maximize the distance that you can gain with a single action. These roads are somewhat of a spiderweb connecting points and you can reach all points eventually but finding the best and most efficient route is important. Studying the Game Map and the layout of the roads is key to playing the game well as you can block off the use of certain Main Roads and force your opponent ot move much slower on Secondary Roads frustrating their plans and efforts.
Main Towns
Main Towns are generally populated areas that have some political, economic or strategic importance and are identified on the board with a hexagonal shape that is of a similar size and proportion as the Cities. Also, the name of the town will be capitalized the same as the Cities. If the Main Town is Liberal it will be colored turquoise and if it leans Carlist it is colored red.
A player will gain +1 VP for capturing a Main Town that was held by the other side. These are not as valuable as the Cities but there are more of these on the Game Map than the Cities with 13 Main Towns as compared to only 5 Cities. Prioriting their capture and control is important for many purposes such as Supply, movement and being able to avoid interceptions and
Carlist Refuge
There are 2 Carlist Refuges identified on the Game Map including Améscoas and Baztán. These are spaces where the Carlists are particularly favored by geography and local popular support. Neither player may construct fortresses in these spaces. These Refuges are identified with a square with an X at the top and a dashed brown line.
Carlist Zones and Liberal Zones
The Carlist Zones take up a considerable portion of the Game Map which is denoted with a red shaded background and a dotted red line. All locations within it are considered to be in the Carlist Zone, while all locations outside of it are considered to be in the Liberal Zone. Also, spaces adjacent to the Carlist Zone are spaces belonging to the Liberal Zone, but that are connected via a road to any space within the Carlist Zone.
The Carlist units in the game are tied to specific localities—Navarre, the Basque Provinces, or “Castilians”—rather than a standard, monolithic national army and are numerically outnumbered by the Liberals. As such, they have a clear need to be nimble and move around the board causing difficulties. One of the ways the Carlist player scores Victory Points through the increase in Prestige is by is controlling at least 4 spaces with at least 4 units. If there are at least four Liberal infantry or Cavalry units in the same space in the Carlist Zone 1 is subtracted from the sum of besieged Cities and active Expedition.
Essentially, the zone embodies the “Impossible War” by forcing the Carlist player to maximize localized, high-quality forces in their home territory against a numerically superior foe. The Carlist player increases their Prestige by besieging cities and launching expeditions. They also benefit from the growing Carlist uprising in the rest of Spain. The Liberal player will be busy countering Carlist Prestige, putting down uprisings, and hunting down expeditions. They have the advantage that, in the long run, war fatigue will affect the enemy.
The terrain is simple with each space containing rough or open terrain, depending on the relief of its area. Much of the northern geography was rugged, which played an important role in favor of Carlism, as it mitigated three of the advantages of government troops: their superiority in numbers, cavalry, and artillery.
The spaces at the western, southern, and eastern ends of the map have connections to regions on the map of the rest of Spain, which can be used to move from one map to another.
Finally, the Game Map includes various game tables (Year, Turn, Initiative, Victory Points, Carlist Prestige, etc.), as well as a lot of information about commonly used rules, so players don’t need to consult the rulebook that often.
Rest of Spain Smaller Map
The map of the Regions of Spain is smaller and simpler. It consists of nine large regions that cover large territories. This map’s purpose is to record the spread of the Carlist uprisings, to enable Carlist expeditions to operate and for the Liberal player to hunt them down. We will take a closer look at the Carlist Uprising Phase in a later post but I wanted to show you the map so you understand its layout.
I very much enjoyed An Impossible War, even though I played just a few turns of a smaller scenario with Francisco Ronco. He was a master at the game, as obviously as the publisher and a playtester he is intimately familiar with the rules and strategies, and I learned a lot from him about how the game should be played. I am looking forward to future plays as the game is just very good and has some interesting aspects that create a very tense and interesting game of maneuver and strategy. The Game Map is very well done, from an aesthetic perspective as well as functionally, and the board makes playing the game easier.
In Action Point 2, we will examine the units available to both sides and cover the importance of Supply.