Normale Ansicht

An Impossible War: The First Carlist War in the North, 1834-1838 from Bellica Third Generation – Action Point 1

Von: Grant
14. April 2026 um 14:00

An Impossible War: The First Carlist War in the North, 1834-1838 from Bellica Third Generation is a block wargame that recreates the First Carlist War in the North of Spain which was a civil war between the Carlists who supported the succession of the late king’s brother Carlos de Borbón and the progressive and centralist supporters of the regent Maria Christina acting for Isabella II of Spain who were referred to as the Liberals. The game uses blocks representing units but also includes counters and uses cards. I was able to play the game about a month or so ago with Francisco Ronco who owns the publishing company Bellica Third Generation and very much enjoyed the game and how it represented this interesting struggle.

In this series of Action Points, we will first take a look at the Game Map, discussing the point-to-point movement configuration, the various spaces and the delineation of the Carlist versus the Liberal Zones, as well as explain the use of the Rest of Spain smaller map, examine the units available to both sides and cover the importance of Supply, take a look at the Carlist Uprising Phase and what it means for the game, take a look at the activation system and the use of Action Point Markers, and cover some examples of Battle, focusing on the tactical aspect of combat with the use of the Battlefield Board, as well as an example of a Siege.
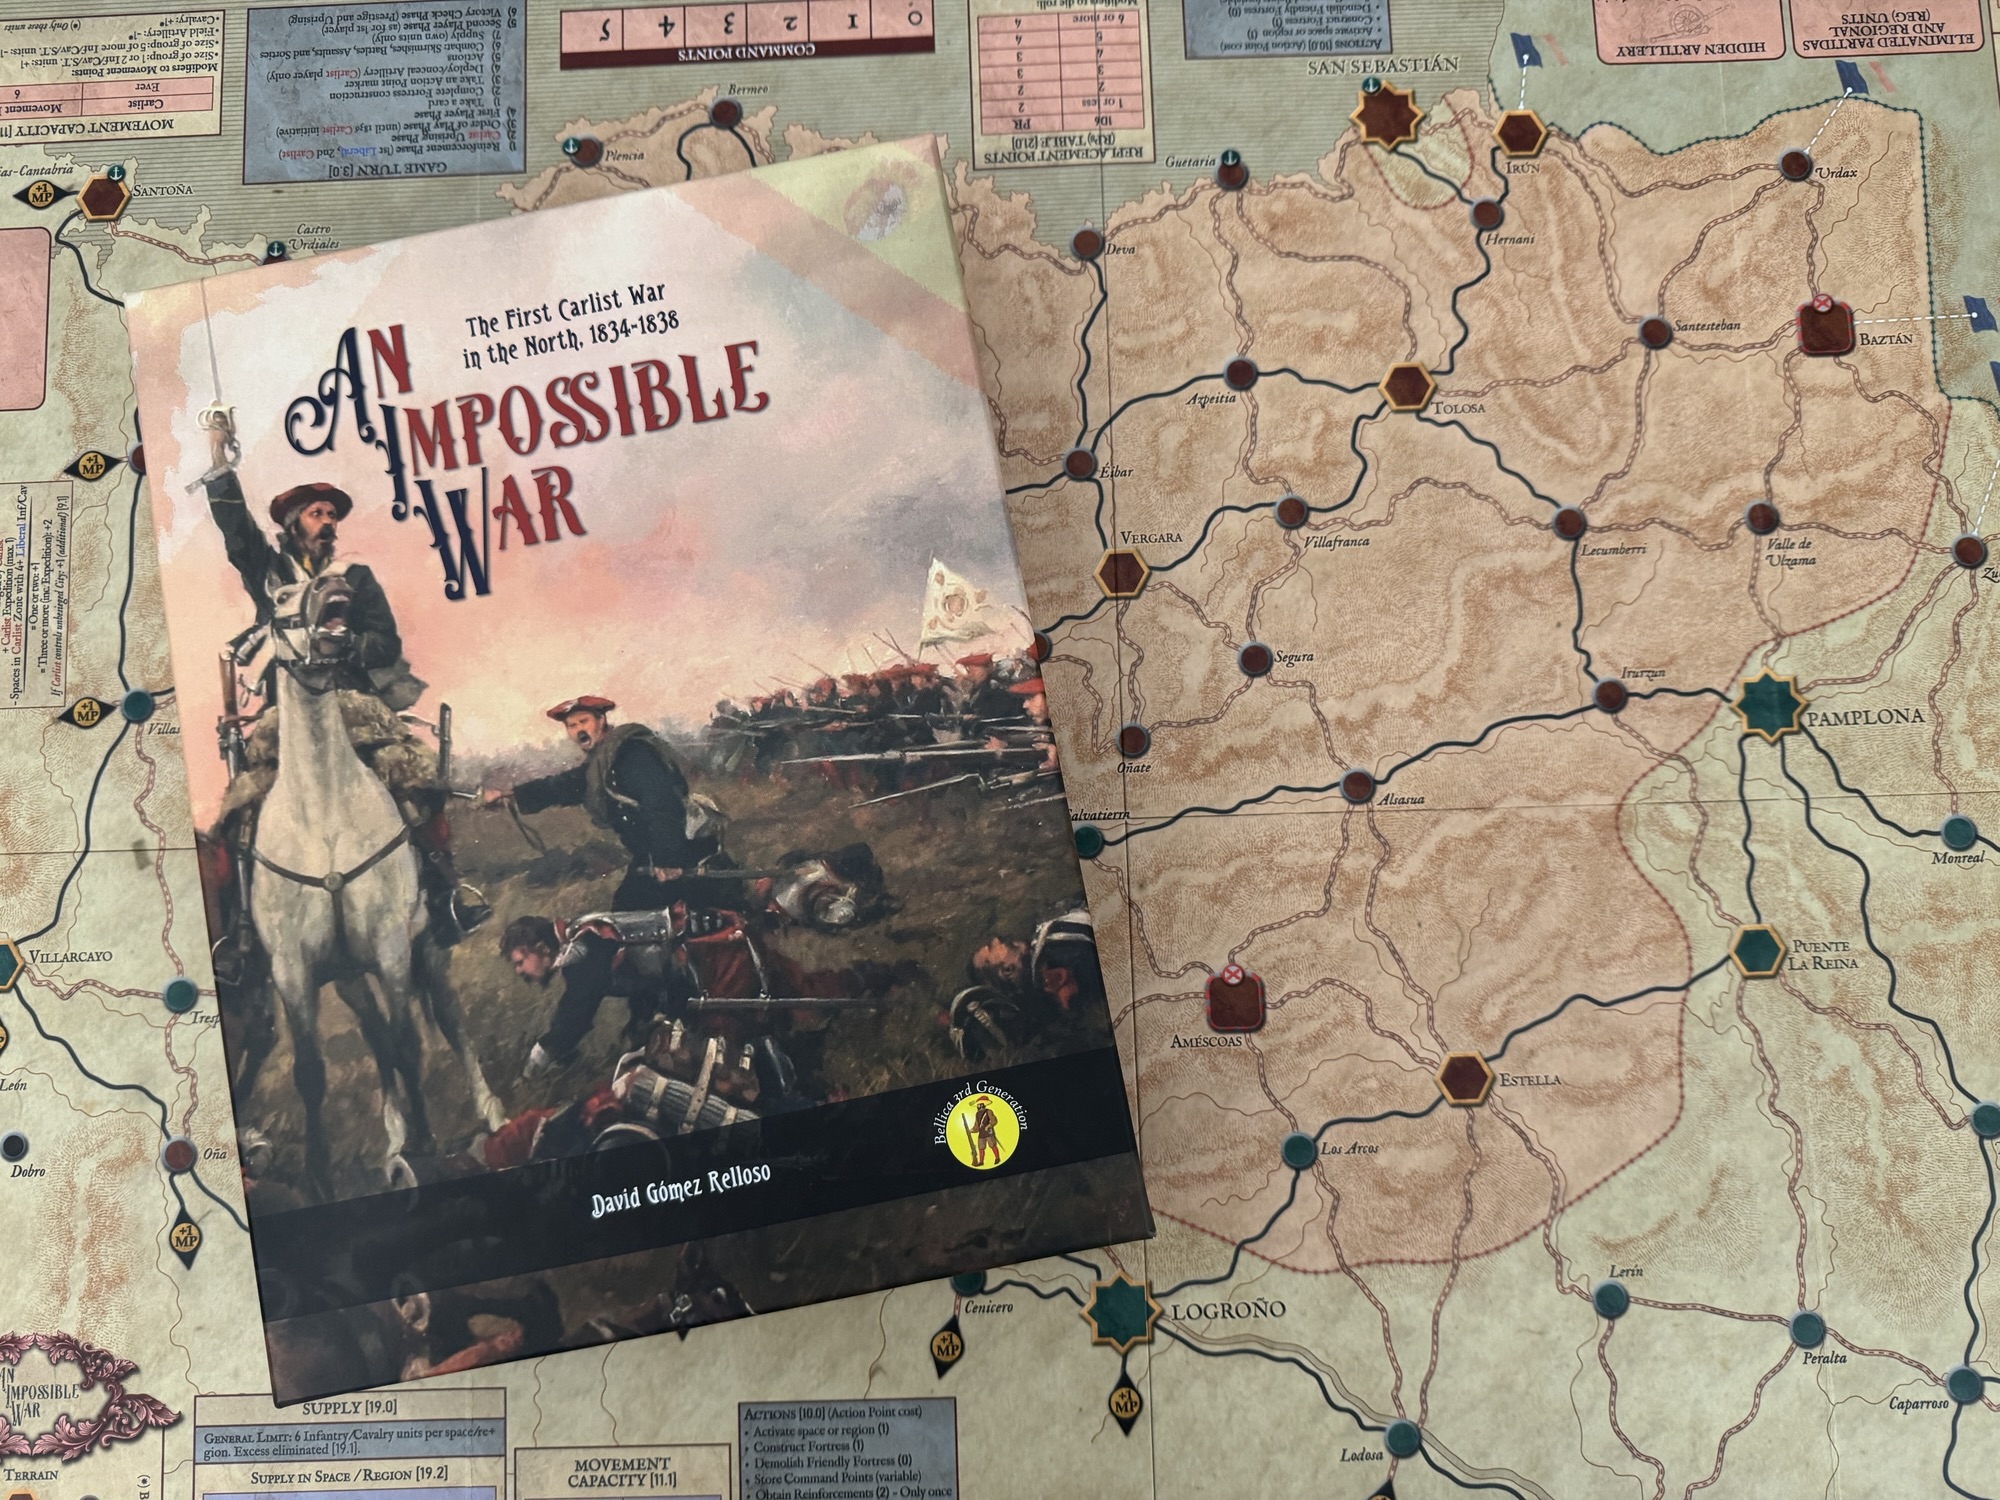
Main Game Map

There is a Main Game Map, which is commonly referred to as the Northern Map, shows the northernmost tier of Spain along the coast of the Cantabrian Sea including Navarre, the Basque Provinces and part of Cantabria, Burgos and La Rioja, and a small secondary Game Map that reflects the regions of the rest of the country, where Carlist uprisings break out and the expeditions sent from the North may operate.

The Main Game Map contains various elements including named settlements, such as Towns and Cities, and also identify key Carlist Refuges and has a clear demarcation of Carlist and Liberal territory. There are locations identified by the name of a settlement or area, which can be of greater or lesser importance and size. There are four types of spaces including Cities, Main Towns, Carlist Refuges and Other Spaces.

Cities

Cities are represented on the Game Map by an octagonal shape and the name of the city is capitalized. If the City is Liberal it will be colored turquoise and if it leans Carlist it is colored red. There are five Cities on the Game Map including Bilbao, San Sebastián, Vitoria, Pamplona, and Logroño. All of them have a permanent Fortress as well as an Intrinsic Garrison marker indicating the controlling side. Also, the Bilbao space has a Port, identified by the anchor symbol, because it is connected to the Cantabrian Sea via the River Nervión. If the Carlist player is besieging Bilbao, or controls or is besieging either of the two spaces located next to the river (Portugalete or Guecho), the Port of Bilbao is cancelled for the purposes of naval transport and supply.

Supply is also determined based on 2 things, a Region and then each of the Cities within that Region. A Region can supply up to 6 Liberal Infantry and Cavalry units. But, a Region does not supply any Carlist units, which must obtain supply from a Supply Train or Knapsack in the Region. Without a Supply Train or a Knapsack, in order for Carlist units to get supply they then must attempt to forage. Each space can supply a certain number of units, depending on whether the space is located in the Carlist or Liberal Zone, the type of space, and the side the units belong to. We will cover this a bit more in Action Point 2 when we discuss units.

A player will gain +3 VP’s for capturing a City during the game. These are the most important ways to score in the game and protecting them is vital to either side. It is also important to keep in mind that if the Carlist player ever gains control of 2 Cities at the same time that were initially held by the Liberal player, that player will immediately gain an automatic victory.

Connecting the various Cities and Towns are the Roads. Units can move along these roads and there are 2 types of Roads including Main Roads and Secondary Roads. The Main Roads are indicated by a continuous thick black line while Secondary Roads are indicated by dashed brown lines. The cost of moving along a Main Road is 1 Movement Point and along a Secondary Road is 2 Movement Points. I found it very important to properly plan out your movements to maximize the distance that you can gain with a single action. These roads are somewhat of a spiderweb connecting points and you can reach all points eventually but finding the best and most efficient route is important. Studying the Game Map and the layout of the roads is key to playing the game well as you can block off the use of certain Main Roads and force your opponent ot move much slower on Secondary Roads frustrating their plans and efforts.

Main Towns

Main Towns are generally populated areas that have some political, economic or strategic importance and are identified on the board with a hexagonal shape that is of a similar size and proportion as the Cities. Also, the name of the town will be capitalized the same as the Cities. If the Main Town is Liberal it will be colored turquoise and if it leans Carlist it is colored red.

A player will gain +1 VP for capturing a Main Town that was held by the other side. These are not as valuable as the Cities but there are more of these on the Game Map than the Cities with 13 Main Towns as compared to only 5 Cities. Prioriting their capture and control is important for many purposes such as Supply, movement and being able to avoid interceptions and

Carlist Refuge

There are 2 Carlist Refuges identified on the Game Map including Améscoas and Baztán. These are spaces where the Carlists are particularly favored by geography and local popular support. Neither player may construct fortresses in these spaces. These Refuges are identified with a square with an X at the top and a dashed brown line.

Carlist Zones and Liberal Zones

The Carlist Zones take up a considerable portion of the Game Map which is denoted with a red shaded background and a dotted red line. All locations within it are considered to be in the Carlist Zone, while all locations outside of it are considered to be in the Liberal Zone. Also, spaces adjacent to the Carlist Zone are spaces belonging to the Liberal Zone, but that are connected via a road to any space within the Carlist Zone.

The Carlist units in the game are tied to specific localities—Navarre, the Basque Provinces, or “Castilians”—rather than a standard, monolithic national army and are numerically outnumbered by the Liberals. As such, they have a clear need to be nimble and move around the board causing difficulties. One of the ways the Carlist player scores Victory Points through the increase in Prestige is by is controlling at least 4 spaces with at least 4 units. If there are at least four Liberal infantry or Cavalry units in the same space in the Carlist Zone 1 is subtracted
from the sum of besieged Cities and active Expedition.

Essentially, the zone embodies the “Impossible War” by forcing the Carlist player to maximize localized, high-quality forces in their home territory against a numerically superior foe. The Carlist player increases their Prestige by besieging cities and launching expeditions. They also benefit from the growing Carlist uprising in the rest of Spain. The Liberal player will be busy countering Carlist Prestige, putting down uprisings, and hunting down expeditions. They have the advantage that, in the long run, war fatigue will affect the enemy.

The terrain is simple with each space containing rough or open terrain, depending on the relief of its area. Much of the northern geography was rugged, which played an important role in favor of Carlism, as it mitigated three of the advantages of government troops: their superiority in numbers, cavalry, and artillery.

The spaces at the western, southern, and eastern ends of the map have connections to regions on the map of the rest of Spain, which can be used to move from one map to another.

Finally, the Game Map includes various game tables (Year, Turn, Initiative, Victory Points, Carlist Prestige, etc.), as well as a lot of information about commonly used rules, so players don’t need to consult the rulebook that often.

Rest of Spain Smaller Map

The map of the Regions of Spain is smaller and simpler. It consists of nine large regions that cover large territories. This map’s purpose is to record the spread of the Carlist uprisings, to enable Carlist expeditions to operate and for the Liberal player to hunt them down. We will take a closer look at the Carlist Uprising Phase in a later post but I wanted to show you the map so you understand its layout.

I very much enjoyed An Impossible War, even though I played just a few turns of a smaller scenario with Francisco Ronco. He was a master at the game, as obviously as the publisher and a playtester he is intimately familiar with the rules and strategies, and I learned a lot from him about how the game should be played. I am looking forward to future plays as the game is just very good and has some interesting aspects that create a very tense and interesting game of maneuver and strategy. The Game Map is very well done, from an aesthetic perspective as well as functionally, and the board makes playing the game easier.

In Action Point 2, we will examine the units available to both sides and cover the importance of Supply.

-Grant

La Der des Ders – The War to End War from Hexasim – Action Point 1

Von: Grant
12. Februar 2026 um 14:00

La Der des Ders – The War to End War from Hexasim is a 1-2 player slightly abstracted strategic level look at World War I. The game allows the players to relive the First World War at a strategic level, with each player controlling one of the 2 sides either the Entente, consisting of France, England, Russia, Serbia and other minor nations or the Central Powers including Germany, Austria-Hungary, the Ottoman Empire and a few minors. La Der des Ders can also be played solo, with a dedicated solitaire bot called “Athena” who utilizes special Cornflower Cards to make decisions about what technologies to invest in, where to undertake offensives and how to utilize limited resources and reinforcements. Each turn, players gain an amount of Resource Points dependent on what nations are in the war, which they can allocate to different areas to guide their overall strategy. Victory is achieved by launching offensives that drain the morale of enemy nations, forcing them out of the conflict through collapse.

In this series of Action Points, we will first take a look at the Game Board, discussing the Collapse Tracks, Trade Tracks, Russian Revolution Track and Naval Control Table and other various on-board tables and offensive spaces, cover the Technology Phase and the Technology Tree and Technological Improvement Boards, take a look at the Event Cards and how they alter the game, go through an example of an Offensive and the combat procedure, review the Victory Conditions and give an overview of the “Athena” solitaire bot and how it works.

Game Board

The Game Board used in La Der des Ders covers the entirety of the European and Eastern portions of World War I and is a simplified geographical representation of the major players involved in the war. You will not find anything more than simple borders of countries and then not all of each country is represented in its entirety such as the Ottoman Empire of the vastness of the Russian steppes. There is also an inset map in the bottom left hand corner that covers the war in Africa. The Game Board is divided up into what are called Sectors representing both the major and minor powers involved in World War I. These Sector representations are illustrative of the main countries that took part in the war and one Sector can actually represent multiple countries. For example, in the case of France, you will notice that England really has no specific direct playable area or a Collapse Track of its own on the Game Board other than the graphical representation of their island nation. The British troops, along with those of Belgium, are abstracted into those of France for simplicities sake and to meet the design goals of the game. To further differentiate these Sectors from each other and to make playing visually simpler, the Sectors are shaded blue if they belong to the Entente and then green if they are part of the Central Powers.

The Collapse Tracks

Let’s take a closer look at the various information that is contained in these Sectors. Above is a picture focused on Germany with France (lower left), Austria-Hungary (on the right) and Russia (upper right) also included. You will first notice a line of small boxes with numbers listed in each box numbered from 3 on the far left descending to 0 and a blank box on the far right. These numbers are referred to as the Operational Value. This Track is referred to as the Collapse Track and represents the morale, fighting spirit, economic stability, martial resources and preparation of each of the countries for war in the game. On the left end of the Collapse Track is the country’s Production Value printed in a yellow circle. The Production Value corresponds to the number of Resource Points (RP) that will be generated by this sector at the start of each turn, if it is at war. If this Production Value number is printed in black, this means that this Sector is at war at the start of the game. If the Production Value is printed in white, the Sector is not at war at the start of the game but will enter the war through the appropriate Event Card being drawn. If a Sector is not at war but is Neutral, for purposes of the game this means that it does not generate any Resource Points.

At the start of the game, a wooden cube is placed in the space to the right of the box containing the red value. As losses are inflicted in this Sector due to Offensives or Event Cards, the cube will be moved to the right on the Collapse Track. When the Sector receives reinforcements, the cube will be moved moved to the left. The cube will never be placed on the space with the red value and the player must read the number in the box to the left of the cube to ascertain the current Operational Value. The numbers indicate the maximum amount of Resource Points that can be allocated to this Sector during an Offensive, which will also determine the size and number of dice that are used for the Offensive. This Operational Value will change throughout the game due to losses in Offensives or due to specific Event Cards. If the cube ever reaches the end of the Collapse Track, and another reduction must be made, the country will surrender and fall to their enemies.

The other important piece of information found on the far right side of the Collapse Track is the Attack Value. The Attack Value is used for Offensives and is how players determine whether they score hits or not with their troops and artillery. This Attack Value is represented by a die face that shows the number needed to hit. If the rolled Attack Dice are equal to or greater than the printed Attack Value a hit will be scored and losses will be taken by the defender by moving the cube down on the Collapse Track. This Attack Value can be modified through the advancement of technologies including on Attack and on Defense. The player will simply add up all applicable modifiers from these Technologies or from Event Cards and then reduce or increase that target Attack Value accordingly.

Offensive Arrows

Shown on the board are the Offensive Arrows that will remind the players about what Offensives they can undertake, meaning what Sectors may be attacked, and what Sectors have already taken their one Offensive against that adjacent Sector per turn. These are identified by red arrows connecting adjacent Sectors and will be covered up by the appropriate Offensive Marker when undertaken. In the below picture, we will take a look at Serbia as an example. You can see that Serbia is surrounded by Central Power countries including Austria-Hungary and Bulgaria (Neutral at the start of the war). They also have a few of their Allied nations adjacent including Romania (Neutral at the start of the war) and Greece (Neutral at the start of the war). From each of the adjacent Sectors there are 2 Offensive Arrows represented meaning that this Sector can both be attacked and can attack the adjacent Sector.

It is important to remember that an individual Sector can only launch one Offensive per turn, and that is always against an enemy sector adjacent to it. During the same turn, a sector may be attacked by several adjacent enemy sectors, but each Offensive is resolved separately.

Trade Tracks

There are two Trade Tracks shown on the Game Board, both of which are located in the top left hand corner of the board, 1 for the Entente (Merchant Navy) and the other for the Central Powers (Kaiserliche Marine). These 2 tracks provide additional Resource Points to both sides at the beginning of a turn when they are collecting income. Naval Control die rolls can modify the number of RP’s received at the beginning of a turn. It is important to remember that the Merchant Navy Marker is moved forward 1 space at the end of each turn, which will result in advancing the Production Marker of the Entente. If the Lafayette Marker is on this track, it is also moved forward 1 space. These markers are never moved to the left. Once the end of the track has been reached, the markers will no longer need to be moved.

Russian Revolution Track

The Russian Revolution Track indicates the advance of the Russian people towards their ultimate Revolution, which historically broke out in March 1917. The Russian Revolution Marker will begin the game in the white
space. This marker may be moved to the right each time Russia obtains reinforcements. It is never moved to the left. When this marker reaches the last space, Revolution breaks out and Russia will no longer produce resources and can no longer receive reinforcements.

Naval Control Table and Track

The Naval Control Table is used to represent the efforts of the German U-Boat attacks on commerce and mimic the associated receipt of foreign support by the Entente from the United States of America. At the outset of each turn, a die is rolled and the table referred to in order to determine a possible number of lost Resource Points. There are 2 rows on the table, 1 being the U-Boat for the Central Powers and the other the effects of the Blockade for the Entente.

The track located under the Naval Control Table indicates the modifier that will be applied to the Central Powers’ Naval Control die rolls. It takes into account the Naval Technology levels of the Central Powers and that of the Entente. At the start of the game, only the Central Powers can carry out a Naval Control die roll. You may notice the small gray box with a lock linked to the Naval Control Table that indicates that the Entente cannot carry out a Naval Control die roll yet. Only once it has unlocked Naval Technology Level 1, can the Entente perform Naval Control die rolls.

There are also several administrative tracks on the Game Board including the Resource Track, used to track the current Resource Points of both the Entente and the Central Powers, the Turn Track and the Victory Point Track. You will also notice lots of dashed boxes with small white numbers printed in them all over the board. These are the Event Boxes and act as a reminder of the effects of various Event Cards when they are pulled. When Event Cards happen, some will provide the players with a counter that should be placed in these boxes to remind them of the effects of the historical events.

One final comment on the Game Board. Marc von Martial is the artist and he has done an excellent job with this game board as it is truly functional and aids play but also is very attractive and has a very clean and pleasing aesthetic. I enjoy the choice of colors, even though these old eyes are starting to have trouble differentiating gray and green when they are both light, that work well together and the tracks and information found on the board are all crisp and clean and easily read. I just like the overall appearance of the game board and wanted to congratulate him on his exemplary graphic design work.

In Action Point 2, we will cover what I would consider one of the better parts of the game in the Technology Phase and the Technology Tree and Technological Improvement Boards.

-Grant

❌