Everything seems to get ever bigger. Cars. Phones. Board game boxes. And the cities whose history and board games we explore are no exception: We started with Venice, moved on to Amsterdam, and today, we’re starting with New York. I say starting, because unlike the previous two cities, there is no way to do the vast number of board games set in New York’s history justice in a single post. Thus, this will be a mini-series with (tentatively) three instalments.
Names are given by people. “New York” was what the English called the settlement they took over in 1664, but the place had been inhabited by thousands of years before. While that is thus technically not the history of New York, we’ll take a short look at it.
We don’t know very much about the first humans to live in what would become New York: The indigenous people did not keep written records. Archaeology is hard to do in a place which is almost entirely covered in buildings and streets today. And the oral tradition of the Indians was largely destroyed when the westward expansion of the European colonists pushed them out of their native homes, broke up their communities, and finally confined them to reservations.
Five hundred years ago, several thousand Lenape Indians inhabited an island they called Mannahatta (“island of many hills”). They lived off slash-and-burn agriculture, hunting, and fishing. I am not aware of any board game which depicts their lives before the arrival of the first Europeans, but I think it would be a nice change of perspective while still retaining the familiar geography which draws many board gamers (of course, especially those from New York and its surroundings) to games about the city.
In 1524, Giovanni da Verrazzano, an Italian explorer employed by the king of France, sailed into what would be called New York Bay. There, he met a group of Lenape in their canoes. He called the area New Angoulême to honor the French royal house of Valois-Angoulême. For the next century, European fur traders would occasionally visit the Lenape, but not attempt to build a permanent presence.
Nieuw Amsterdam
Only in the 1620s did the Dutch, by then the premier commercial and maritime country of Europe, decide to colonize parts of North America. They resolved that this colony should include Mannahatta to take advantage of the rich beaver population whose pelts were much sought after in Europe, and put the merchant Peter Minuit in charge of the operation.
Minuit arrived on May 4, 1626. He met with some of the Lenape, and, according to his written report to Europe, purchased the southern tip of Mannahatta from them for trade goods worth 60 guilders. Even though nobody knows any details beyond Minuit’s own account, the deal is the founding story of New York. One thing that stands out about it is that it was a business transaction. Unlike other cities in North America, New York was not founded by a royal agent or religious refugees, but in the spirit and through the means of commerce (which has since remained the supreme political order and religious faith of New York). In that sense, Minuit’s purchase is either a very smart business move – after all, a large tract of land in such a prime position was surely worth more than the trade goods he handed over – or the hostile act of an unscrupulous merchant taking advantage of the less business-savvy (both actions hallmarks of New York’s commercial culture until today). Beyond the foundational myth, the transaction mostly shows different ways of thinking about land – the Lenape only accepted the right to temporarily co-use it, whereas the Europeans subscribed to the tenet of permanent, exclusive ownership.
While the Dutch colonized the whole mid-Atlantic coast of what is today the US, their settlement on Mannahatta was meant to be its center – as evidenced by its name of Nieuw Amsterdam (New Amsterdam), after the Dutch capital. Nieuw Amsterdam grew into a trading hub based on its deep natural harbor, the best on the Atlantic coast. The fur trade was soon complemented by Dutch farms which extended ever further north on Mannahatta, which triggered conflicts with the Lenape. This period is represented in New Amsterdam (Jeffrey D. Allers, White Goblin Games), which casts its players in the shoes of Dutch traders who will gather resources and expand New Amsterdam (at the expense of the Lenape).
Nieuw Amsterdam already contained the seeds of some characteristic New York traits: Its demographics diversified (Africans lived in Nieuw Amsterdam in 1626 already, an Italian followed a few years after); and the municipal council established in 1653, the first of its kind in America, was the start of the great democratic tradition of the city.
The English Colony
The Dutch colony did not last long. When the commercial and maritime rivalry with England flared up again, an English fleet seized Manhattan in 1664. To honor the heir presumptive, James, Duke of York, they renamed the city New York. The Dutch briefly recaptured the city in the next Anglo-Dutch war, but had to cede it permanently in 1674.
New York’s fine deep-water harbor was as valuable to English as it had been to Dutch traders, and the city continued to grow larger and more prosperous. When the British parliament imposed taxes on the American colonies from the 1760s on, the merchants of New York found themselves in a bind: On the one hand, like all entrepreneurs, they resented being parted from money. On the other, a rupture between Britain and its American colonies would cut off trade entirely – much worse than having to pay a moderate due. New York became thus both a hotbed of anti-British activism and one of the places in the American colonies which least wanted a war with the British motherland.
Fierier heads than those of the New Yorkers prevailed. War between Britain and the colonies erupted in 1775. Once George Washington had expelled the British from Boston in the first major action of the war, he moved his headquarters to New York. The city was thus the biggest possible prize for the British smarting from their first defeat. If they could beat the colonials there soundly, force Washington to surrender with his army, they could still quash the rebellion quickly… or so they thought. The amphibious campaign against New York would become the biggest operation of the entire War of Independence. While the British defeated Washington’s army and took the city, the wily colonial commander extricated most of his forces and lived to fight another day. The city of New York, however, would remain under British occupation for the rest of the war.
The British occupation cut New York off from its sister colonies. Many New Yorkers fled to towns which were under control of the American rebels. The loyalists left the town when Britain recognized American independence. In 1783, New York’s population had fallen by 60% compared to the pre-war number of 30,000. From then on, however, the city would know nothing but spectacular growth for over a century… but that’s a story for next time.
For a concise introduction, especially focused on local politics, see Lankevich, George J.: New York City. A Short History, New York University Press, New York City, NY/London 1998.
If you want a treatment which is both more in-depth and more journalistic (and lavishly illustrated) and don’t mind its history practically ending around 1970, see the book version of the 17-hour PBS documentary from 1999: Burns, Ric/Sanders, James/Ades, Lisa: New York. An Illustrated History, Knopf, New York City, NY 2001.
La Der des Ders – The War to End War from Hexasim is a 1-2 player slightly abstracted strategic level look at World War I. The game allows the players to relive the First World War at a strategic level, with each player controlling one of the 2 sides either the Entente, consisting of France, England, Russia, Serbia and other minor nations or the Central Powers including Germany, Austria-Hungary, the Ottoman Empire and a few minors. La Der des Ders can also be played solo, with a dedicated solitaire bot called “Athena” who utilizes special Cornflower Cards to make decisions about what technologies to invest in, where to undertake offensives and how to utilize limited resources and reinforcements. Each turn, players gain an amount of Resource Points dependent on what nations are in the war, which they can allocate to different areas to guide their overall strategy. Victory is achieved by launching offensives that drain the morale of enemy nations, forcing them out of the conflict through collapse.
In Action Point 1, we looked at the Game Board, discussing the Collapse Tracks, Trade Tracks, Russian Revolution Track and Naval Control Table and other various on-board tables and offensive spaces. In Action Point 2, we covered the Technology Phase and the Technology Tree and Technological Improvement Boards. In Action Point 3, we examined the Event Cards and how they inject the historical narrative into the gameplay and also alter the conditions of the game. In Action Point 4, we walked through an example of an Offensive and took a look at the combat procedure. In Action Point 5, we reviewed the Victory Conditions. In this Action Point, which is the final entry in the series, we will give an overview of the “Athena” solitaire bot and how it works.
Athena
La Der des Ders – The War to End War is designed as a 2-player game but it does have a dedicated solitaire bot called Athena that can be used to simulate an opponent to play against. This Athena bot, named after the Greek goddess of strategy, can be used to play as either the Entente or as the Central Powers and is focused on the use of special cards referred to as Cornflower Cards. There are 12 of these Cornflower Cards and these are used to determine the various actions taken by the Athena bot during their turn. A solitaire play uses the usual rules for the 2-player game, with just a few exceptions.
The Cornflower Cards are multi-use cards that are divided into 3 different sections to be used at different points of the Sequence of Play in a solitaire game. They are drawn and referred to during the Technology Development Phase, the Reinforcement Phase and the Offensive Phase. Let’s take a look at the anatomy of these cards. In the above picture, you will notice that there are 3 main categories listed at the top of the card including Technologies at the top, Reinforcements in the middle and Offensives on the bottom of the card. During the appropriate phase, the player will draw 1 Cornflower Card for the Athena AI.
If it is the Technology Development Phase, the player will refer to the top of the card where there are listed the 6 different technologies that can be pursued. Under each of these categories will show the number of Resource Points that will be spent by Athena in order to attempt to unlock a new level in each of the technologies. If there is an X in that space, that means that Athena will not attempt to gain a level of that technology during this phase. If there is a 2 listed, this means that 2 RP will be spent and the roll for the technology will gain a +1 DRM. Keep in mind though, that if the technology shown is not available yet because the year it is available has not yet arrived, then the bot will not spend a resource to attempt that technology. If Athena doesn’t have enough Resource Points to make all the attempts shown on the card, she will spend as much as possible to attempt these technologies. Athena never re-rolls the die for these attempts by discarding a Technological Research Cube for previous failed attempts. One of the differences for Athena during this step is that if a success is earned in unlocking a level of technology, she will get to advance all cylinders of the corresponding technology in all sectors under Athena’s control. This means all of the countries of the alliance as well as the active minors. These technological improvements cost no Resource Points.
If it is the Reinforcement Phase, Athena will attempt to reinforce sectors that have suffered losses in previous turns according to the following priority order:
The sector which suffered the most losses or in other words the sector whose cube is furthest from its maximum;
The sector with the second most losses and then the sectors in the following order, ignoring the sectors already covered above:
When you have chosen what sector is to receive reinforcements based upon the priority described, the player will draw as many Cornflower Cards as there are spaces separating the Sector Cube from the space with the red value. After drawing the cards, the player will count the instances of cards that have the name of that sector shown on them. If you look at the 3 cards shown above, if doing reinforcements for Germany they would move their Sector Cube up only 1 space on the Collapse Track as once Germany is listed in the middle of the card under Reinforcements. Very simple. Athena will also have to spend the required Resource Points from their total to actually move the Sector Cube up and if they cannot afford all of the reinforcements shown by the cards, they will move and pay for what they can afford. This phase ends when Athena no longer has enough Resource Points, or when all the sectors have been able to try to obtain reinforcements.
Finally, if it is the Offensive Phase, each side launches an offensive in turn starting with the side that has the initiative. When it is Athena’s turn to attack, the player will draw one Cornflower Card and refer to the bottom portion of the card, which will indicate the sector Athena is attacking. The sector to be attacked will be the one on the left of the card if Athena is playing the Entente, and the one on the right if she is playing as the Central Powers. The sector indicated on the card must always be attacked by the sector that has the best chance of inflicting damage. This usually means the sector with the highest current Operational Value and that has not yet launched an Offensive this turn. In the event of a tie, preference should be given to the sector least likely to be able to attack elsewhere during a later card draw in the turn. The size of the Offensive will be equal to the current Operational Value of the attacking sector only if the number of Resource Points Athena has remaining will allow for it. Otherwise the Offensive is reduced to the number of remaining RP. Once Athena’s Resource Points have been spent, the dice rolled and any losses applied, the player will then take their own turn to launch an Offensive or decide to pass. Then Athena will draw a new Cornflower Card to determine their next Offensive. If there are ever 3 Cornflower Cards drawn by Athena without having the ability to attack because of sector availability or Offensives by adjacent sectors have already been taken, the Offensive Phase will come to an end.
That is all there is to the Cornflower Cards and the Athena bot. It is a really well designed system that removes most of the work by the player when playing solitaire. There will be times when you have to make a decision, as described above with Offensives, but these decisions are easy and the hard work is done by the simple flipping of a card.
I do want to point out one final thing. The sequence of play differs slightly from the 2-player game as it rearranges when the Athena bot does a few of the steps during the Spend Resource Points Phase as shown below. The human player will start by doing their Reinforcements first followed by their Technology investment. Athena will then go and do their Technology investment first followed by Reinforcements. Both players will then move into the Offensive Phase and the player with initiative as shown on the turn track will take the first Offensive of the turn.
The Athena bot works very well as a playable solitaire experience for La Der Des Ders. The Cornflower Cards are a stroke of genius and really are easy to use, which makes playing the game a much better experience. I found that the bot actually holds its own in the game, even though they are not in total control of their own actions like a human player would be. The changes also made in the Sequence of Play as well as to the way Technology Investments work more than make up for the lack of true intelligence by the system and will definitely give the player a run for their money. I have played the game about 5 times solitaire, both as the Entente and as the Central Powers, and have won just 2 out of 5 tries. But the experience was easy, enjoyable and pretty seamless. The game really is a great example of a slightly abstracted strategic level look at World War I and I would wholeheartedly recommend this game to anyone who has an interest in The Great War.
I shot a playthrough video for the solitaire system and you can watch that at the following link (beware as I did make a few errors but I have found errors make viewers understand the rules of the game better):
I also did a video review and you can watch that at the following link:
Thank you for allowing me to share this game with you through this series of posts over the past several months. I have very much enjoyed doing these and I hope that you find them helpful.
La Der des Ders – The War to End War from Hexasim is a 1-2 player slightly abstracted strategic level look at World War I. The game allows the players to relive the First World War at a strategic level, with each player controlling one of the 2 sides either the Entente, consisting of France, England, Russia, Serbia and other minor nations or the Central Powers including Germany, Austria-Hungary, the Ottoman Empire and a few minors. La Der des Ders can also be played solo, with a dedicated solitaire bot called “Athena” who utilizes special Cornflower Cards to make decisions about what technologies to invest in, where to undertake offensives and how to utilize limited resources and reinforcements. Each turn, players gain an amount of Resource Points dependent on what nations are in the war, which they can allocate to different areas to guide their overall strategy. Victory is achieved by launching offensives that drain the morale of enemy nations, forcing them out of the conflict through collapse.
In Action Point 1, we looked at the Game Board, discussing the Collapse Tracks, Trade Tracks, Russian Revolution Track and Naval Control Table and other various on-board tables and offensive spaces. In Action Point 2, we covered the Technology Phase and the Technology Tree and Technological Improvement Boards. In Action Point 3, we examined the Event Cards and how they inject the historical narrative into the gameplay and also alter the conditions of the game. In Action Point 4, we walked through an example of an Offensive and took a look at the combat procedure. In this Action Point, we will simply review the Victory Conditions.
Victory Conditions
In La Der des Ders, there are a few ways to trigger the concept of Sudden Death, which leads to the game concluding and a victor being declared, or to win the game through armistice being signed and then through the accumulation of Prestige Points. Let’s first take a look at what I think is the most common way for the game to come to an end, Sudden Death.
Sudden Death
The game will end immediately in the event of Sudden Death and this Sudden Death can be triggered in three ways. First, if France surrenders, the Central Powers will immediately win the game, second if Germany surrenders, the Entente will immediately win the game and finally if any one side achieves 6 Victory Points then that side immediately wins the game. Really pretty simple. If countries other than France or Germany surrender, such as Austria-Hungary, Russia or the Ottoman Empire, the game will continue although the Production Value of the surrendered country will no longer be included in the sides Resource Points.
Now there is a remote possibility that both sides could trigger Sudden Death at the same time through an attack. Remember, that if the attacker rolls a 1 on their Attack Dice, it will result a Counter Attack and 1 loss on their Collapse Track and if this would cause them to have to surrender as well as inflicting enough hits on their target to reach the end of their Collapse Track, both will Surrender and then neither side will win. But also, this could possibly occur with the play of the Spanish Flu Event, which causes losses to all powers. This is a rare possibility but it can happen.
One of the things that I very much like about this game is the concept of Collapse and the fatigue and weariness of war. World War I drug on for 4 long years and particularly on the Western Front very little ground was actually gained. During the early years of the war in 1915–1916, these advances were measured in mere feet, while later in the war during the campaigns of 1918, particularly in the case of the Hundred Days Offensive, which began on August 8, 1918, the Allies achieved deep, lasting breakthroughs, pushing the Germans back to their original 1914 lines. But the war was a meat grinder, plain and simple, and attacks were made sometimes to keep the war going because High Command demanded action and not necessarily to gain any ground or obtain any key objectives. Resources dwindled, troops dried up as men were shattered, maimed and demoralized to the point of being unable to stand a watch or fight, and nation’s desire for the war to continue faded. I think that at points, one breakthrough or catastrophic loss could have ended the war and this is very well reflected in La Der des Ders as if you are too low on your own Collapse Track and decide to attack because you believe you can finish your opponent you always have a chance of catastrophe and losses of your own while on the offensive.
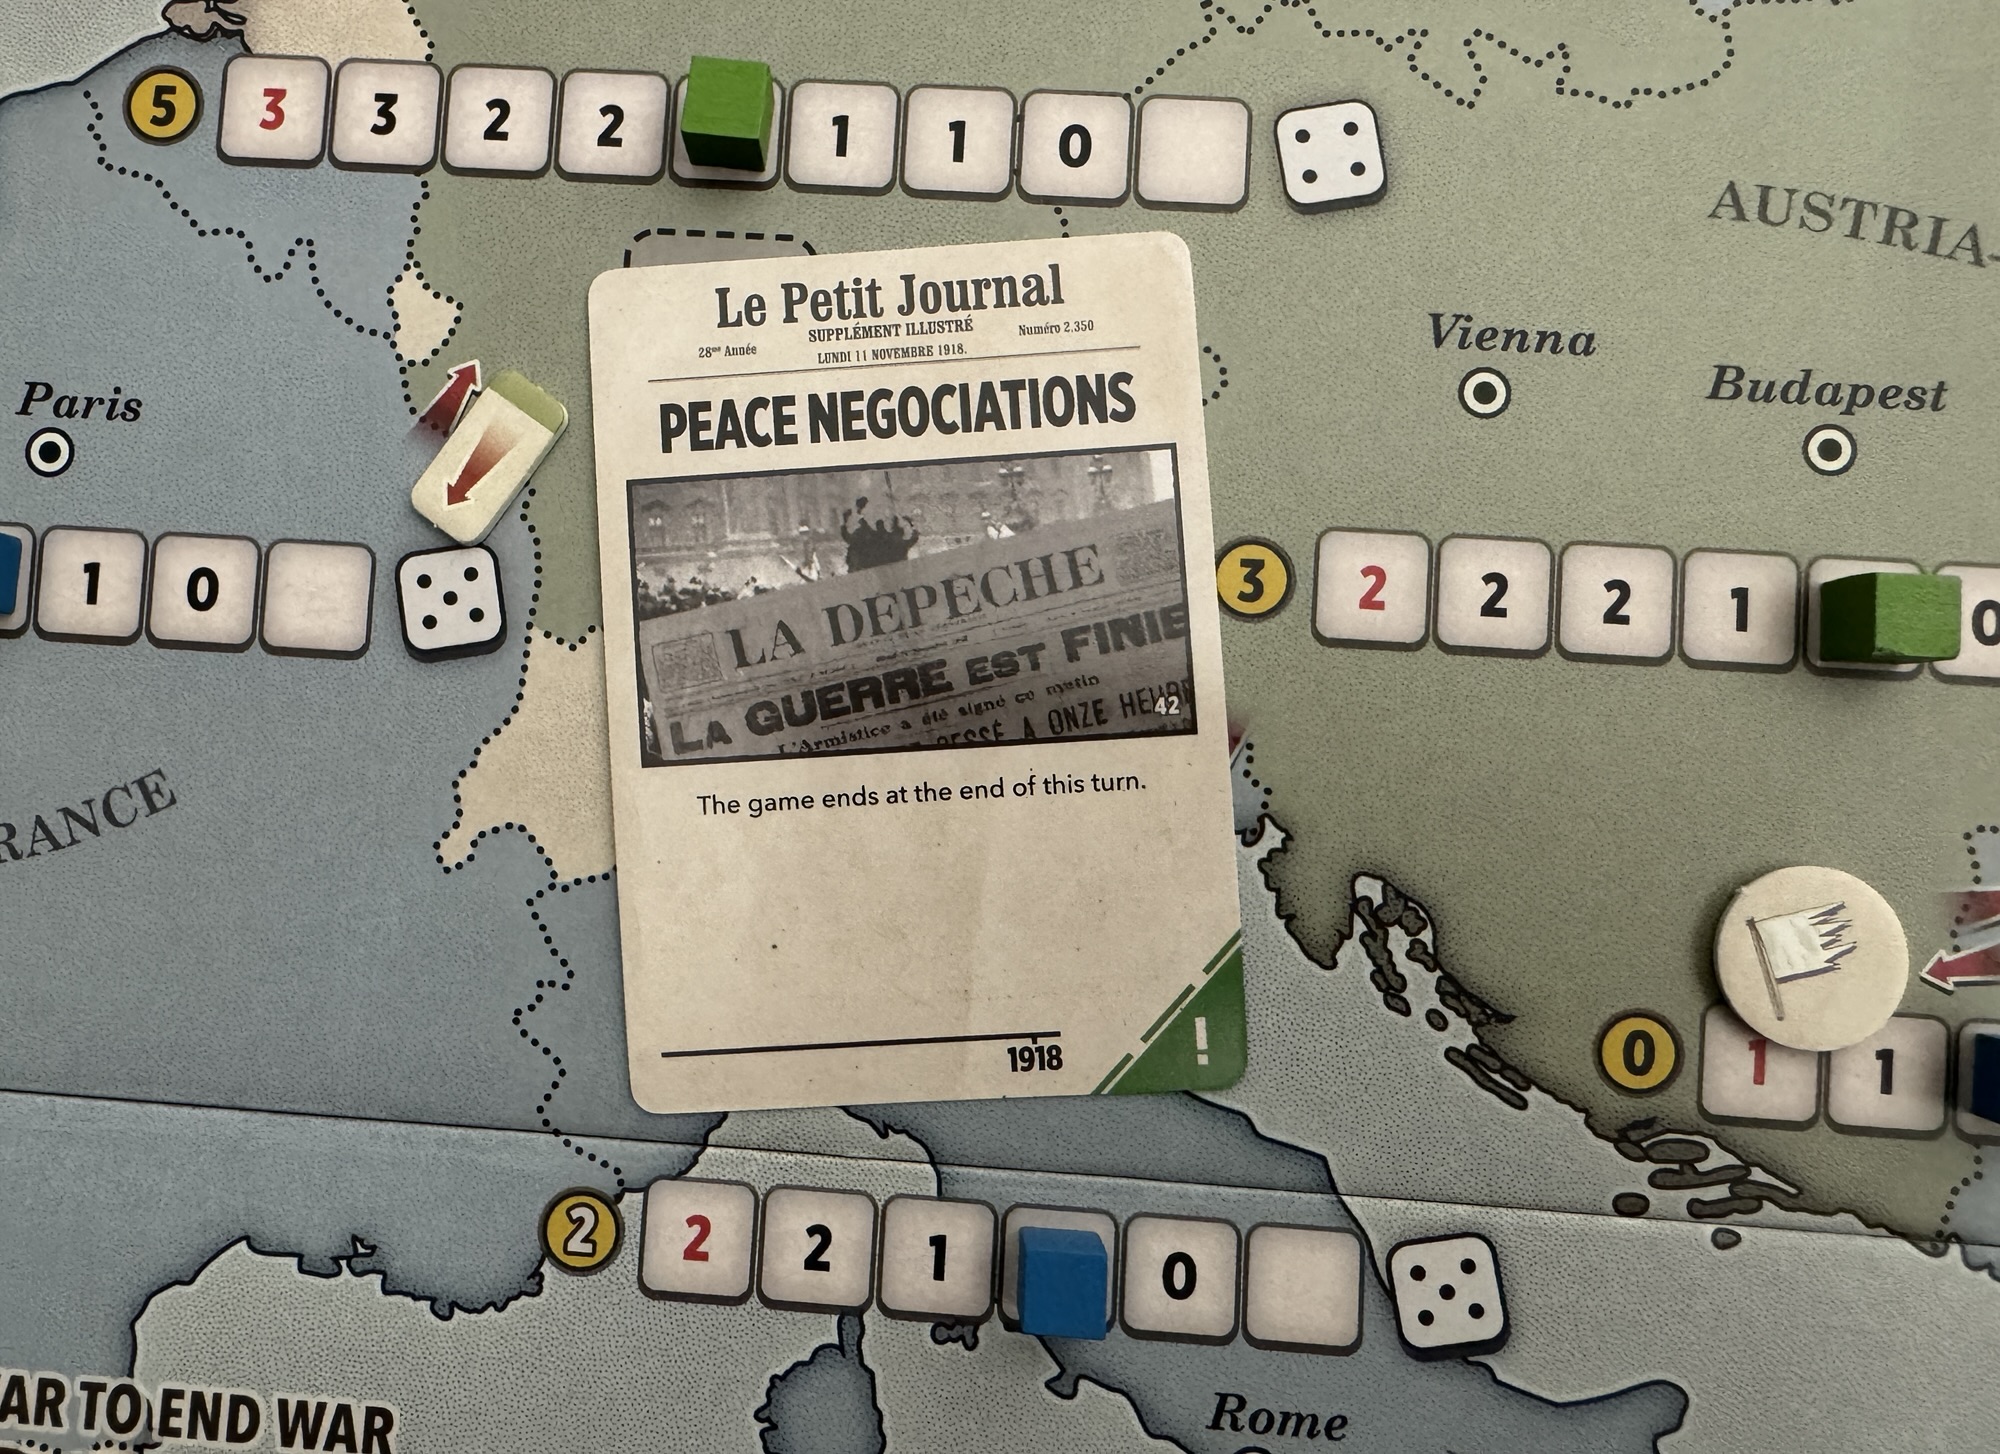
Armistice
Aside from the Sudden Death ending, the game can end in 2 ways including at the end of the turn during which the Peace Negotiations card was drawn, or at the end of turn 14. In both of these cases, the side with the most Prestige Points is declared the winner. If there is a tie, the Central Powers will win the game.
So what are Prestige Points? Prestige Points are a concept that takes into account the standing of each of the combatant nations on both sides, using the location of the Sector cube on their Collapse Track as a base, and then uses a simple mathematical formula to determine the overall standing and condition of the nations morale, production and will to fight. One of the most important parts of this calculation though is that it only takes into account nations that have not collapsed and surrendered. If a nation has been forced to surrender because their Collapse Track reached the end, they will not count toward the Prestige Points of their allied side.
Each player will calculate their total Prestige Points very simply by paying attention to several numbers such as the Operational Value and Prestige Value. For each country still At War during the Armistice, the player multiplies the sector’s current Operational Value (OV), which is shown by the location of the Sector cube on the Collapse Track, by its Prestige Value (PV), which is the value printed on the left side of the Collapse Track. The various nations’ Prestige Values are Germany 5, France 4, Austria-Hungary 3, Ottoman Empire 3, Italy 3, Middle East 3 and all other Sectors 1.
Let’s take a look at a quick example of how to calculate Germany’s Prestige Points. If Germany is still At War and their Collapse Track is showing an Operational Value of 2, then we will multiply their Prestige Value shown on the far left of the Collapse Track of 5 x the Operational Value of 2 resulting in a total of 10 Prestige Points. The players then add the number of Victory Points (VP) indicated by the location of their marker on the Victory Point Track. You might be wondering Where do Victory Points come from? Victory Points are specifically earned from forcing countries to surrender and the side that caused the surrender will earn a number of Victory Points as shown in the rules. For the Entente, their values are Russia 3 VP, Italy, Middle East and Romania 2 VP and Serbia, Africa and Greece 1 VP. For the Central Powers, their values are Austria-Hungary 3 VP, the Ottoman Empire and Bulgaria 2 VP and the German Colonies 1 VP.
I very much like the concept of only calculating the value for those countries who have not Collapsed and who are still in the war. We all know that it is easier to negotiate a peace that is favorable to your side when you are still a threat and if too many nations of either side have collapsed then their Prestige Points will reflect this as those countries won’t contribute to the final value. And I also like the simplicity of the scoring system. If certain key countries like France and Germany surrender, then that equates to a victory for the side causing the surrender and if the game continues to grind on through the final turn, then there is this calculation that is really pretty simple and gives importance to each goal with a different value that can be earned. Just a solid method for determining victory that makes sense and fits with the historical aspect of the outcome of the Great War.
In Action Point 6, which is the conclusion to this series, we will give an overview of the “Athena” solitaire bot and show how it works for solitaire play.
Neva Game Press is really exploring the space of wargame publishing and have games that are being worked on spanning all of history including modern and ancient. They also are looking at non-traditional topics to cover such as the Reformation. Their newest pre-order offering is called Reformation: Fire and Faith and is designed by Clint Warren-Davey. I am keenly interested in this one and have been working with Clint on this interview and maybe a series of other articles on strategies.
Grant: Welcome back to the blog Clint. With 4 published games to your credit what lessons have you learned about the design process and been able to put into practice?
Clint: Thanks for having me back guys! Yes I have learned a lot. Mainly, my iterative loop has become faster. I use mainly digital prototypes on PowerPoint and can get a prototype up and running pretty fast. This means I don’t need to print components and then reprint when things change. I also have a larger “toolbox” of ideas to draw from as I’ve played a wider variety of games. I still have a core design philosophy though – I want games that give players lots of meaningful decisions and a minimum of busywork, plus I generally prefer a high level of player interaction and interdependence.
Grant:How do you pitch games to publishers? What is your approach?
Clint: First I make sure the game is ready. I play-test the game myself a minimum of 20 times. Then I give it to external play-testers (basically my followers on Twitter/X). I keep refining it and make sure all the rules are nailed down. Once I have a fully functional and viable digital prototype, I send an email to a lot of different publishers to see who wants the game. So far, I’ve usually found at least one publisher who will accept each game.
Grant: What is your new game upcoming game Reformation: Fire and Faith about?
Clint: It’s about the wars and religious struggles that tore Europe apart during the Reformation, from 1517 (Martin Luther nailing the 95 Theses to the door of Wittenberg cathedral) to 1555 (the Peace of Augsburg). This is during the “pike and shot” era, which I love. It also includes a lot of political, religious and military conflict that is fascinating on multiple levels. It’s the perfect setting for an asymmetric wargame.
Grant: What image and feeling did you want to convey to players with the subtitle “Fire and Faith”?
Clint: Well this subtitle was decided by my publisher, Jose Neva of Neva Game Press. He wanted to convey both religious and military struggle in the title of the game, hence fire and faith. Before that the game title was undecided – it was either going to be just “Reformation” or “One Hour Reformation” – though upon further development it was clear this game doesn’t really fit with my other “One Hour” games.
Grant: Why was this a game you were inspired to design?
Clint: I am fascinated by the Reformation – both from a religious and a historical perspective. When I converted to Christianity about 10 years ago I had to choose which church to join, which forced me to read more on this time period, and read the arguments put forward by Protestant and Catholic apologists, then and now. I should state here that although I decided upon Catholicism, I hold no ill-feeling towards Protestantism and I understand the impetus behind it.
I was also drawn in by the fascinating geopolitics and tactical level military transformations of the time. The struggles between the French, Habsburgs, English, Ottomans, Venice, Scotland, Hungary, the Papacy and many other much smaller states were kaleidoscopic in their complexity but endlessly entertaining. To take one example of the political maneuvering of the time – the French lost the battle of Pavia to the Habsburgs, partially because 5,000 of their Swiss mercenaries just left and went home to defend their own cantons from rampaging German Landsknechts. Losing Pavia meant that King Francis I was captured. This in turn meant the English sensed weakness and struck in north-eastern France.
Seeking allies against this double threat, the French turned to the one great power that might help them – the Islamic Ottoman Empire! This outraged the Habsburg Emperor Charles V, who had his hands full containing the spread of Protestantism in Germany. The Saxons, Hessians and Brandenburgers following Luther’s lead would be much better used to help defend Vienna from the Turks, but instead both the Pope and the Emperor found themselves facing a full-scale religious revolt at the same time as renewed Ottoman offensives in the Balkans and the Mediterranean. This was all taking place against the backdrop of a military revolution in which pike and shot, and artillery, were replacing feudal levies of armoured knights.
Grant: What other Reformation games did you study for inspiration?
Clint: The complexity of this time period, and the sensitivity of religion as a topic, has meant that few game designers have been willing to tackle it. The exception is Here I Stand, the classic 6-player card-driven game by Ed Beach. This game is a well-renowned and even genre-defining title that managed to cram tons of inter-faction dynamics and historical chrome into the CDG system invented by Mark Herman (who made the first such CDG – We the People). It is absolutely brilliant in so many ways. Baroque, intricate, full of theme. It is almost like a historical equivalent of Twilight Imperium – one of my other favorite games.
The problem? It takes way too long to play for most gamers. Ever since playing Here I Stand many years ago, I had kept the idea of a simplified version at the back of my mind. Then, when I started teaching religious history at a Catholic school, I found myself teaching the Reformation. A classroom game on the topic would sure come in handy. So, in 2024 I made one. The images below give an idea of this, including my very basic graphics made in PowerPoint and Word. In 2025, I revisited the idea and thought it might be worth making into a serious game, still using the basic concepts and inter-faction dynamics borrowed from Here I Stand.
Early prototype version of the board.
Grant: What is your design goal with the game?
Clint: To make a game with 6 asymmetric factions that shows the inter-factional dynamics and key decisions of the period, all with mechanics that are simple enough to be used in a high school classroom AND simple enough for non-wargamers to pick up. Also, a game that players of Here I Stand would enjoy – especially when they are pressed for time. I believe I have succeeded in this goal but time will tell.
Grant: What main mechanics are used in the design?
Clint: The core gameplay loop is very simple. Each faction has a list of actions to choose from. Each turn, each faction will choose two actions. That’s it. But these vary greatly. They include everything from exploring the New World to translating the Bible to raising armies to piracy and everything in between.
All the factions have some actions in common – like Recruit (placing military units) and Campaign (moving and fighting). The two religious factions – the Protestants and the Papacy – are set apart from the others by having most of their actions focus on non-military functions.
Early prototype version of the Papacy Player Board.
The Protestants are trying to convert people to their new faith (or rather, in their terms, restore an older and more purified form of the Christian religion). As such, their overriding focus is placing Followers on the map. As a rough approximation, each Follower piece represents 5-10% of the population converting to Protestantism. What the Protestant faction is aiming for is gaining a majority, or a near-majority, in the countries of Europe. So, their main way of earning Victory Points is by having 5 or more Followers in as many spaces as possible. Now, the Reformation did not initially take hold everywhere. Geographically it was concentrated in Germany above all, then England, then in scattered pockets throughout France. In the game this is basically where the Protestants will be focusing all of their efforts. They start with only 1 Follower on the map in Germany – this represents Martin Luther and the nascent reform movement that started to gather around him in 1517. From this humble beginning, I wanted the Protestants to build up and expand, sometimes rapidly, across the map.
To speed up their placement of Followers, the Protestants can translate the Bible into local languages – German, English and French. This is an idea I took directly from Here I Stand and of course from the actual history of the Reformation. Having the Bible in the vernacular language, and spread by the printing press, was key to the spread of Luther’s ideas. Bible translation is a simple, two-step process in the game. First you need to accumulate “Knowledge” through the Study action and then use the Translate action to place Knowledge markers on the three Bible language spots on the Protestant faction sheet. Initially, this was the only purpose of Knowledge. But then I expanded it to other uses – especially the Debate action, which is a competitive bid against the Papacy that can score a valuable “Issue” token worth a precious VP. These Issue tokens represent the points of dispute in the Reformation, like the role of Scripture, Tradition and authority of the Magisterium. I liked the idea of carefully studying to build up knowledge in preparation for a debate – it’s a case of the game language matching the theme.
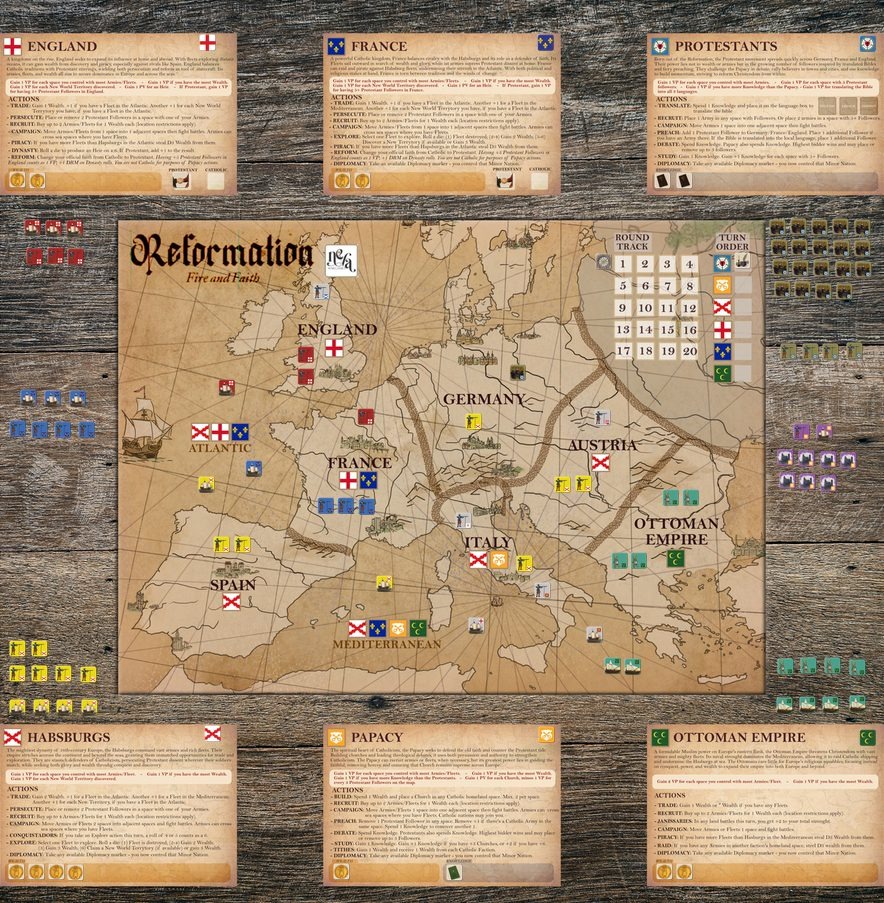
Near final look at the board and player boards.
The Papacy works in a similar way to the Protestants – but in reverse. The Pope is trying to remove Protestant Followers, through Preach and Debate actions. Every 3 Protestant Followers is minus 1 Victory Point for the Papacy, so they are incentivized to contain the spread of the Reformation. The Papacy also has ways of building up their own points, through Churches. This general term refers to all the infrastructure of the Catholic religion – not just beautiful cathedrals (like St. Peter’s, which was being built during the Reformation) but also schools, Jesuit universities, seminaries, monasteries, trained clergymen and church councils. I was originally going to have a track or chart on the Papacy faction sheet to measure this but later decided to have it as pieces on the map – the Churches you see in the game.
This was because I wanted the Papacy to have some of physical presence on the map like the other factions. This was loosely inspired by the building tokens in games like Root or the resources placed on the map in Scythe. It has the advantage of opening up the Papacy’s primary victory metric to attacks from the other factions. Just like Protestant Follower pieces, papal Church pieces can be attacked and removed. This represents iconoclasm and persecution of Catholic clergy, as well as periodic waves of destruction like the Sack of Rome in 1527. Unlike Protestant Followers, I had the Papacy’s Churches cost Wealth. This Wealth is gained entirely through the Tithe action – which takes money from any nations that are still Catholic. Early in the game this includes three out of the six factions: Habsburgs, England and France. But England and France might convert to Protestantism, and a greedy Pope constantly demanding their money might hasten this on!
Grant: What are the playable factions? How did you differentiate them?
Clint: There are 6 factions in the game: Protestants, Papacy, Habsburgs, England, France and Ottoman Empire. Each one has a faction sheet, like the one below, which summarizes their victory conditions and available actions.
The Protestants and Papacy are religious-focused factions. They do have military forces, but they are relatively few in number and are not the main priority. The Protestants are trying to build up their knowledge of the Bible and translate it into vernacular languages, preach to the masses and debate the Catholics to spread their ideas. Their main goal is getting their Followers on the map. The Papacy is trying to contain the spread of Protestant Followers and remove them from the map as much as possible, plus place their own Churches. Both Churches and Followers are immobile and do not count as military units. But they can be attacked and persecuted off the map.
The other factions – the Habsburgs, England, France and the Ottomans – function more like the nations in a wargame. Amassing armies and fleets, fighting battles, aiming for control of spaces on the map. There are plenty of differences though. The English, French and Habsburgs have the option of Explore action – sending their Atlantic Fleets to explore the New World, gaining varying amounts of Wealth or a valuable New World colony (at the risk of losing the Fleet). This provides a great way for factions to gamble early on in the game in a high-stakes race for colonies. Two tweaks were made to the Explore action during the design process. First, my co-designer Ed Farren suggested that New World colonies should provide extra income during the Trade action if the owner has a Fleet in the Atlantic.
I loved this idea and implemented it immediately. I later thought that the Habsburgs should have a distinct advantage in exploring the New World, what with Hernan Cortez and Francisco Pizarro active during this time. I gave the Habsburgs a way to boost their Explore action with “Conquistadors” – effectively tripling their chance of finding a colony at the cost of an additional action. This means the Habsburgs will be raking in more money. But there are a lot of ways for the other factions to steal it! The English, French and Ottomans can all use the Piracy action to get that Spanish silver, and the Ottomans can also Raid on land if their Armies make it through to Austria.
The relationship between the military/political factions and the religious factions is also fascinating. I kept the Habsburgs as a staunchly Catholic faction – they can’t change their allegiance and will act as the strong right arm of the Holy See throughout the game. But England and France are a different story. England needed a historically-rooted incentive to convert to Protestantism, and this was solved in two ways. First, if England officially converts, they will earn 1 VP if England itself contains at least 5 Protestant Followers. This also gives 1 VP to the Protestant player, so there would be strong reasons for both players to work together in the conversion for England. I also wanted some of the high drama of Henry VIII and his wives without an entire sub-system and chart like Here I Stand. This became the “Dynasty” action – a simple die roll to gain a VP by producing a viable heir to the throne.
If England is Catholic, they need a 6 for this. But converting to Protestantism offers success on a 5 or a 6, as Henry can start divorcing his infertile wives. England can therefore grab 2 VP quite easily by ushering in the Anglican faith, which is handy because their opportunities for expansion on the continent are quite limited. France can also earn VP by converting to Protestantism and having at least 5 Protestant Followers in France. For both England and France, converting to the new faith costs an action – which Ed quite appropriately labelled “Reform”. This could be a wasted action if Protestantism doesn’t end up spreading in that nation or if the Dynasty action still fails. But it’s a live issue. Among experienced players, I expect that the Papacy player and the Protestant player will spend a lot of their table talk trying to convince England and France to side with them in religious terms.
Grant: What is the layout of the board?
Clint: I made the map as simple as possible. There are 7 land spaces: Spain, France, Germany, England, Austria, Italy and the Ottoman Empire. There are 2 sea spaces: the Atlantic and the Mediterranean. And that’s it! But you will find that this still provides plenty of interesting strategic choices, as there are 6 factions crammed into these 9 spaces. So, like the proverbial “knife fight in a telephone booth,” players are stuck in fierce competition from the very beginning. For example, the Papacy, France and Habsburgs all have some presence in Italy in the game’s set up. Plus, there are pieces from neutral nations there – like Venice and Florence. So inevitably there be some conflict there!
Grant: Why did you feel area movement was the best approach? What strategic decisions are forced upon the players by the layout?
Clint: Honestly, I didn’t want this to be game about operational level maneuver, more about strategic level decisions and inter-faction dynamics. The map is very heavily abstracted. But you can see it this way. Every faction has a “homeland” space. The Habsburgs, being the hegemon of Europe, have two (Spain and Austria). Each faction will usually be aiming to keep its homeland secure while pushing into 1 or 2 other spaces. Taking control of a space is a big deal and will involve good timing, negotiation and applying just enough force. Some spaces – like Germany and Italy – will usually become battleground spaces with multiple factions vying for control.
Grant:What is the counter anatomy? What different units are included?
Clint: Like the map, the counter anatomy is as simple as possible. There is really no information on the counters other than their type. There are Armies and Fleets – which are the only military units in the game. There are also two religious “units” – Churches for the Papacy and Followers for the Protestants. These don’t fight and can’t move, but they are essential for the two religious factions to build up their influence and victory points. There are also counters for many other things – New World Territories, the Royal Heir for England, the Issues that can be won in a Debate, Knowledge, Wealth and a few other things.
Grant: What is the scale of the game?
Clint: There’s no specific ground or time scale as many things have been heavily abstracted. But very roughly you could say that each turn represents about 2-3 years and each army piece represents 5,000-10,000 men.
Grant: What actions do players have each turn?
Clint: Players can choose two actions per turn. As explained above, they are different for each faction. But there are some similarities. I will give a list of the actions for each faction.
Many of these are self-explanatory but I will explain some of my favourite ones. Diplomacy means getting a Minor Nation on your side, or pulling one away from an enemy. These Minor Nations include Venice, Florence, Genoa, Hungary and Scotland and they have their own Armies or Fleets or both.
Piracy means using your Fleets to steal money from the enemy. Explore means trying to find a valuable New World Territory – worth VP and more income during Trade actions if you have a Fleet in the Atlantic.
The Persecute action means placing or removing Protestant Followers. The Reform action – available only to England and France – means officially converting your nation to Protestantism.
Dynasty is unique to England and represents Henry VIII trying to get an Heir (worth a VP). It’s a dice roll, but it’s easier when you’re Protestant to represent Henry being able to divorce and try with a different woman.
Janissaries is unique to the Ottomans and gives them a valuable +2 bonus in battle that turn. Conquistadors is unique to the Habsburgs and gives them a bonus on their Explore rolls – making it more likely that they will grab a New World Territory.
Grant: How does combat work in the design?
Clint: Very simple – add up your Armies/Fleets, add a D3 roll, the highest score wins. If there were a total of 7 or more units in the battle, the winner suffers 1 loss and the loser suffers 2 losses. Otherwise, the loser suffers 1 loss.
Clint: How do players obtain victory?
Clint: Every faction can score Victory Points (VP) in multiple ways. The margins here are very tight – typically the winning faction will score 5 or 6 VP while second and third place will have 4-5. So, a single point really matters. Every faction can score VP for control of spaces – this is hard to pull off as you need more Armies or Fleets in the space than all other factions combined. So, you might retain control of your own homeland, but taking control of another space is hard. Aside from control, each faction has other ways of getting VP:
The Protestants earn 1 VP for translating the Bible into all 3 languages (French, English and German), 1 VP for each space on the map with 5 or more Followers, 1 VP for each Issue you win in a Debate and 1 VP for having more Knowledge than the Papacy. So the Protestants need to focus on their religious actions – studying, translating and preaching.
The Papacy earns 1 VP for each Church they have on the map MINUS 1 for every 3 Protestant Followers on the map. They also earn 1 VP for having more Knowledge than the Protestants, 1 VP for each Issue they win in a Debate and 1 VP for having more Wealth than any other faction. So, the Pope also needs to focus more on his religious goals – but can also use the Tithe action to build up Wealth (for building Churches) and maybe get a point for rolling in cash.
The Habsburgs earn VP for each New World Territory they discover – and they are better at it than other factions because of their Conquistadors. They also earn VP for having 2 or more Churches in their homelands (Spain and Austria) and can earn VP for having the most Wealth.
The English earn VP for New World Territories and for having the most Wealth. They can also earn 1 VP for producing an Heir with their Dynasty action. The Dynasty action represents Henry VIII’s efforts to produce a legitimate male heir for his throne, and is easier if England becomes Protestant. England earns 1 VP if it converts to Protestantism and has 5 or more Protestant Followers in England. If it stays Catholic, it earns 1 VP for having 2 Churches in England.
France is basically like England but doesn’t have the Dynasty action. They will focus on military action, exploration and building up Wealth. If they stay Catholic they will want the Pope to build up Churches in France, if they go Protestant they earn VP for having 5+ Protestant Followers in France.
The Ottomans are the most straightforward – they can earn 1 VP for having the most Wealth but mostly they just get VP for control of spaces – they earn 2 per space instead of 1. They are an expansionist juggernaut and don’t care about the religious squabbles in Europe.
Grant: What type of an experience does the game create?
Clint: I think it gives you an understanding of the key inter-factional dynamics of the Reformation era using mechanics that are simple to understand and easy to enact.
Grant: What are you most pleased about with the design?
Clint: The asymmetry, the simplicity and the interaction between the players. I’m also really happy with the “bot” rules which allow you to play at anything from 1 to 6 players, with non-player-controlled factions run by a simple dice-based action sheet.
Grant:What has been the response of playtesters?
Clint: Very positive. Every play-tester has said the game is really fun and easy to learn, their only suggestions have been refinements to improve the balance between the 6 factions. For example, one play-tester noticed that the Debate action was under-powered and that the Protestants and Papacy were scoring fewer VP than the other factions on average. Changing the Debate action to winning “Issue” markers (worth 1 VP each) solved both problems. This is why play-testers are so valuable!
Grant: What other designs are you working on?
Clint: A lot! I will share a few of them with you.
First, there is One Hour Napoleon and One Hour WW1, sequels to my game One Hour WW2. Napoleon should be out this year, WW1 next year.
Then there is Messiah – my “Jesus COIN game” which is set in 1st century Roman-occupied Israel and lets you play as the Christians, Zealots, Pharisees or Romans. Similarly, there is “Testament” – my card drafting game on the entire Old Testament, inspired by 7 Wonders. These are still in development but they have a publisher and will certainly be made.
Anyone interested in my designs should follow me on X at @Clint_Davey1 to keep up to date with all the new releases. Thanks for having me on again!
If you have followed us for a while now, you know how we feel about Here I Stand: Wars of the Reformation from GMT Games. And, you know that we enjoy multi-player wargames. So, this one really seems to b simple and take in the concepts of negotiation and the asymmetry of each of the factions. I think that this game will be a good quick playing substitute for the longer and more involved Here I Stand experience. I cannot wait to get this one hopefully this year.
Last day. We have had a great time and got 14 different games played! I’m exhausted but it’s a good exhaustion, if there is such a thing. Our final day was filled with 3 more great games as well as a lot of quality time with friends and fellow wargamers.
The day started with our first play of a brand new game called Imperial Elegy: The Road to the Great War 1850-1920 from VUCA Simulations. Imperial Elegy is a card driven game that blends diplomacy, warfare, and statecraft and feels a bit akin to games like Here I Stand and Virgin Queen from GMT Games. Grand scale sweeping epics that play multiplayers and take a day to play. Players play as 1 of 6 unique major powers in the game including Germany/Prussia, the United Kingdom, France, Austria-Hungary, Russia and the Ottoman Empire.
The game takes place over 7 turns, with each turn representing approximately a decade. If the Great War breaks out, the game can be extended by an additional 6 shorter turns.A turn in the game consists of numerous player impulses that is driven by the play of action cards for their Command Points or the printed events. Players will use CP and events to take actions like colonize, conduct diplomacy with minor nations, fight wars, as well as hinder their opponents by playing events that take away their actions or resources. A turn will end once all players have consecutively passed or when all players run out of cards.
Here is a look at the German player board which tracks a lot of information including current Stability, which decides whether various actions like war can be taken or if there are various positive or negative modifiers, the available Manpower that will determine how many armies can be built, Industry that tells how many action pointed you will have to spend during war to maneuver units, attack and replace losses. The focus of the game is about the control of territories both on the Minsk and of Europe as well colonies abroad and there is an automatic victory if a certain target number is met, in the case of Germany 15.
Here is a quick look at the Russia player board for comparison’s sake as each faction is unique and has various starting levels and abilities.
We only played the first full turn and it took us about 90 minutes including an hour of setup and rules overview and discussion as only one of us at the table had player previously (John Lapham). But we very much enjoyed the experience and found lots to like. We are going to try to put together another full game in the next several months and will have more to report on after that. But suffice it to stay everyone at the table was impressed with the design and everyone had a good time with it.
The 2nd game of the day was Bretwalda from PHALANX. This is such a beautiful game but is also a very good design in the area control/dudes on a map realm.
Bretwalda attempts to do what Civ Builders do but do it in a novel and different way…and also finds a way to incentivize combat, which was really a breath of fresh air for me. Bretwalda from PHALANX is a game for 1-4 players that plays in around 2 1/2 hours. Each player takes charge of one of the kingdoms of medieval England, including Northumbria, Mercia, Wessex and East Anglea, and each of these kingdoms has unique leaders and abilities. The goal is to be crowned the Bretwalda of England and victory will be achieved through a combination of controlling key areas with victory points, completing Chronicle cards in the form of hidden objectives and also focusing on building various buildings such as Abbeys.
The game has very little assymetry and I initially thought that this would be a bad thing for the design but really enjoyed how they did make each kingdom feel different, also how they provided unique choices in the area of Kingdom Tiles and the development of your kingdom. The Kingdoms differ in three main aspects. First, they are located in different areas on the map. Now this might not seem very important but there are advantages to each of these locations. East Anglea has access to several Areas that produce Food. This is very good as you have to feed your soldiers at the start of each Winter Phase and you will always be on the lookout for how to get more Food. This is a very good advantage but the tradeoff is that they are very open and spread-out on the map in the east and have more areas susceptible to attack which requires more troops for defense. Northumbria is located in the north of England up against Hadrian’s Wall which provides some form of protection as it provides extra defense if attacked. They can also conquer the area to the north of their kingdom and have very little worry about any threat from that side so they can focus on defending other areas.
Second, each kingdom has its own permanent, unique special rule that provides them with an advantage. East Anglea starts with 3 Food in their capital while other kingdoms start with just 1 and they also obtain 2 Food at the start of each Spring Season. Wessex will draw one extra Lordship Card after winning a battle. This is very important as these cards are very versatile special benefit cards that can be used in battle to do several things like reroll dice, add reinforcements, bring back a destroyed unit, etc. They also though have other uses through other phases of the game including scouting your opponents stash of cards before attacking, cancelling played card effects, gaining additional Gold, amongst other benefits. Mercia is able to Recruit 1 additional land unit when they take the Fyrd (Recruit) action. This gives them access to larger armies more quickly than other kingdoms so you have to watch out for them to be aggressive early. Finally, Northumbria may build Abbeys for 1 less Gold. This is probably the most simple benefit but Gold is at a premium and this really helps them to get more Gold as Abbeys give victory points (called Dalcs) as well as provide 1 additional Gold during the Collect Action. These benefits are not massive or game breaking but really add some flavor to each kingdom. Third and finally, as already discussed in the point above, each of the kingdoms has a set of its own unique historical Rulers, each with a different ability. I wont say anymore about this here but I really liked this part of the assymetry and thought it worked really well without breaking the game or making it more difficult than it had to be.
The area that I really wanted to cover in this part though was the Kingdom Tiles. During the Development Action, each player can pay 3 Gold and place 1 Kingdom Tile on their board. These Kingdom Tiles are divided into 4 different categories (you can see the four categories on the Kingdom Board shown above) tied to the four available Actions for players, including Development, Collection, Fyrd (Recruit) and Movement. The surprising thing about these tiles was that they are all the same for each kingdom. At first I thought maybe this was a missed opportunity but then after playing I saw that each having the same access to the same tiles was smarter as it gave the game balance. Also, each of the categories offers 3 possible Kingdom Tiles to develop and each player only has 2 spots on their board so you cannot develop all 3 in each category and each player will have to choose what makes the most sense for them at the time. I have seen this done in several of the Lite Civ Dudes on a Map Area Control games but they tend to overcomplicate it and make it clunky whereas in Bretwalda it is streamlined and simple yet there are options and paths to develop.
Bretwalda is a unique game amongst the many Lite Civ Building Dudes on a Map Area Control games out there. I had a great time playing the game and enjoyed the very interesting and fun combat system with custom dice for each unit type and Lordship Cards that add special abilities. This game is special and beautiful and thematic and earns a spot on my shelf as a game that I want to play again and again.
The wrap up event was annual roleplaying game and this year Cullen prepared a session of a new RPG called War Stories, which is set during the World War II. With it, players take the roles of heroic soldiers parachuting into Normandy during Operation Overlord in June of 1944.
As an RPG players will have characters with various special focuses across 4 abilities including Strength, Agility, Intelligence and Empathy. Each time a skill is to the checked you find the matching ability and roll that number of six sided dice looking fur 6’s which mean success. If multiple successes are rolled you can earn special tokens called Lucky Strikes that can be saved and used as successes on future rolls. The players will have to decide if they roll their dice again and will remove any 1’s from the pool and roll the remaining dice again. If they fail this time though the GM will gain a FUBAR token that can be used to cause a failure on a rolled success in the future. This really created some cinematic moments and was a very interesting way to handle a check.
Our friend Cullen was the GM and did a fantastic job guiding us through our first experience with the system. His good explanation and clear understanding and familiarity with the system really made our first experience an enjoyable one.
We were tasked with taking a hardpoint on D-Day behind enemy lines to assault and take out several gun emplacements shelling the upcoming landing beaches. We went through a series of rolls and checks on the flight in on the Dakota C-47 and then had to bail out over flak filled skies taking hits and losing gear or our musette bags.
When we landed we had to gather up, create a plan and then execute that plan to maneuver through German held positions under fire and take out the emplacements. There were lots of heroic actions, good sniper shots, daring orders and of course explosions and we had a great time with the game.
In the end we were successful and only lost a few of the men under our command. I look forward to playing more in the future. Thanks to Cullen for his preparation and time devoted to teaching us the system
We finished up at about 9:00pm and we then gathered up all of our games, equipment and items and said goodbye to friends who we hope to see next year. This week was a major success as we played 14 different games and had a very good time. Thank you so much for following along in my daily posts and look ahead to the videos we did appearing on the YouTube Channel over the next month.


