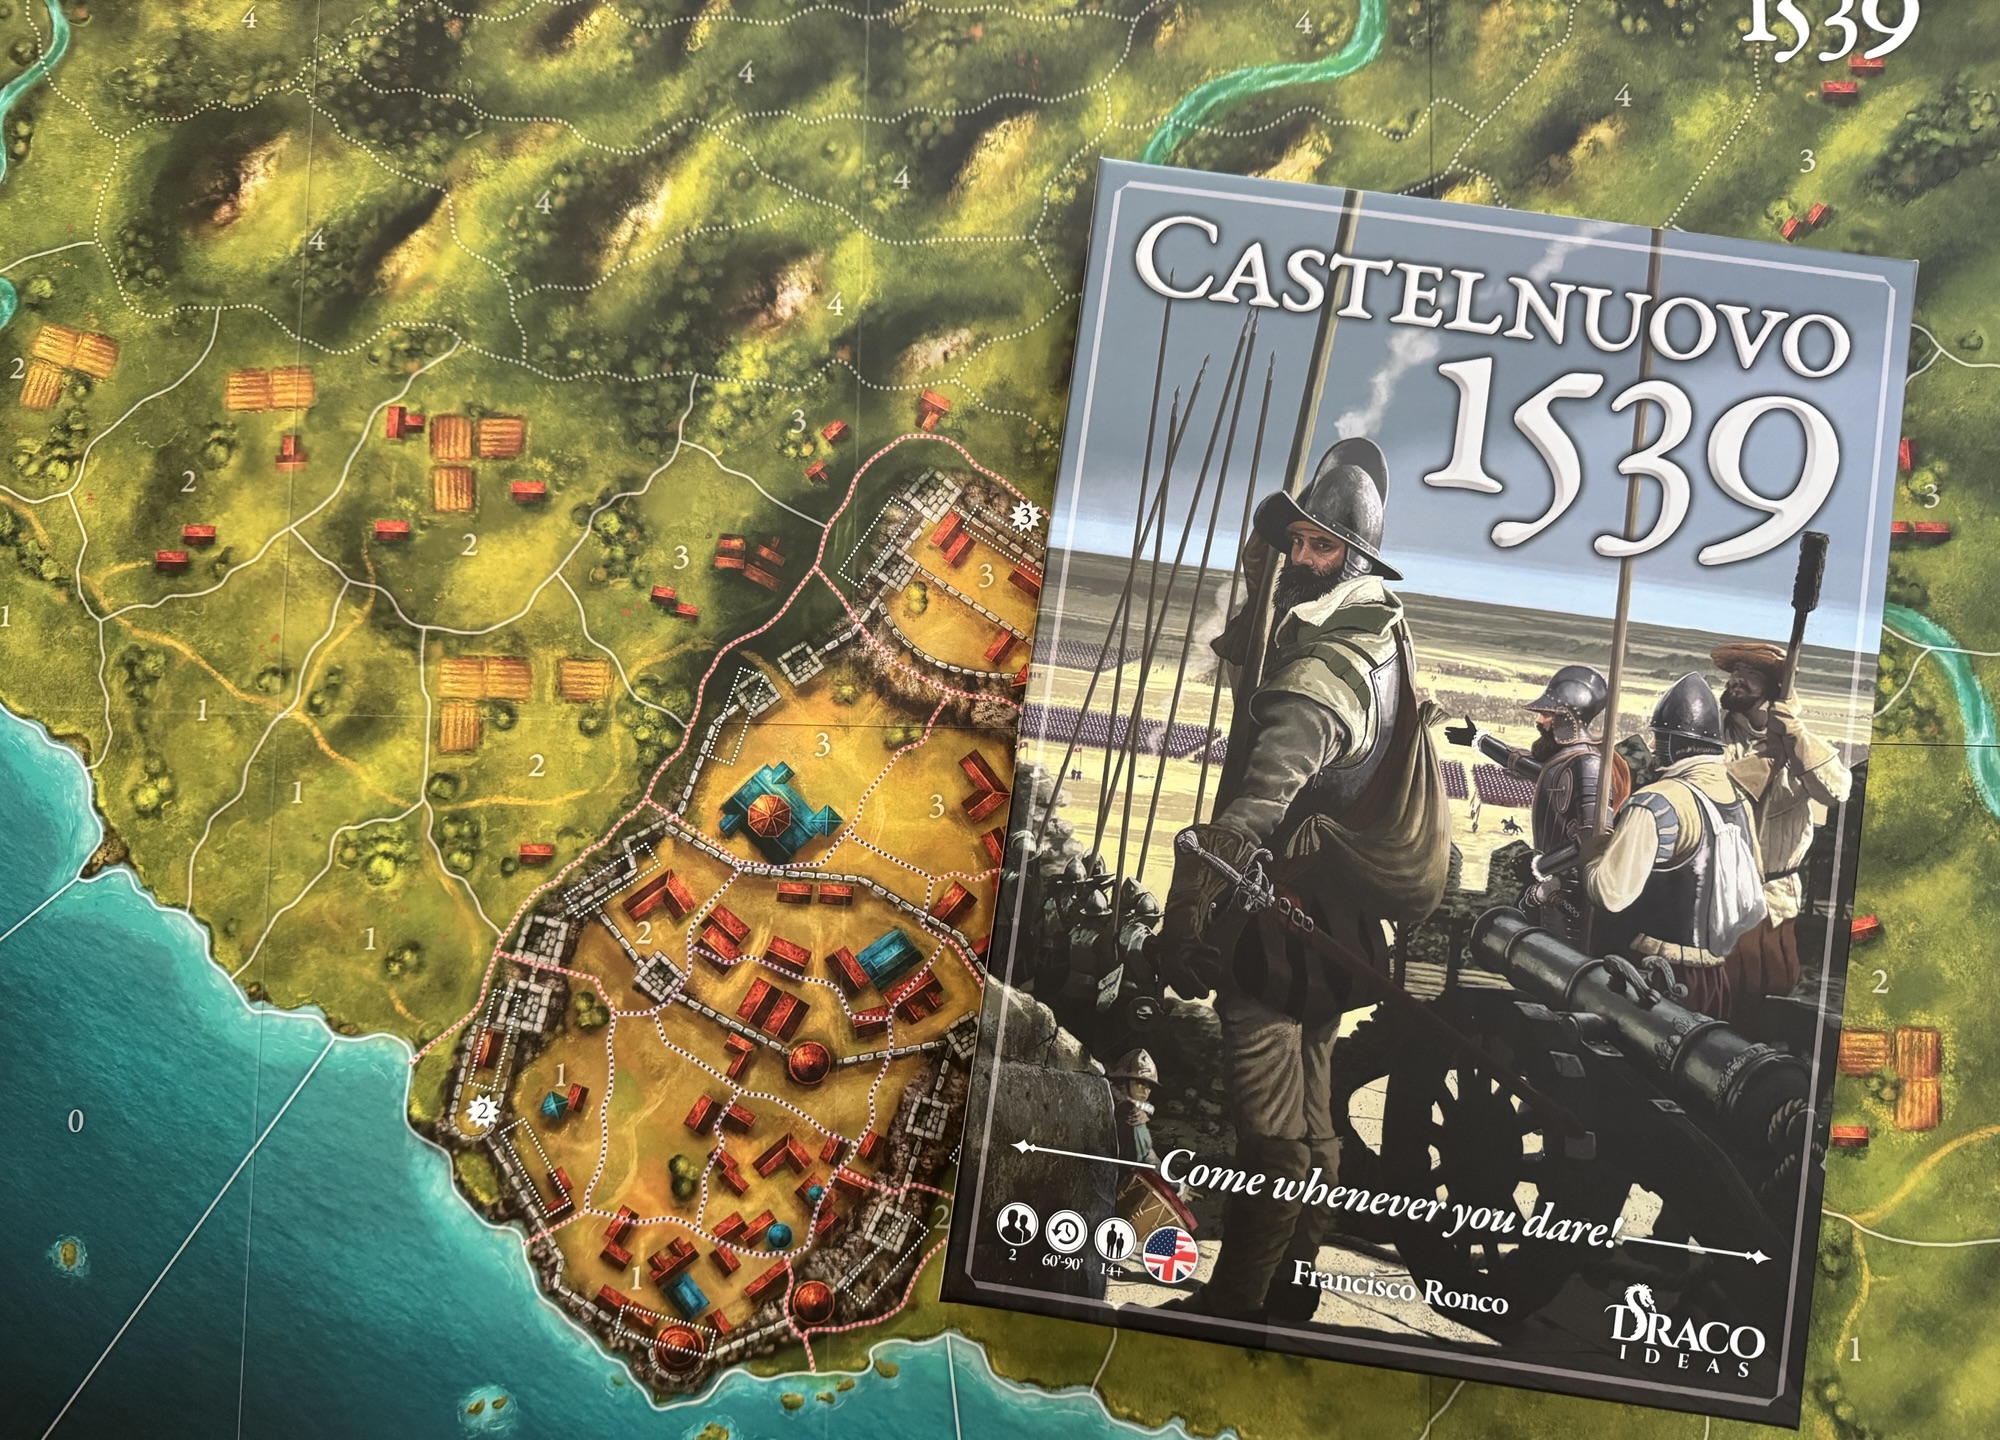
In 1539, a small Spanish garrison of troops numbering 3,500 men held the Albanian village of Castelnuovo for 22 days against the massive Ottoman army consisting of over 54,000 Turk soldiers. This siege took place as a part of the Ottoman-Habsburg struggle for control of the Mediterranean Sea in July 1539 at the walled town of Castelnuovo, which is the location of present-day Herceg Novi, Montenegro. After days of open trench warfare and more than a month of smaller combats, skirmishes, assaults and bombardments from the Turkish navy, the last Spanish defenders fell ending the siege. Castelnuovo 1539 is a wargame that focuses on this siege designed by Francisco Ronco. The defenders are safe behind sturdy walls and battlements but time and continual shelling from the Ottomans will lead to assaults over the walls. The battle is hopeless for the defenders but they can win the game by doing enough damage to the Ottomans to end their campaign and stop them from invading further into the Albania and then onto Spain and the rest of Europe. The game is very well produced using wooden blocks for soldiers, stylized walls, siege trenches and cannon along with ships and the board is also beautifully illustrated. The game is a block wargame where the strength of units are hidden from the opponent and plays pretty quickly in less than 90 minutes and really is a great representation of the battle and its history.
In this series of Action Points, we will first take a look at the beautiful Game Board and its area movement scheme, examine the units available to both sides and compare their relative strengths and weaknesses, take a look at the 5 different types of Command Cards and discuss how they are used, look at the 2 different types of rounds including a Siege Round and an Assault Round and how they differ, take a look at an example of combat and bombardment and finally examine the victory conditions for both sides and how casualties effect this outcome.
Game Board
The Game Board represents the fortified city of Castelnuovo and its surrounding areas, including the Mediterranean Sea to the south and the rolling countryside to the north. The Game Board is divided up into areas which are used to regulate the movement and positioning of the block units. The Game Board is pretty large really measuring in at 29″ x 21″ and is a fully mounted map board and is very nicely illustrated by Paco Arenas and absolutely was a joy to play on.
As you look at the Game Board in the picture above you will notice a few things. The areas of the city of Castelnuovo are outlined in red with a dotted line representing the city walls around its perimeter. There are also 4 inner areas of the city itself outlined in purple. Sometimes the game rules make reference to the “Fortress”, which means the 4 areas of the city and the walls surrounding them.
Here is a closeup of the Fortress where you can see the colored lines a bit better. You will also notice that there are rectangular boxes on top of the walls in the Fortress outlined with white dotted lines. These are spaces where the wooden wall segments are placed to represent the Resistance Level of the walls. You will see that in each area of the city that has walls, there is a number found in a white star that represents this Resistance Level. There are areas with both Resistance 1, 2 and 3 inside the Fortress. As the walls are attacked with bombardments from artillery, their Resistance Level will be degraded represented by placing wooden cubes in each area marking the current Resistance Level with 1, 2 or 3 cubes. If an area has 3 Resistance Level and takes a hit, the player will remove one wooden piece indicating that the Resistance points have dropped. Once the Resistance Level reaches 0, the walls are destroyed and the wooden wall pieces are removed from the board. The Ottoman player may then storm the walls and attack the defending units in the city.
There are 2 types of terrain found in the countryside of the Game Board with clear terrain being shown by a solid white outline and rough terrain outlined by a white dotted line. Each area of the map has a Height Level value printed in its location, which indicates the height of the area. The heights are 0 being the lowest, or basically the sea level with a 4 being the highest which represents a mountain level. The height effects the shooting of firearms. In addition, other terrain features are printed on the Game Board including the coastline, which separates the sea areas from the land areas, and also is a landing point for a majority of the Ottoman player’s reinforcement troops. Also, the 3 areas with Resistance Levels of 2 and 3, marked with the white star, are the areas that the Ottoman army must occupy at the end of any round to win the game.
Movement is specifically tied to the type of lines found in the areas of terrain. Units and Leaders can move by playing Action Cards, which allow a group of 1 to 3 units that are in the same area to one or more areas. Activated Infantry units will have 2 movement points and Cavalry have 4 movement points. Moving into a clear terrain area costs 1 movement point while moving into a rough terrain area, which is marked with white dotted lines will cost 2.
The countryside areas have various depictions of buildings including shacks, storage sheds, houses as well as farm fields. These buildings do not affect combat or movement and are simply illustrative of the surroundings of the city. They are also many trees and bushes drawn on the Game Board with connecting roads also shown.
There are a few pieces that the players will place on the Game Board at the outset of playing including the wall blocks already mentioned as well as the Bastions. These Bastions are used by the Spanish player and are placed at the beginning of the game in any terrain areas outside of the city proper. These Bastions function similarly to the walls of Castelnuovo’s fortifications. Once these are placed, they cannot be moved and will remain on the board even if their Resistance drops to 0 and they are destroyed. The Ottoman player can destroy them with artillery Bombardments or by spending Trench Points from Command Cards when entering them. These Bastions do not provide defense to the Ottoman player.
The Casualty Track is printed in the bottom left hand corner of the Game Board and is used to keep track of the number of blocks lost by the Ottoman player. In addition, also tracked will be Leaders and the number of Assault Rounds used by the Ottoman player.
The game really is a nicely made production with the Game Board being one of the best parts of the package. It is clear, well laid out and takes little to no time to understand its locations and areas. I think that one of the strengths of this game is that it is not only nicely produced but the rules are very clear and the strategy of what each side should be doing, by taking advantage of their defenses and the terrain.
In Action Point 2, we will examine the units available to both sides and compare their relative strengths and weaknesses.
An Impossible War: The First Carlist War in the North, 1834-1838 from Bellica Third Generation is a block wargame that recreates the First Carlist War in the North of Spain which was a civil war between the Carlists who supported the succession of the late king’s brother Carlos de Borbón and the progressive and centralist supporters of the regent Maria Christina acting for Isabella II of Spain who were referred to as the Liberals. The game uses blocks representing units but also includes counters and uses cards. I was able to play the game about a month or so ago with Francisco Ronco who owns the publishing company Bellica Third Generation and very much enjoyed the game and how it represented this interesting struggle.
In Action Point 1, we took a look at the Game Map, discussing the point-to-point movement configuration, the various spaces and the delineation of the Carlist versus the Liberal Zones, as well as explained the use of the Rest of Spain smaller map. In Action Point 2, we examined the units available to both sides and covered the importance of Supply. In Action Point 3, we took a closer look at the Carlist Uprising Phase and what it means for the game. In this Action Point, we will take a look at the activation system and the use of Action Point Markers.
Activation System
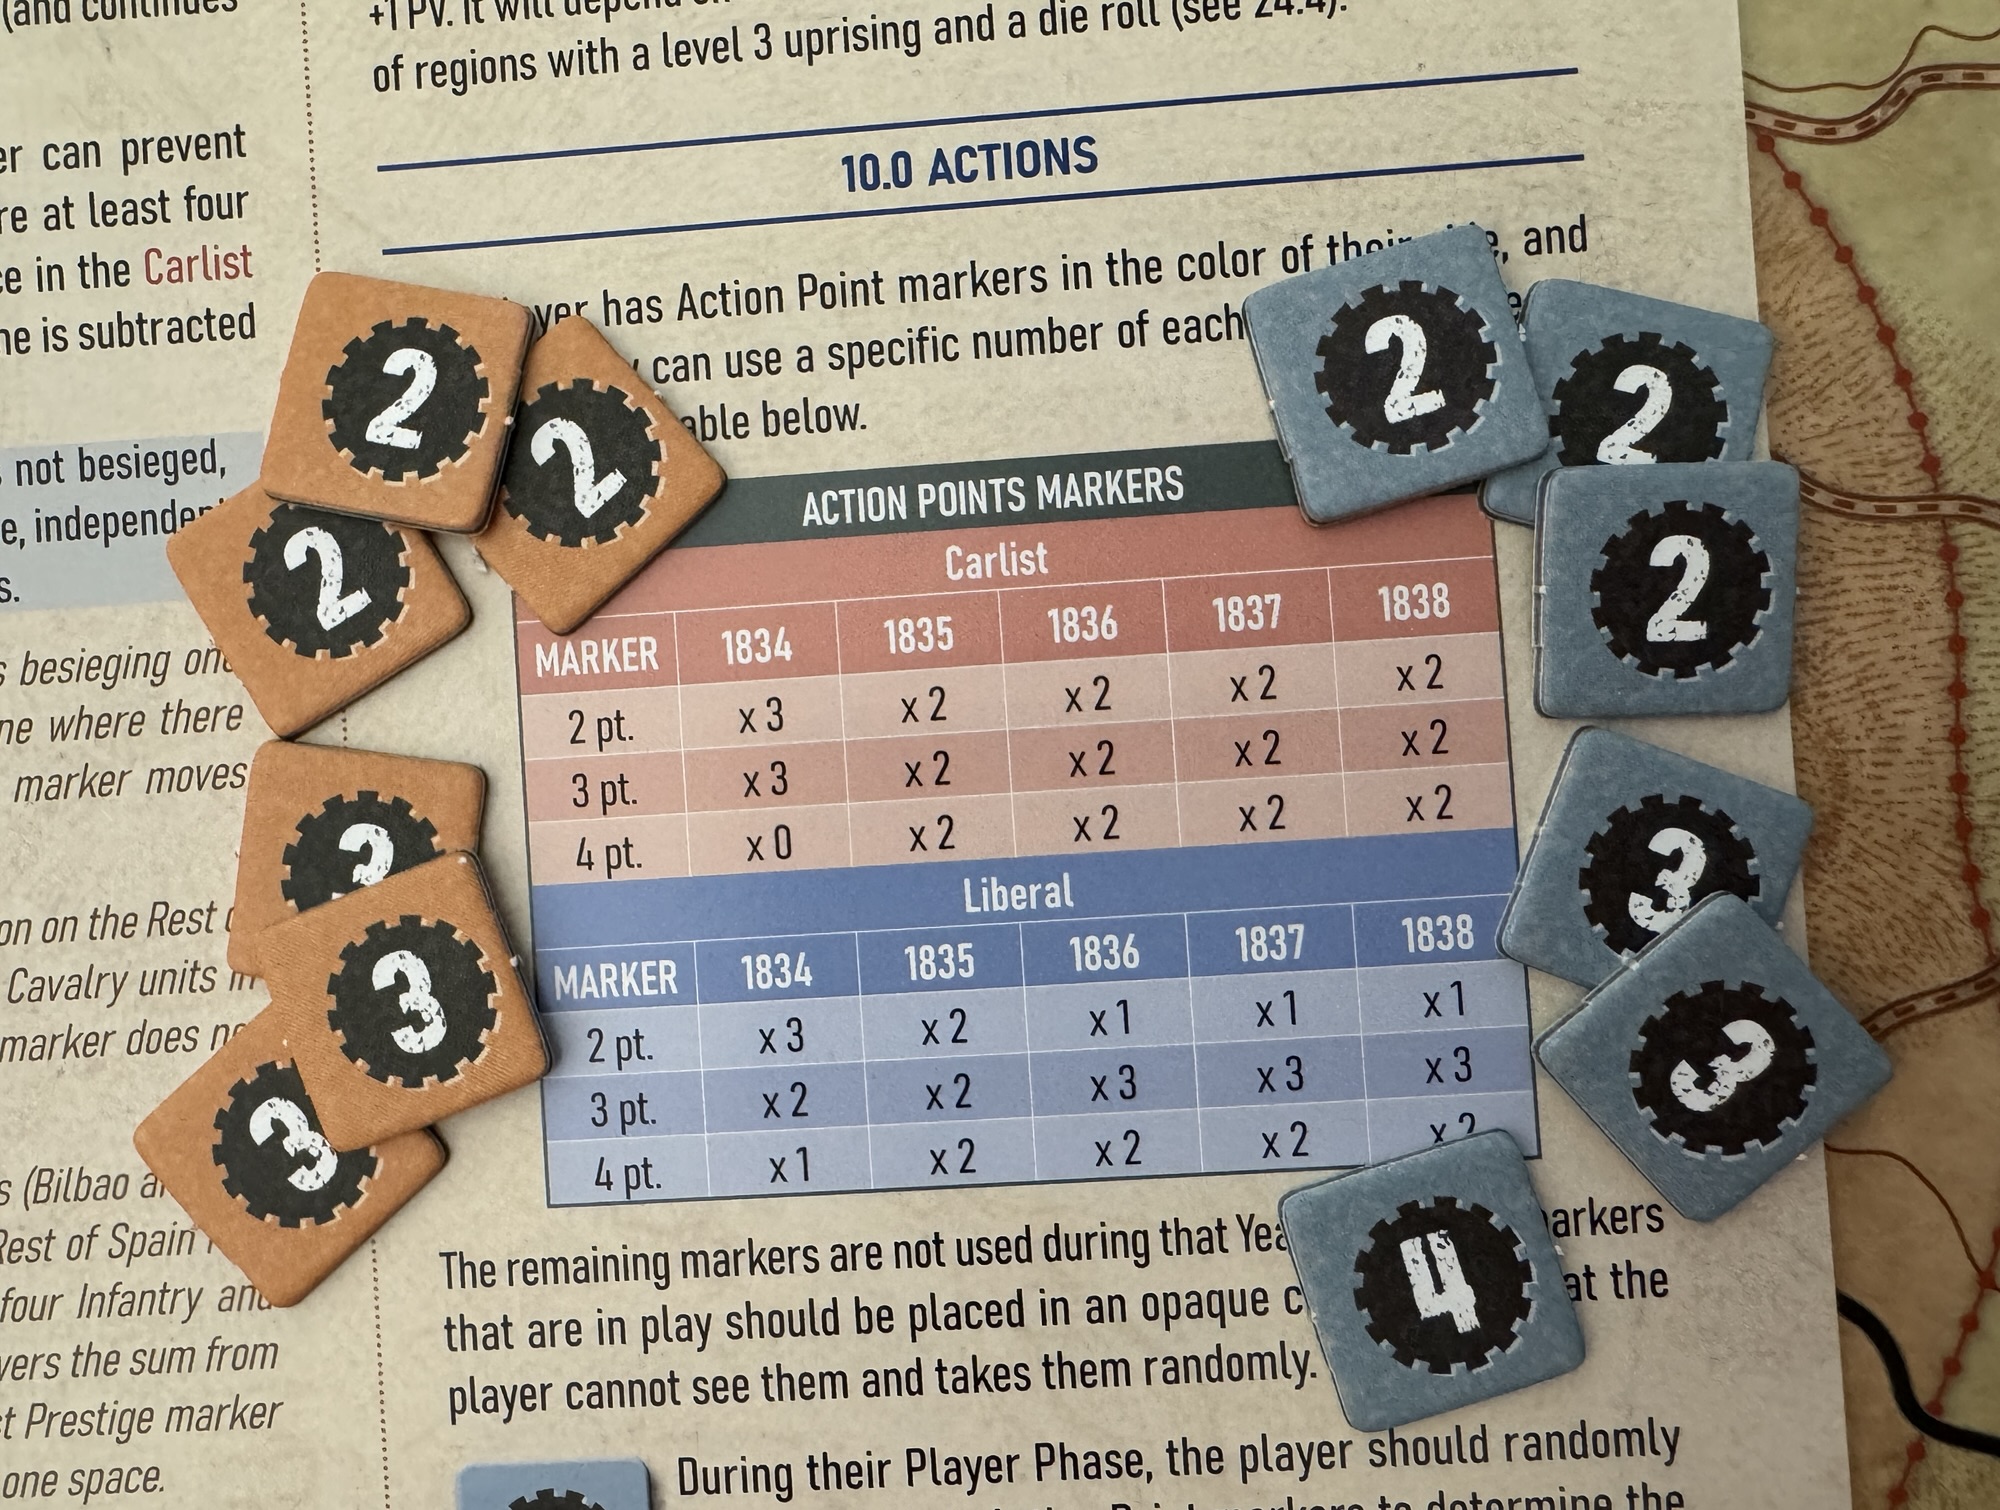
The main focus of the activation of units is the concept of Action Points. These Action Points are used to take various actions such as to activate units for movement, build fortresses, destroy enemy fortresses, obtain replacements, recruit units into Expeditions, suppress uprisings and enter into combat as a part of activation for movement. Both the Carlist and Liberal player has Action Point Markers in the color of their side and each year they can use a specific number of each value of marker. This is determined at the outset of each year according to the Action Point Marker Table.
After the number of Action Point Markers used is determined, the players will each build a chit draw cup for their own Action Point Markers. This should be an opaque container that obscures the identity of each marker as the draw is supposed to be random and is really part of the fun of the design. Then at the start of their Activation Phase, the player will randomly draw an Action Point Marker and then mark their Action Point Track accordingly. As already mentioned, these Action Points are the “fuel” spent to perform actions.
As you can see in the chart above, each year the players both have access to the same amount of overall Action Point Markers with 6 but the makeup of these markers will be different ranging from 2 points to a maximum of 4 points. For example, in 1834 the Carlist player will have three 2-point markers and three 3 point markers while the Liberal player will have access to three 2-point markers, two 3-point markers and one 4-point marker. This is an interesting point as the Liberal player has the potential to obtain more Action Points in 4 of the 5 years covered in the game. This is random of course and fate can decide that the Carlist player will get the most Action Points each year but the potential is there for the Liberal player to have the advantage.
As mentioned, these Action Points are the currency used to take various actions and in most instances they will be used to Activate units on the board. Activated units can then move and their movement allowance will depend on how many units move together and the roads used, either main or secondary.
But one of the more interesting ways that Action Points can be used is to convert them into Command Points. The player may choose to convert as many Action Points as desired each year into Command Points, noting them on the Command Points Track. A player may have no more than 5 Command Points. Command Points are flexible currency that will not be lost and can then be used to contest initiative, as Action Points or even to attempt an interception of enemy units. These Command Points are vital and should be something that players invest into as they are very flexible and also allow for the taking of actions during the other players activation. I like the way the game uses this random activation concept and currency for those actions. In reading the designer notes in the Playbook, the designer David Gómez Relloso emphasized the fact that the war was brutal, difficult and that communication and distribution of orders was very difficult, particularly for the Liberals as they were operating in hostile territory where the locals continually harassed and denied them of provender as they would flee taking their livestock with them to keep them out of enemy hands. This random number of Action Points, and thereby a varied number of points to do things with on the board, really is central to the design and can make for a very interesting challenge for those that are unlucky like me. While the differences in the values of the Action Points are not that far apart, a few extra or less than your opponent can cause great difficulty as you will simply not be able to perform what you need to each turn. This boils down to a prioritization of goals and will lead to some very tough decision having to be made about activating units versus recruitment of new units or focusing on the game board state versus the state of the Rest of Spain Map and the Carlist Uprisings and Expeditions.
I also was able to shoot a fairly short video summary of my game play with Francisco Ronco who is the owner of Bellica Third Generation and you can watch that at the following link:
In Action Point 5, which is the conclusion to the series, we will cover some examples of Battle, focusing on the tactical aspect of combat with the use of the Battlefield Board, as well as an example of a Siege.
While attending Buckeye Game Fest this spring, we were gifted a copy of a newly published game called And the War Came: American Civil War 1861-1865 from Pinkerton Games, which is published by Blue Panther LLC and Steve Jones. The designer and owner of Pinkerton Games Larry Pinkerton had been their earlier but had to leave due to some other pressing business and we were unable to meet but were very grateful for the game. Upon returning home, I reached out to Larry to see if he would give us a bit of an inside look at the design and he was more than willing to discuss the game.
Grant: Larry welcome to our blog. First off please tell us a little about yourself. What are your hobbies? What’s your day job?
Larry: Grant and Alex, first, thanks for the opportunity to tell you about myself, and my game, And The War Came. I’m a lifelong resident of southwest Ohio, from the Dayton area. I’ve got three great adult kids, each working on their families and/or careers. I’m now retired from both my civilian job, and my almost 34 years as a traditional Ohio National Guard member-last duty assignment as an Air Defense Brigade Commander-so now more time for hobbies.
Now that And The War Came is finally done, I enjoy hanging with my kids, playing music, and traveling. I still do part time contract work in support of US Army training events, which I enjoy as well. And I hope to find more time for playing other wargames too!
Grant: What motivated you to break into game design? What have you enjoyed most about the experience thus far?
Larry: I’ve always been interested in the American Civil War, and many years ago it came to me that a block style game and a strategic level treatment of that war would make a great game-one that didn’t really seem to be available, at least for what I was looking for. I’ve really enjoyed developing the game, adopting, changing or dropping processes, seeking to get at the right balance of playability, workable mechanics and good history. It took a while, but I’m happy with the results.
Grant: What is your upcoming game And the War Came about?
Larry:And the War Came is a strategic level American Civil War game, focused on the southeastern United States. It started life as a block game, but when I decided to self-publish, I switched to rotatable counters due to cost. But play is similar-it’s area movement and card driven, so those familiar with Columbia style block games will recognize some of the mechanics.
Grant: What does the title mean in relation to the history of the American Civil War?
Larry: I bounced so many title ideas and finally settled on And The War Came, which is a sentence in Lincoln’s 2nd inaugural address (March 4, 1865). I felt that line summarized how the United States stumbled and staggered into civil war. And the wonderful Carte de Visite Collection images from the US Library of Congress I chose for the game box spotlight who the actual participants really were.
Grant: What games gave you inspiration for your design?
Larry: Columbia Game’s Hammer of the Scots and Victory Game’s The Civil War 1861-1865 were by far the strongest influences.
Grant: What is important to model or include in a game about the American Civil War?
Larry: Above all, I think it is leaders and leadership at the corps and army level. Any discussion of ACW campaigns seems to hit on the “what ifs” of senior leaders. There were simply so many generals I could have chosen to model in the game, but I finally settled on 22 Union and 19 Confederate leaders that did or could have risen to army or independent command. The formations on both sides were so similar, in my opinion it was the leadership that was truly decisive.
Grant: What challenges did you encounter in the design? How have you overcome them?
Larry: Wow, there were a lot; game flow, simple but historically accurate mechanics, relative strength and play balance, rail and naval capacity, re-playability, map scale-all had to be refined through trial and error, playtesting and compromise. And countless rulebook edits! Rules concepts I thought made perfect sense in my head and on the page drew several questions when reviewed by others. But I think it’s a pretty good final product.
Grant: What is the scale of the game? Force structure of units?
Larry: Regional area movement, and seasonal turns, representing three months. The map is bounded by eastern Kansas to eastern Texas on the western edge, New Jersey to northern Florida along the Atlantic Coast, lower Midwest on the northern edge, and Gulf of Mexico on the southern. Most states contain 4 to 10 areas-states with better road networks tend to have less areas. But there is more territory than units to control it. Fortress cities (i.e. Washington, D.C.), major railroads, navigable rivers, and mountains and swamp areas are also portrayed on the map. Rail and naval support capacity change each year.
Units represent infantry or cavalry corps, with a strength of from 1 to 4 divisions, or forts representing 1 to 4 installations. Unit count is: Union-33 Infantry counters, 10 Cavalry counters, 5 Fort counters, Confederate-26 Infantry counters, 8 Cavalry counters, 8 Fort counters.
Grant: What is the counter anatomy?
Larry: Very straightforward if familiar with Columbia style block wargames-a mechanic I have always admired for simple and clean fog of war, step reduction, and ranged or initiative combat. \Counters are square with strength point symbols (divisions) arrayed along each edge, plus movement and combat ratings. Infantry has a combat value of C2 with a move allowance of 1. Cavalry has a combat value of B1 with a move allowance of 3. Forts have a combat value of A1 with a move allowance of 0-they are stationary. There are also corps insignia (Union) or battle flags (Confederate) just to add historical flavor, and the branch insignia of the period for infantry, cavalry or forts. Ultimately, I chose to give similar units of both sides the same combat or movement ratings (since both Union and Confederate formations grew from the same organizational foundations and traditions), but those ratings can be modified by the leaders who command them, both at corps and army levels, and/or the battlefield terrain.
Grant: What does it mean the “game is We Go turn based”?
Larry: Most functions are conducted by both players at the same time. For example, in the Administration Step, both players recruit (buy) their new units/strength points, enter new or recovered from wounds generals, or administratively move/transfer generals already on the map to new assignments/commands. When both players are done, they go to the next step, (Operations), with Action Phases where each plays a card to determine who moves first, they complete their moves and then resolve any battles that result from movement. The Logistics Step and Victory check complete a turn.
Grant: What type of experience does this approach create?
Larry: It minimizes down time for one. Actions in the Administration Step, Operations Step, Logistics Step happen simultaneously. Only in the Operations Steps’ Action Phase (or depending on the season, phases) does movement happen sequentially. This limits the action/reaction dynamic to operations, where maneuver happens in small chunks due to the seasonal card play. Neither side is able to make big sweeping moves, while the other side can only watch-the mechanic enables campaigns like Gettysburg or Vicksburg, although they may not necessarily occur during the course of play.
Grant: How does the game use cards?
Larry: Cards list the number of “orders” you can issue to units in order to conduct movement or other actions. There are also cards with both events and orders where players must choose which to use. And most cards have a bonus action (improved combat, movement, or leader promotion) to spice things up. The season determines the number of cards each player receives that turn. The Winter season/turn, each player receives only one card-in the single Action Phase, each player compares their card to the other player’s to determine who moves first (initiative), then second, then resolve any combats. This makes for a short turn. In both Spring and Fall seasonal turns, players receive two cards each, then play their cards against each other in each of the two Actions Phases, conducting moves and combat. In the Summer seasonal turn, three cards are dealt to each player-thus there are three Action Phases that turn.
Grant: What type of cards are included? Can you share a few examples?
Larry: There are 30 cards in the common game deck (there are not separate unique decks for Union or Confederate players). The deck includes 22 orders cards, each card with a value of 1, 2, 3, 4 or 5 orders. The orders determine how many units (corps) or commands (see Leaders below) can be moved with that card-a card with only one order allows the movement of only one unit, etc. Orders can also be used to promote generals or repair rail roads, etc. Again, most, but not all of these 22 cards also have a bonus that improves movement, or combat for a unit, or gives a free general promotion.
There are also 8 cards that include a combination of orders and events such as blockade impacts, partisan activities, native uprisings, surprise attacks, diplomatic incidents, immigrant or native recruits, or spy activity-each event with favorable impacts for themselves, or negative impacts for the opposing player. I chose for the event cards to be generic in nature and usable for both sides, verses specific events (i.e. Trent Affair) scripted events. For these 8 cards, players have the option to play the event and still have two orders to move other units, or not play the event at all, and have all three orders for movement.
The entire deck is reshuffled at the start of a new year. Since each player only receives 8 cards in a four season/turn year, only 16 of the 30 cards are played each year-some cards may not get played during the entire war, while others may reappear several times.
Grant: How does combat work?
Larry: Again, similar to other Columbia style block games.
Paraphrased from the rulebook:
Units Fire or Retreat in a combat round. The sequence of combat is A class units fire/retreat first, before B class units, followed by C class units which fire/retreat last. If both sides units are the same class, the defender has the advantage, and fire/retreat before attacking units of the same class. A general’s initiative rating may change who has the first shot advantage. To Fire, roll as many dice as the unit’s current strength points (SP). A hit occurs for each die roll equal to, or less than the unit’s combat number rating. Hits on the enemy take effect as they happen, each hit immediately reducing the enemy unit strength point count by one. Say a 3 division (SP) infantry corps has a combat rating of C2-that corps rolls 3D6 dice and every “1” or “2” rolled is a hit, reducing enemy strength and effectiveness when returning fire. In a battle between a B1 cavalry unit and a C2 infantry unit, the B1 rolls first, but only scores a hit for each 1 rolled. The C2 rolls second and scores a hit for each 1 or 2 rolled. One round of combat is complete when each unit fires or retreats.
Some unit strength may be recovered at the end of combat if the unit is not destroyed-with this recovery rule I’m trying to account for after the battle return to duty wounded, stragglers, local prisoner exchanges, etc. I was aiming for about 20% casualty rates in combat.
Grant: How do Leaders work? How are they killed or wounded?
Larry: Leaders are used to command corps or armies (units under the command of a general are actually called “commands”, i.e. Sherman’s command). A leader imparts his initiative (A, B, or C class) and tactical ratings to the unit or units he commands. In Sherman’s case, he changes a C2 infantry corps under his command to a B2. A leader’s initiative and tactical ratings may change at different ranks. And I’ve added optional rules to randomize when leaders enter the game, and their ratings.
Leader counters also rotate-they all enter the game as a one star general. They may be promoted to two or three star rank. Grant and Sherman can even be promoted to four star (GEN) rank as they historically became army group commanders. A one star general (BG) controls one corps counter; a two star (MG) may command one or two corps.
The only way a leader can be promoted to three stars (LTG) rank is to take command of one of the 5 named armies: Potomac, Cumberland, and Tennessee for the Union; Northern Virginia and Tennessee for the Confederacy. Named armies may contain four or more corps, depending on the army. And only named armies may have subordinates of one or two star rank. If a three star army commander is relieved of command, there is a political cost, and the leader reverts to one or two star rank.
Leaders also represent staffs and logistics trains, so commanded units may engage in two rounds of combat, whereas corps without a commander may only initiate one round of combat-so even lower quality leaders can be beneficial since they allow you to fight an additional round. Most leaders also increase the movement allowance for infantry to 2 instead of the base 1.
And yes, leaders may be wounded, killed or captured. At the end of each combat which involved leaders, a leader casualty assessment is rolled-lower ranked leaders are more likely to be casualties. If assessed as a casualty, another D6 is rolled for severity of wound. Rolls of 1 through 5 indicate the leader is out for that many turns. A roll of 6 means the leader is killed. And if a commanded unit is destroyed but the leader is not killed or wounded, the leader is captured. Captured leaders may be exchanged as prisoners.
Grant: How does the design create fog of war and uncertainty?
Larry: The counter covers hide counter information until opposing units engage in combat. Of course, leader losses will occur, which adds to uncertainty. The cards also provide for a lot of variability in maneuver. And the strength replacement recruiting is a combination of fixed values for the year, plus a die roll for variable recruits each season. Recruitment strengths diminish for both sides over the course of the game. There’re several optional rules that address the Emancipation Proclamation, Drafts, Leader randomization, etc. to add historical flavor or variability to the game.
Grant: Who is the artist for the game?
Larry: I did the artwork…in MS PowerPoint. Whew, not the easiest thing to do! But I’m happy with the results. I used public domain art and was able to generate nice graphic quality with the tools available. And I found you can only go so far in development before you have to start addressing production concerns. And the War Came is definitely a game on a budget!
Grant: How is victory achieved?
Larry: Quite simply, players must accomplish more than their historical counterparts in the same period, for example the 1862 scenario, when the Border States, most of Tennessee and New Orleans were in Union hands by year’s end. So, victory usually means holding more territory, but there are also war weariness and political factors that contribute to, or detract from, victory. Examples are the midterm elections of 1862, Presidential elections of 1864, and weariness of the northern population.
Grant: What do you feel the game models well?
Larry: The overall ebb and flow of the conflict-using corps formations on a large area map just works well. And although there are abstracted naval and logistics rules that function well, I chose to focus on the senior commanders and Lincoln’s and Davis’s struggles to find effective military leadership for their troops at corps and army levels. And I think I’ve got the right level of political factors that contributed to the War’s outcome factored in. It’s hard for the CSA to win, but if the USA sits on it’s hands to build strength and perfect its leadership, the USA will lose. The USA must take the fight south early and often-and that’s a lot of territory to cover.
Grant: What are you most pleased about with the design?
Larry: There’s so many classic ACW titles out there that cover the entire scope of the war in great detail, and yet I think And the War Came fills a niche. For those familiar with board wargames, it’s not overly complex and it plays fairly quickly. I like the unknowns and fog of war, and think the re-playability is there. The historical framework is solid. I tried to not model for effect, so historical campaigns and outcomes are certainly possible, but not preordained. I wanted an interesting beer and pretzels game, one that both those familiar and unfamiliar with the ACW could enjoy. Again, I’m satisfied with the results.
Grant: What other designs are you contemplating or already working on?
Larry: I think if there’s another one in me, it’ll be a strategic treatment of the American Revolution-but to model that conflict will take some work, initially just to get the scope right, and factor in the interrelationship with the wider Anglo-French conflict.
Oh, and I must add a hearty thanks to Blue Panther Games, for their great production and distribution support! I just couldn’t nail down a publisher-but after consulting with Steve Jones (BPG) I realized I could partner with Blue Panther and do it myself! I would recommend them to any aspiring designer who’s interested in self-publishing.
If you are interested in And the War Came: American Civil War1861-1865 from Pinkerton Games, you can order a copy for $65.00 from the Blue Panther LLC website at the following link: https://www.bluepantherllc.com/products/and-the-war-came
An Impossible War: The First Carlist War in the North, 1834-1838 from Bellica Third Generation is a block wargame that recreates the First Carlist War in the North of Spain which was a civil war between the Carlists who supported the succession of the late king’s brother Carlos de Borbón and the progressive and centralist supporters of the regent Maria Christina acting for Isabella II of Spain who were referred to as the Liberals. The game uses blocks representing units but also includes counters and uses cards. I was able to play the game about a month or so ago with Francisco Ronco who owns the publishing company Bellica Third Generation and very much enjoyed the game and how it represented this interesting struggle.
In Action Point 1, we took a look at the Game Map, discussing the point-to-point movement configuration, the various spaces and the delineation of the Carlist versus the Liberal Zones, as well as explained the use of the Rest of Spain smaller map. In Action Point 2, we examined the units available to both sides and covered the importance of Supply. In this Action Point, we will take a look at the Carlist Uprising Phase and what it means for the game.
Carlist Uprising Phase
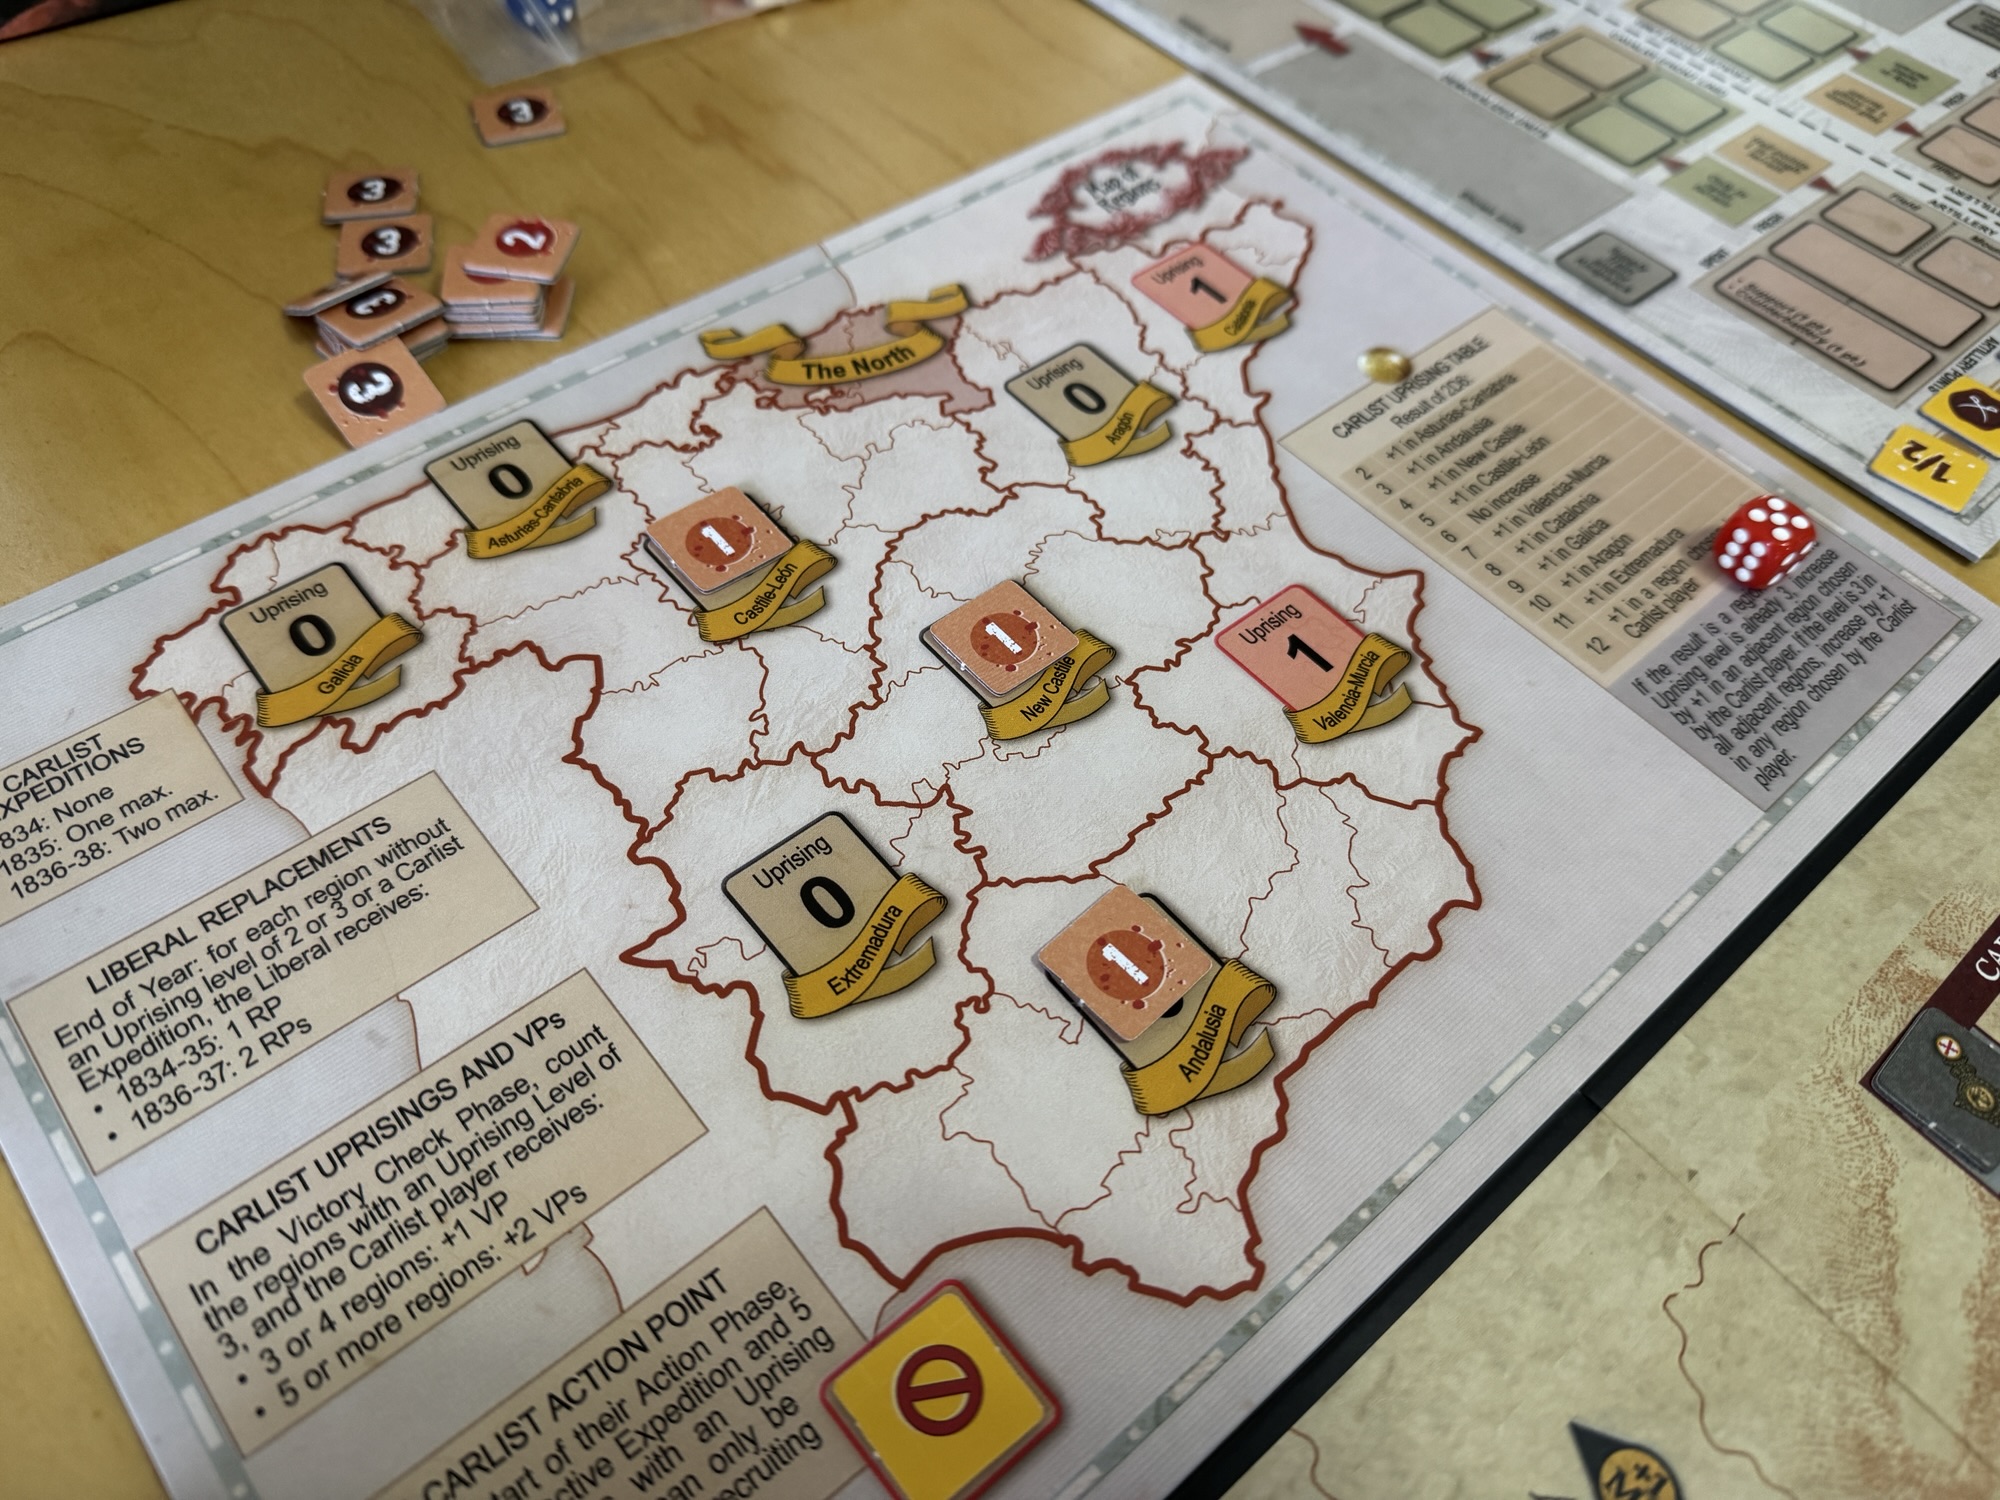
The map of the Regions of Spain, or Rest of Spain Map as it is referred to in the rules, is smaller and simpler than the Game Map itself and is a separate board that plays along side the main board. It consists of 9 large regions that cover large territories of Spain. This map’s purpose is to record the spread of the Carlist Uprisings, to enable Carlist expeditions to operate and for the Liberal player to chase and hunt these expeditions down. The Rest of Spain Map is divided into regions and each region has a Carlist Uprising Level of between 0-3. Also, there are 2 regions, including Valencia-Murcia and Catalonia, where the Carlist Uprising Level cannot fall below 1, reflecting the intensity of Carlism in these regions. The Carlist Uprising Level cannot ever be less than 0 (or less than 1 in Valencia-Murcia and Catalonia which is the printed value on the Rest of Spain Map) or more than 3. Any effects that change the Carlist Uprising Level below or above these numbers is simply ignored.
The Carlist Uprising Phase begins with a roll on the Carlist Uprising Table to determine any effects that will be carried out this turn. Then, if there is an existing active Carlist Expedition on the Rest of Spain Map, the Carlist player may attempt to increase the Carlist Uprising level in its region. This increasing of the Uprising Level is like a wave. A wave that starts out small with presence of unrest being only in a few spaces on the Rest of Spain Map, but it will soon get out of control and turn into a tidal wave that can crush the Liberal player if they have not being paying attention to the situation on the board.
The Carlist player will roll 2D6, sum the result of both of the dice, and then will consult the Carlist Uprising Table found on the Rest of Spain Map to find and then apply the result. If you know anything about the probability of the outcome of this 2D6 roll, the most likely outcome is 7. There are 36 total possible combinations when rolling 2D6 and there are 6 different ways to get to a result of 7 including 1+6, 2+5, 3+4, 4+3, 5+2, and 6+1. So generally your spread will be around that 5-8 range, which according to the Carlist Uprising Table means that you will see the Uprising Level increase in places like Castile-León (result of 5), no increase (result of 6), Valencia-Murcia (result of 7) and Catalonia (result of 8). But it is also important to remember that the highest a region can attain is 3 and if it is rolled then the Carlist player will choose to increase the Carlist Uprising Level in 1 adjacent region.
The next step of this phase is the Expedition portion. If there is any active Expedition on the Rest of Spain Map then the Carlist player can attempt to increase the Uprising Level in each region where there is an Expedition, as long as there are more Carlist units than Liberal units there. The number of Liberal Infantry and Cavalry units in the region is subtracted from the number of Carlist Infantry and Cavalry units forming the Expedition. The Carlist player then rolls a die, and if the result is equal to or less than this number, the Uprising Level increases by +1. An Expedition cannot increase the Uprising Level in a region where the level is already 3 and there is no adjacent spill over of this furor.
The units of the Liberal player can move on this map at all times. The units of the Carlist player cannot enter the Rest of Spain Map before 1835. It is important to keep in mind the Carlist player can only have a single active Carlist Expedition on the Rest of Spain Map in 1835, and a maximum of 2 Expeditions from 1836 onwards.
So why is this part of the game important? Uprisings can provide Victory Points to the Carlist player. In addition to VP’s, Uprisings provide replacements for Carlist Expeditions and feeds the spread of rebellion on the Rest of Spain Map. There is a track on the map where the Carlist player keeps an accounting of the the Carlist Prestige marker to gain VP’s. If the amount of regions with an Uprising Level of 3 is at 3 or 4 regions, the Carlist player will gain 1 VP. If there are 5 or more, the Carlist player will receive +2 VP’s.
But there are other benefits to the players that come as a result of the Uprising Level on the Rest of Spain Map. For the Liberal player, at the end of each year for each region that is empty of Carlist Expeditions and has an Uprising Level of 0 or 1 (no 2’s or 3’s), they gain 1 Replacement Point in 1834-1835 and 2 Replacement Points in 1836-1837. Think of it this way. If there are no Carlist troops threatening the local Liberal supporting public, they are more willing to provide their sons to the military to fight the rebellion. But, if the Carlist fire of uprising has spread and there are active Carlist troops in the streets there will be less support for the Liberal cause.
Also for the Carlist player, if at the start of their turn there is an Expedition on the Rest of Spain Map and there are 5 or more regions with an Uprising Level of 2 or 3, they will gain +1 Action Point that can only be used to move or recruit Expeditions. Once again, if the groundswell of support is leaning toward the Carlist, the local populace are more in favor or supporting these Expeditions and expelling the Liberal from the region.
As you can see, there are a great deal of benefits for both players from the Uprising Level but there seem to be more impactful benefits for the Carlist player. If they can control the Rest of Spain Map, and dot the landscape with support and uprisings, they can win the game handily. But don’t worry, the Liberal player has an action available to them for combating and reducing the Carlist Uprising level in a region. This action is called Suppress Uprising.
Suppress Uprising is where the Liberal player can attempt to reduce the Carlist Uprising Level in a region by spending 1 Action Point and rolling 1D6. If there are no Liberal Infantry or Cavalry unit in the region, or if no unit takes part in the action, if the result is equal to or less than the Carlist Uprising level, then the attempt has no effect. If the result if higher than the Carlist Uprising Level, then the level is reduced by -1. If there is at least 1 Liberal Infantry or Cavalry unit in the region that takes part in the action, for each Liberal Infantry or Cavalry unit after the first that participates in the action, the Liberal player adds +1 to the roll. But there are possible losses that come with using your troops in this manner.
If the result is less than the Carlist Uprising Level, then the attempt has no effect. If the result is equal to the Carlist Uprising Level, then the level is reduced by -1, and one Liberal Infantry or Cavalry unit loses 1 strength point. If the result is 6 or more, then the Uprising Level is reduced by -2. So there is incentive to make sure you use your troops in this action. A bit risky but useful and definitely worth the risk.
An Impossible War is a fantastic design that attempts to capture the historical aspects of this titanic struggle for the throne of Spain in the mid 19th century. Historically, the Carlist forces who were defenders of traditional monarchy, regional privileges, and the Catholic Church, were a minority faction fighting an overwhelmingly larger, richer liberal government. The uprising phase reflects how the Carlists compensated for this disparity by forcing the Liberal government to fight on multiple fronts and suffer from logistical nightmares across hostile terrain. The Carlist Uprising Phase, and the use of its auxiliary Rest of Spain regional map, forces some really tough dilemmas on the Liberal player. They must attempt to divide their forces between the main Game Map and the Rest of Spain Map to prevent the opposition Carlist forces from overwhelming the home territory in the north. It serves as a vital strategic balancing act for the Liberal player that cannot be ignored and must be dealt with systematically and somewhat evenly. Too much focus on the Rest of Spain Map and the situation on the Game Map will quickly snowball and they will lose control. Focus on the situation on the Game Map and the protection of Cities and Towns and the Carlist Expeditions will gain momentum and turn the countryside red. While the primary war centers on the rugged terrain of northern Spain (Navarre and the Basque Provinces), the uprising mechanic abstractly models scattered insurgencies across the rest of the country. And as you know, insurgencies can be very unpredictable and difficult to contain. You stamp out one area only to see a fire start in another. The Liberal player must divert troops and supply resources to the secondary map to quell these localized rebellions and hunt down Carlist expeditions originating from the north. And, the important thing for the Carlist player and the expansion of the uprisings and the success of their expeditions is the possible generation of generation of Prestige and Victory Points, which is really crucial to their path to victory.
In Action Point 4, we will take a look at the activation system and the use of Action Point Markers.

 Anmelden